bowbridge Anti-Virus 4.x - Installation Guide1.WelcomeWelcome to the Installation Guide for bowbridge Anti-Virus 4.x for SAP solutions. This guide will take you through the installation process at the OS layer for several common deployment options on a step-by-step basis.
2.Planning The InstallationBefore installing bowbridge Anti-Virus 4.x, we recommend determining the required components, validating resources, and verifying system and network access privileges. 2.1.System RequirementsSupported Operating Systems – VSA client
Supported Operating Systems – control and scan workers
Disk-space
Memory (RAM) at runtime:
2.2.Identifying Required ModulesThanks to its modular architecture, the installation of bowbridge Anti-Virus 4.x can be adapted to the individual requirements in your environment. Hence, while some modules are required, others are optional. Most modules can be deployed in several ways:
2.3.Connectivity RequirementsInter-module communicationTCP network connectivity on one distinct port (default TCP/5672) is required between the modules and the message broker. Therefore, only the broker opens this port for listening. All other components initiate outgoing connections to the message broker and do not open any listening sockets. Automatic download of updatesFor the bowbridge Anti-Virus 4.x deployment to automatically update virus data and/or program binaries, network access to an update source must be permitted. bowbridge CloudScan ProxyWhen using the bowbridge CloudScan Proxy service, outgoing connections to an assigned CloudScan Message Broker must be allowed on the port in the assigned Broker URL. 3.Performing the installation (Linux/UNIX)3.1.Pre-installation TasksDownload the latest bowbridge Anti-Virus 4.x installer for your operating system platform from the bowbridge website and transfer it to the target system.
Transfer the installer to SIDadm’s home directory or a temporary directory on the target server. Do not yet create the final target directory; do not run the installer from within the designated target directory. Please have the RealmID you wish to use handy. If the components requiring installation include the message broker, then ensure you can access the bowbridge customer portal, so you can generate the broker’s TLS certificate in the portal.
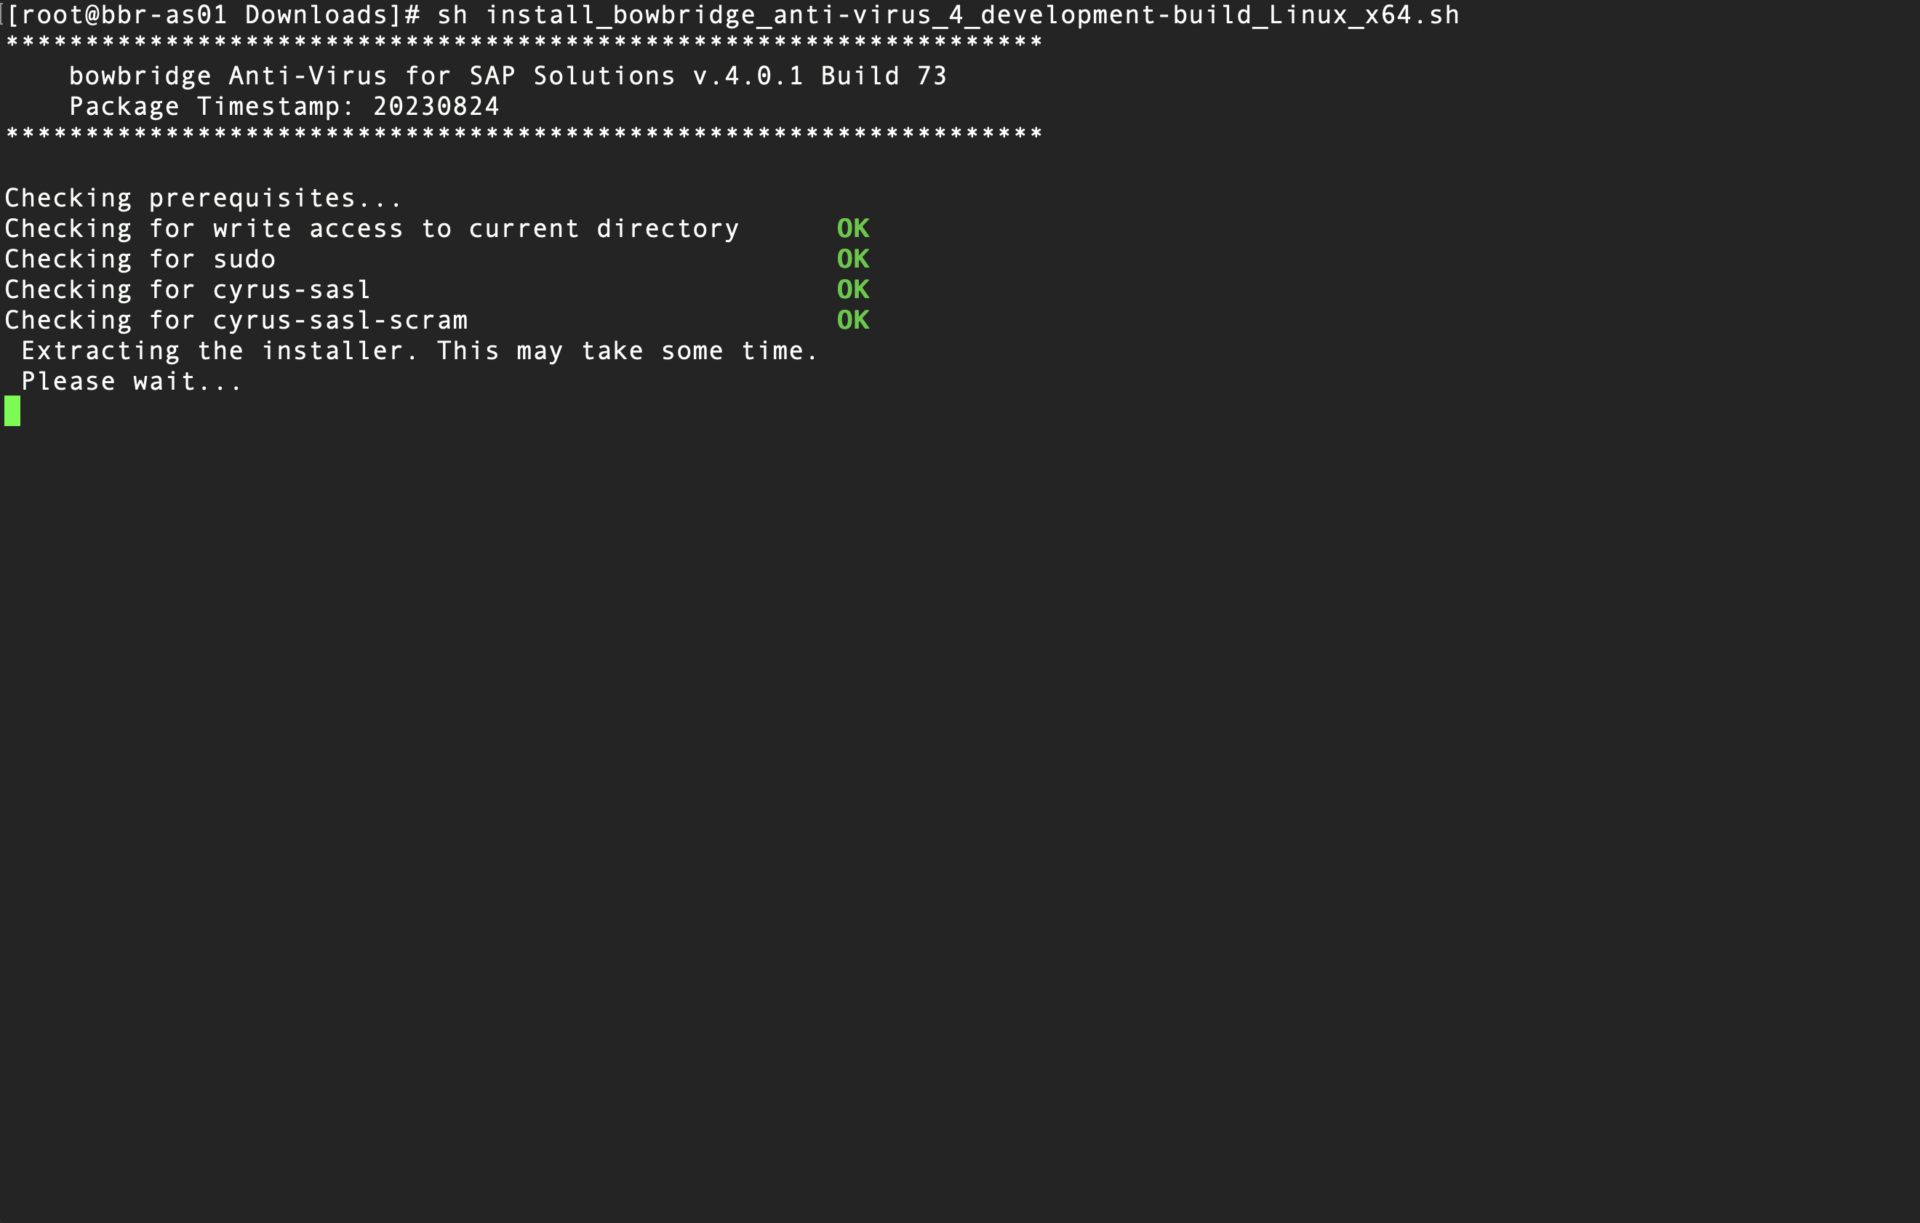
When ready to perform the installation, extract the installer by running gunzip install_bowbridge_anti-virus_<version>_<build>_<OS>_<platform>.sh.gz or gunzip install_bowbridge_anti-virus_client_<version>_<build>_<OS>_<platform>.sh.gz Note: replace <version>, <build>, <OS>, and <platform> with the values in your installer filename.
Due to its much smaller size, using the client-only installer package makes sense when deploying the VSA client to multiple application servers.
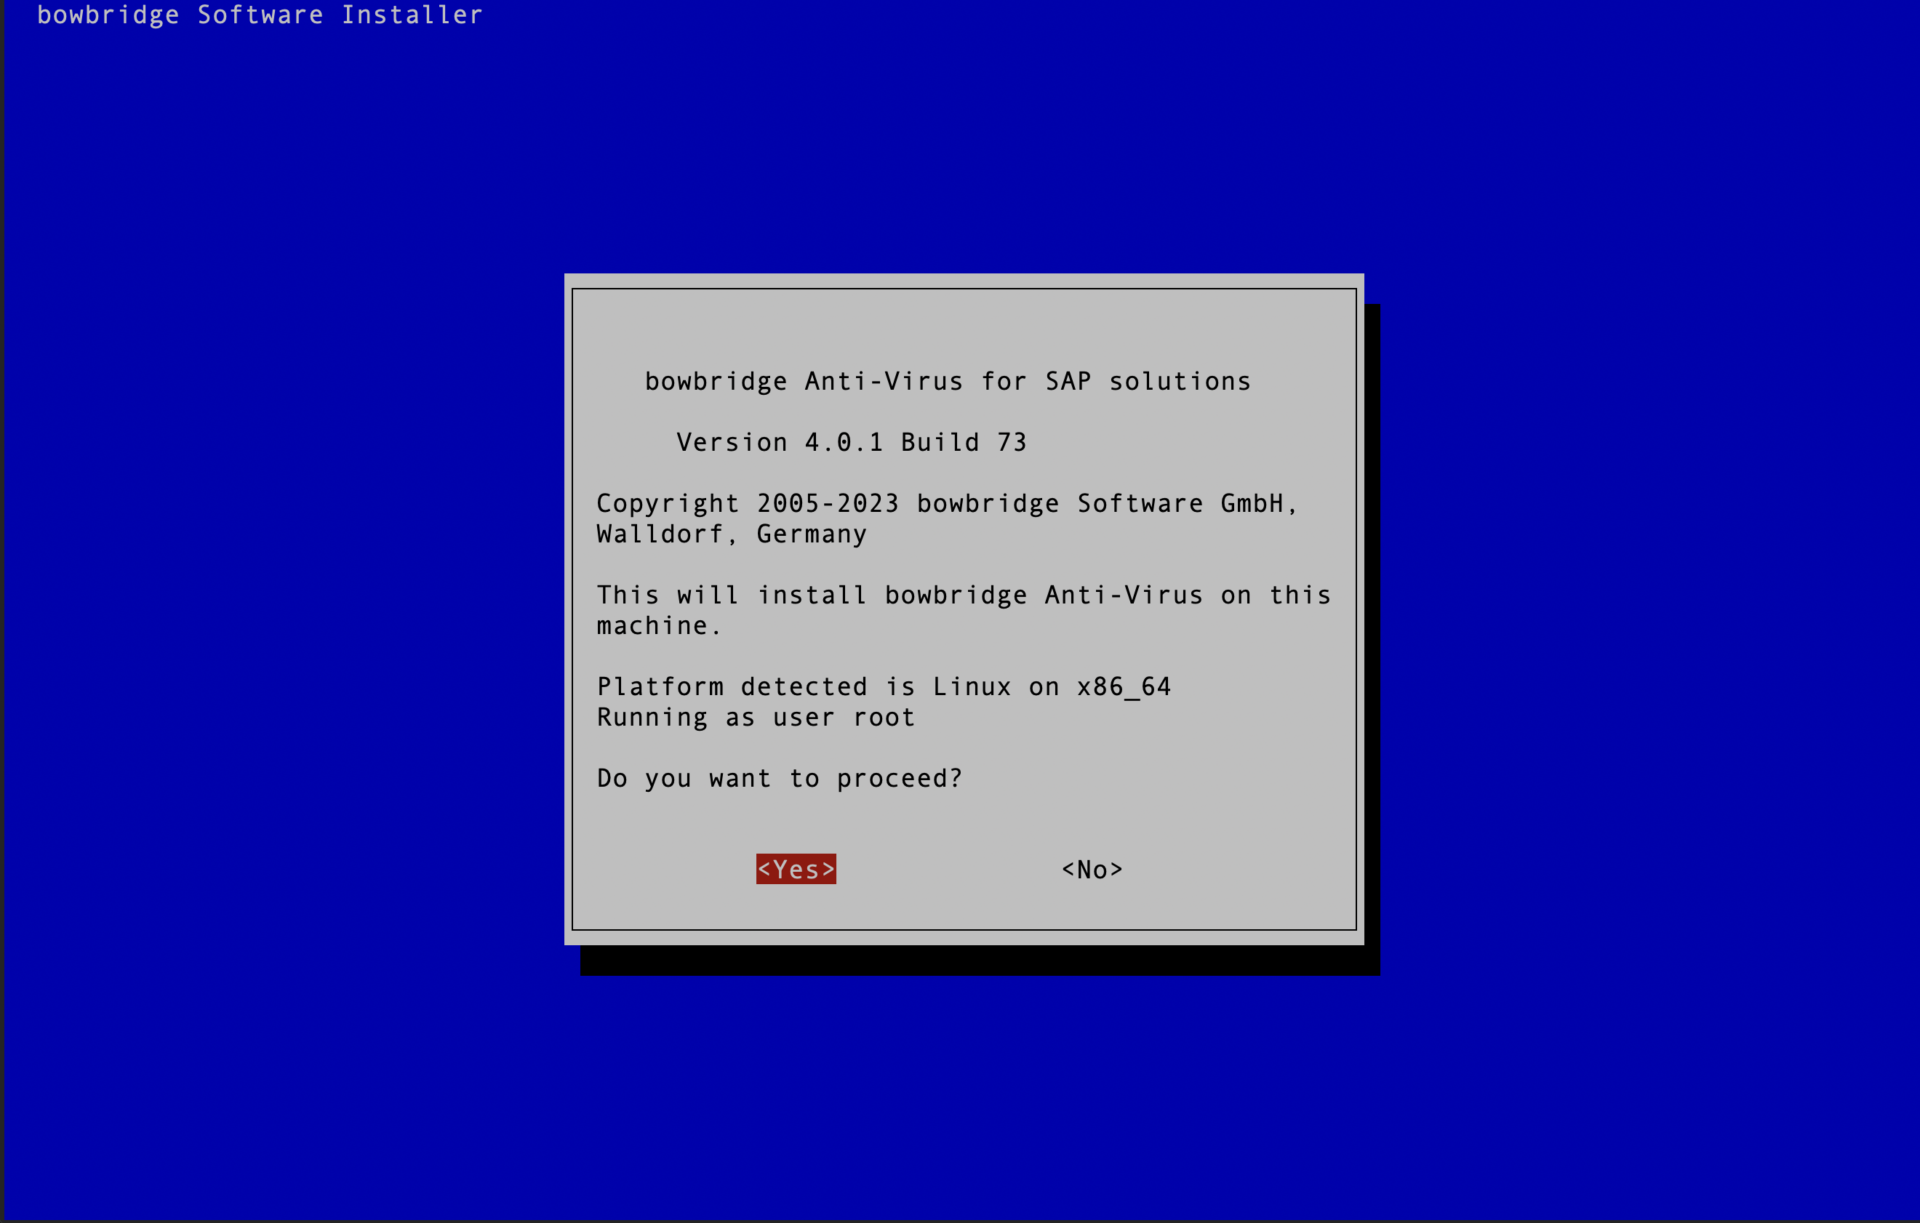
3.2.Common Installation TasksInteractive installationNavigating the interactive installer As a terminal-based application, the interactive installer is navigated using the keyboard.
bowbridge Anti-Virus can be installed with SIDadm privileges only, but installing the product as root is highly recommended for best performance and stability.
Basic installation stepsStart the installer by running the following: sudo ./install_bowbridge_anti-virus_<version>_<build>_<OS>.sh After an initial check of the required packages, the interactive installer will guide you through the installation process.
You may see a message indicating the optional component cyrus-sasl-scram is not available. SASL-SCRAM is a plugin to the SASL authentication framework used by the message broker. You may safely ignore the notice. The authentication will fall back to SASL-PLAIN. As all communication between the modules is TLS-encrypted, even SASL-PLAIN authentication is protected from eavesdropping on the wire. The modules will automatically choose the most secure way of communication. If SASL-SCRAM is available on the sender and the receiver, it will be chosen over SASL-PLAIN.
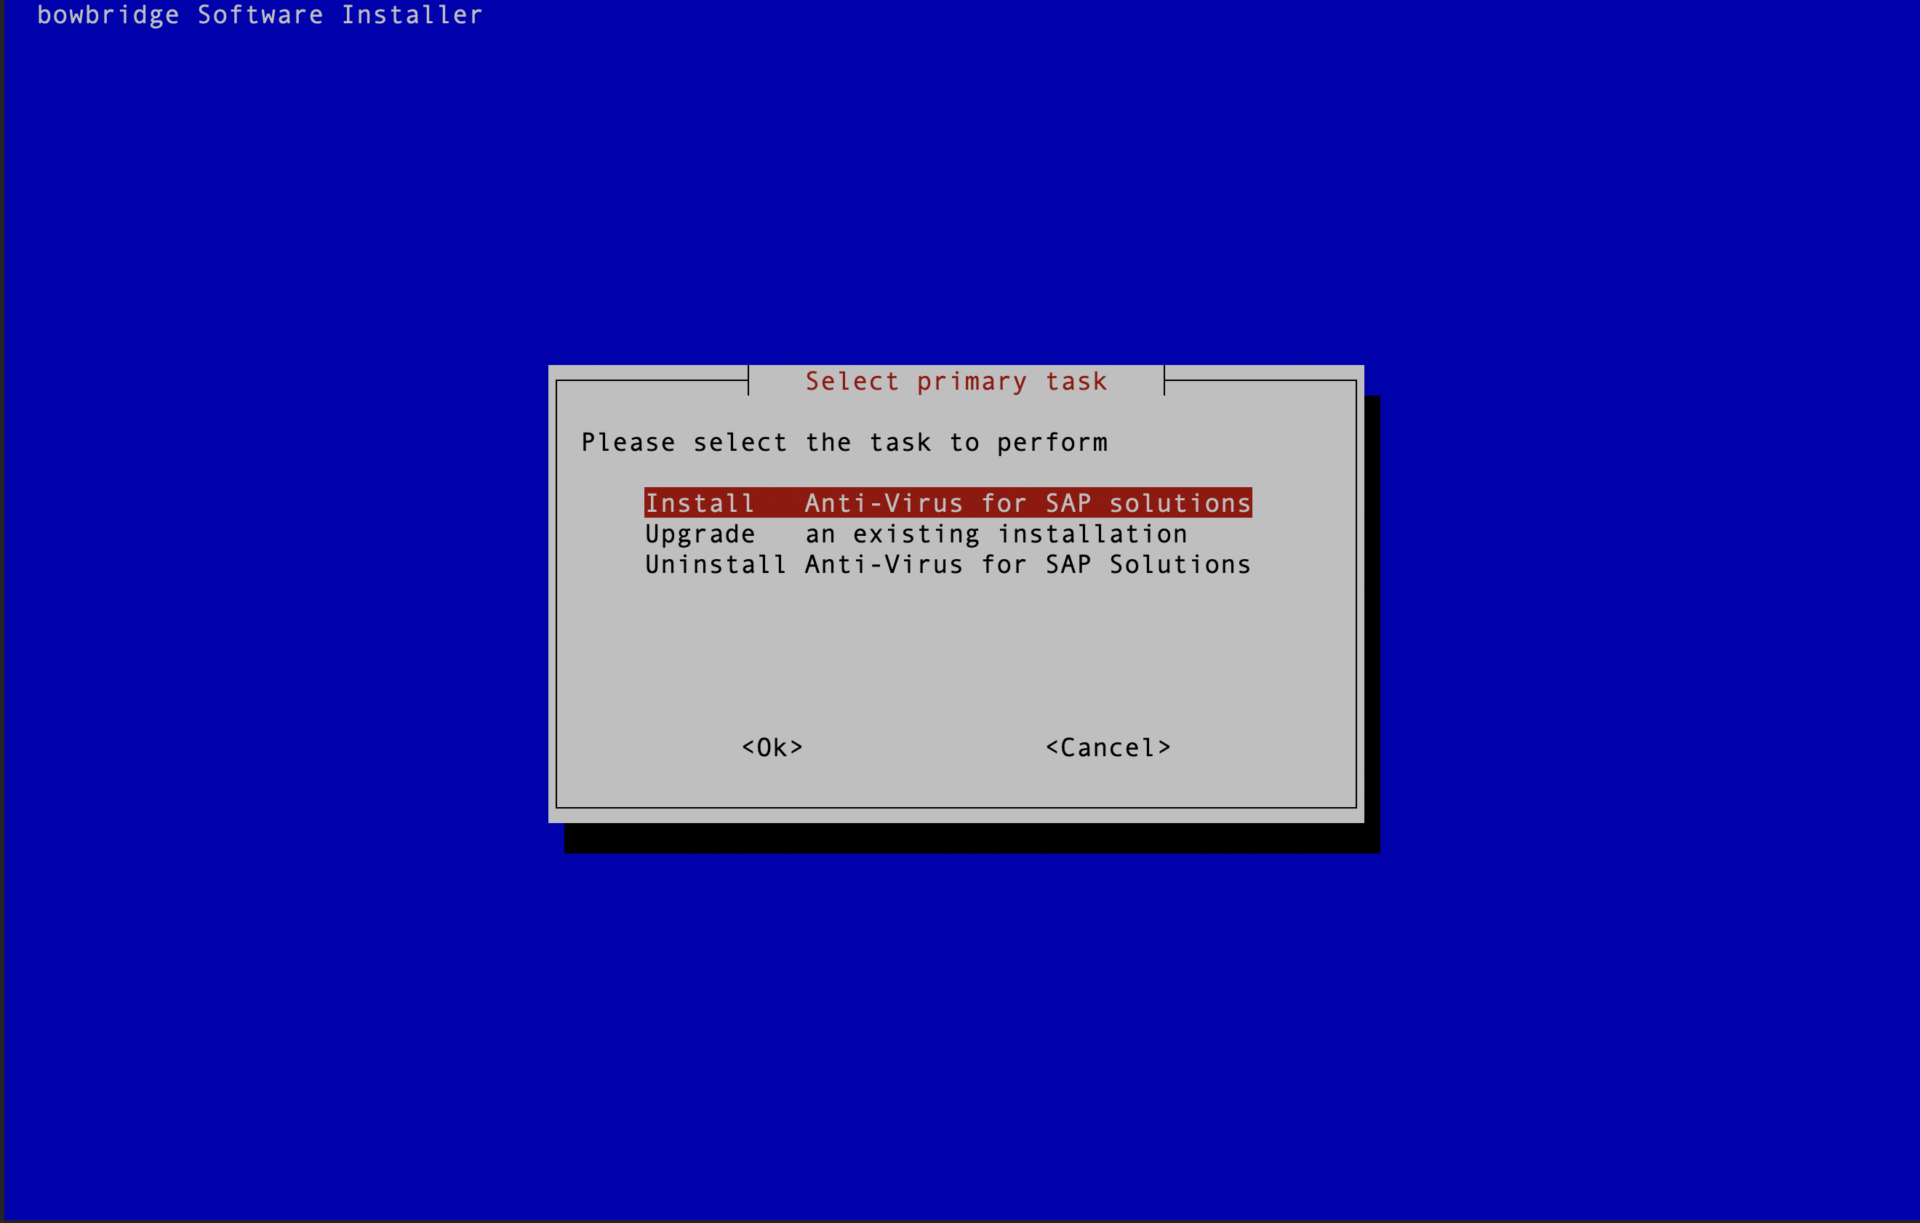
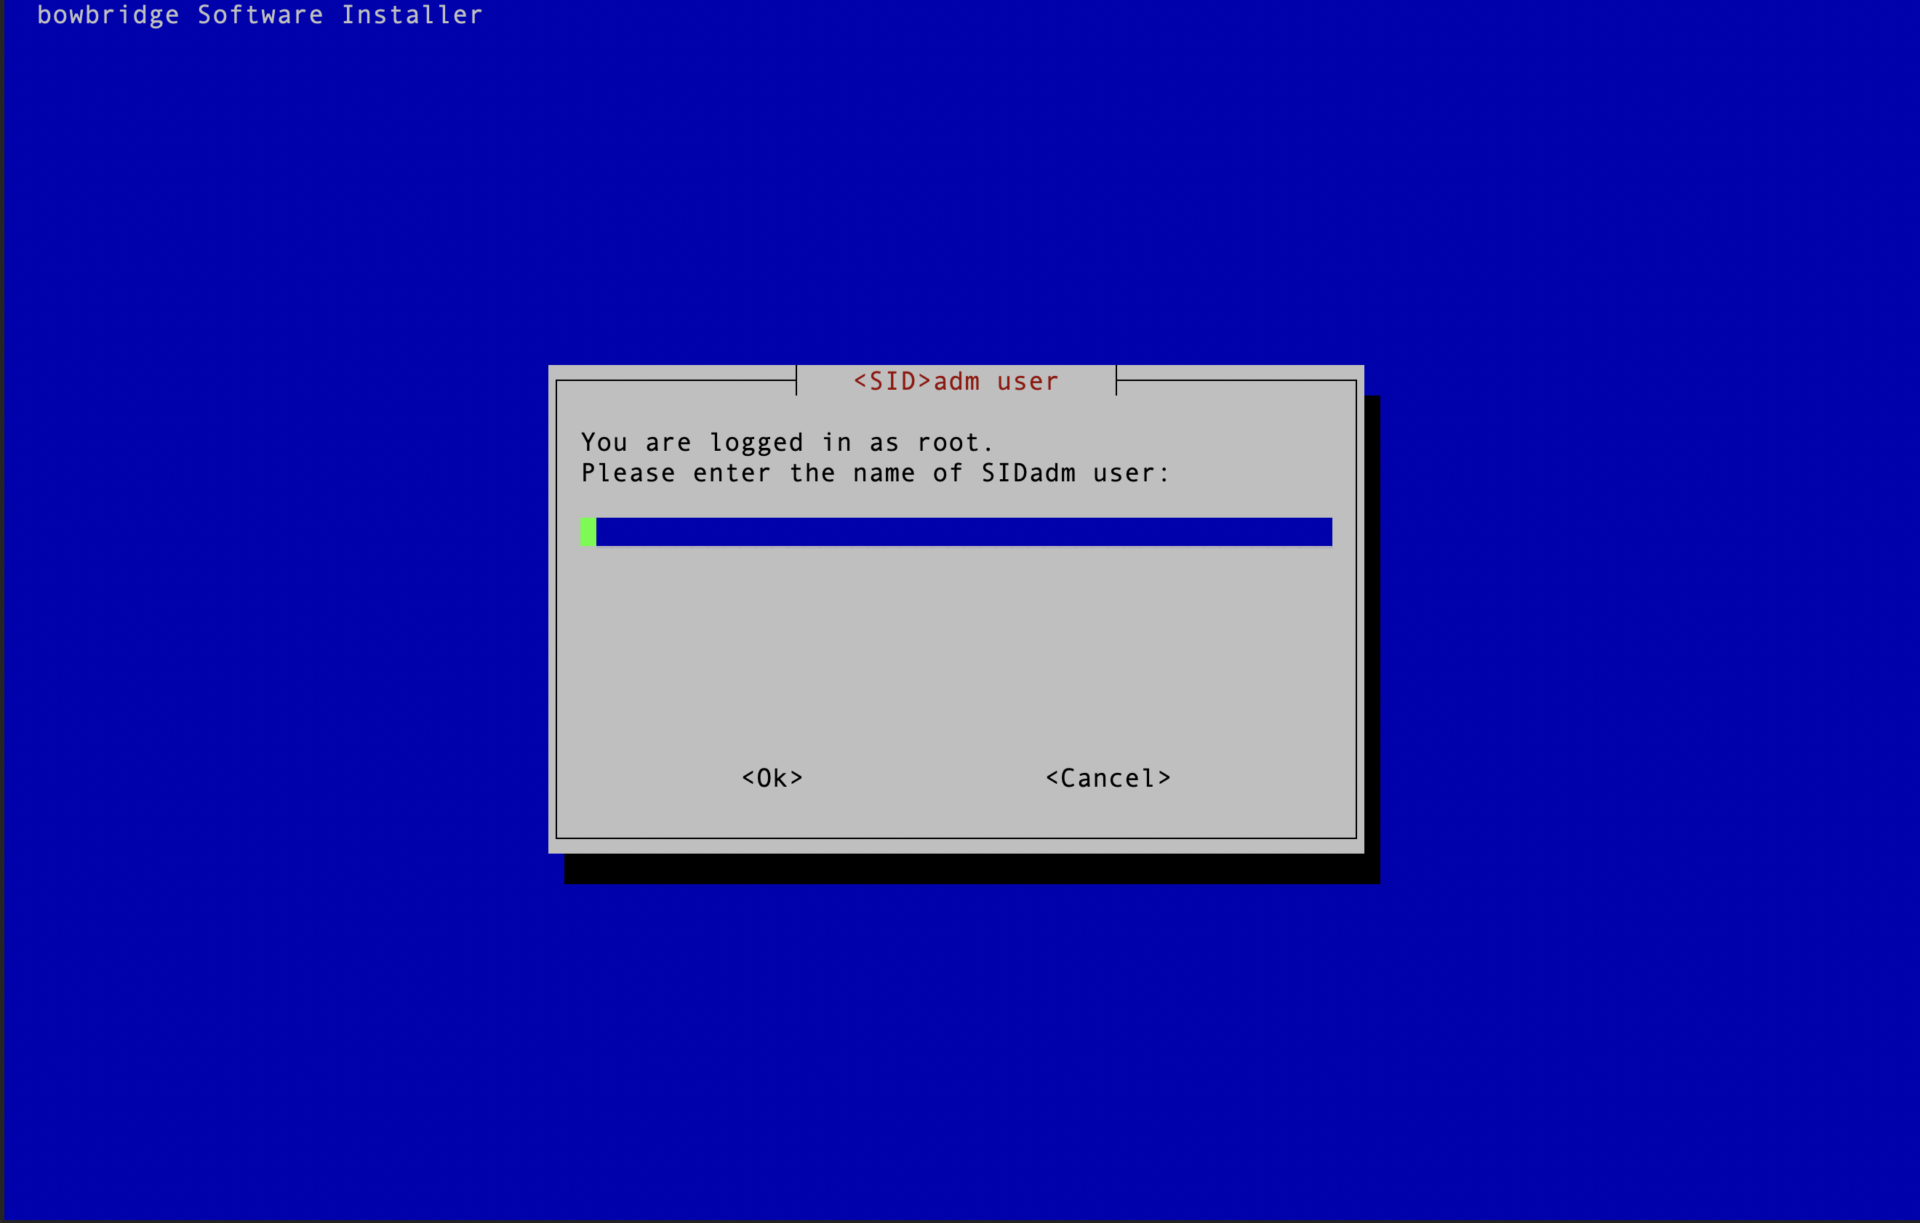
Select the “Install” option. When executed as root, the installer requires the SIDadm user so that file ownership can be adjusted after the installation finishes.
Provide the name of the SIDadm user.
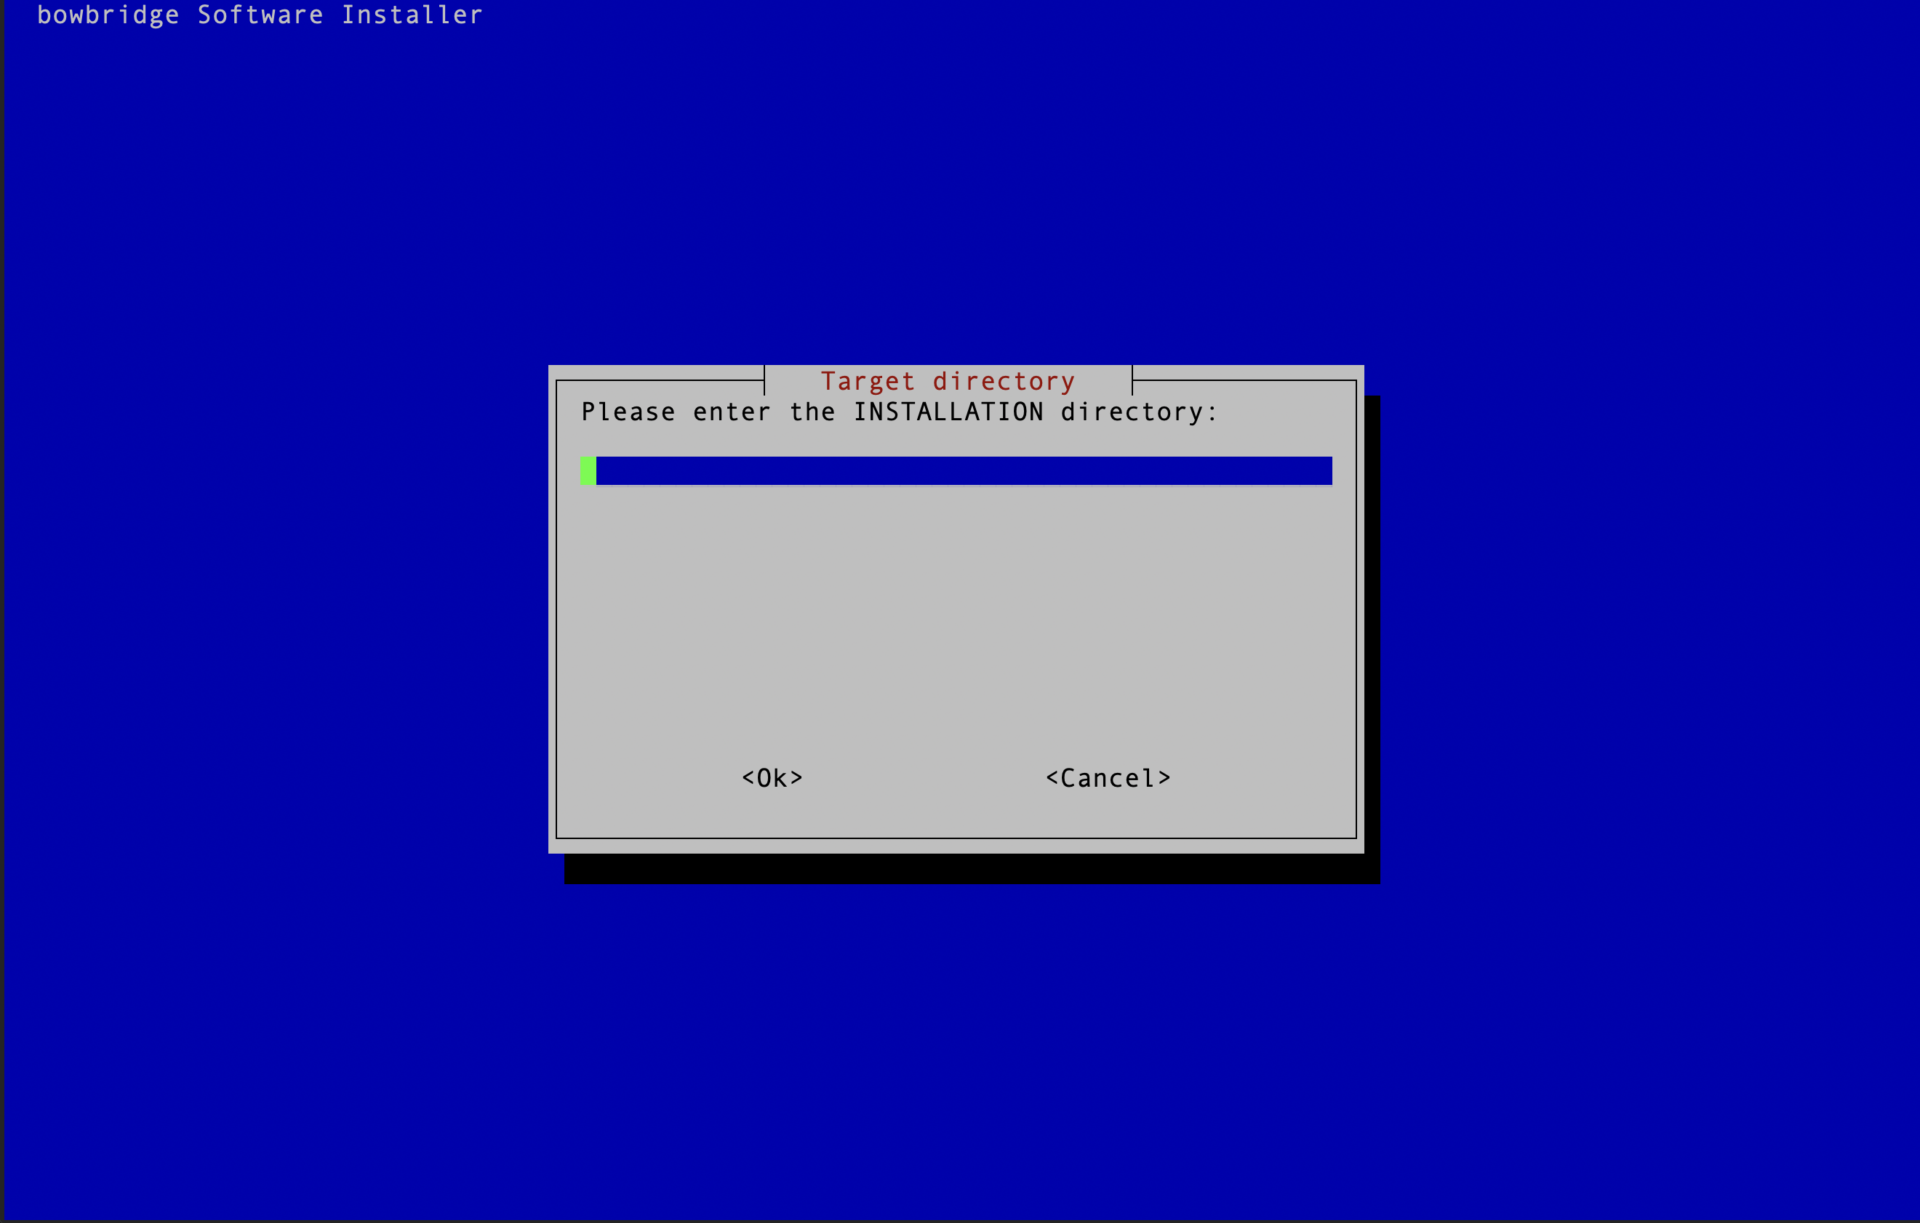
Provide the installation path.
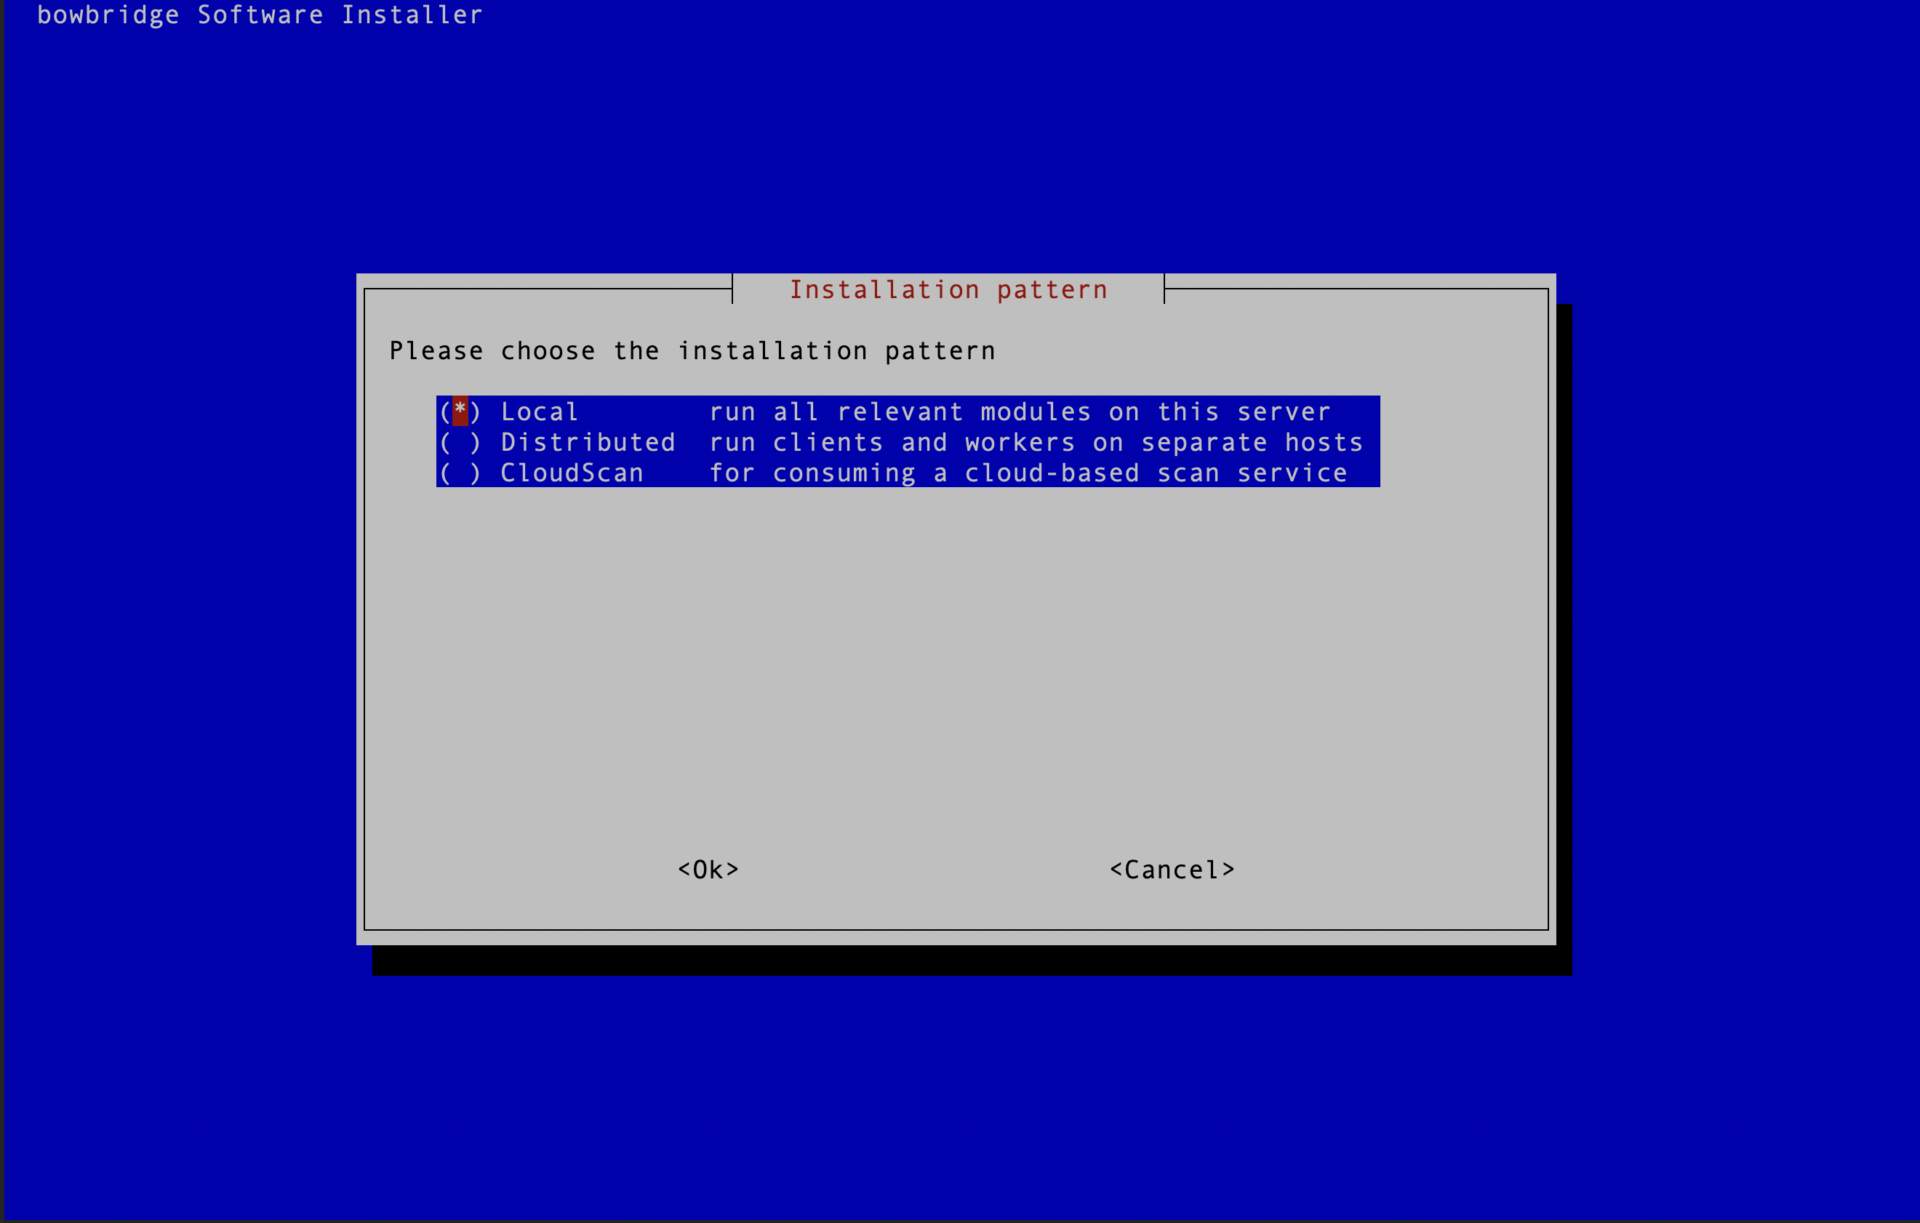
For a local deployment – with all modules running on the SAP application server, select “Local” and continue following the section Local deployment. For a distributed deployment, with some or all modules running on separate hosts, select “Distributed” and continue following the section Distributed deployment. 3.3.Local Deployment
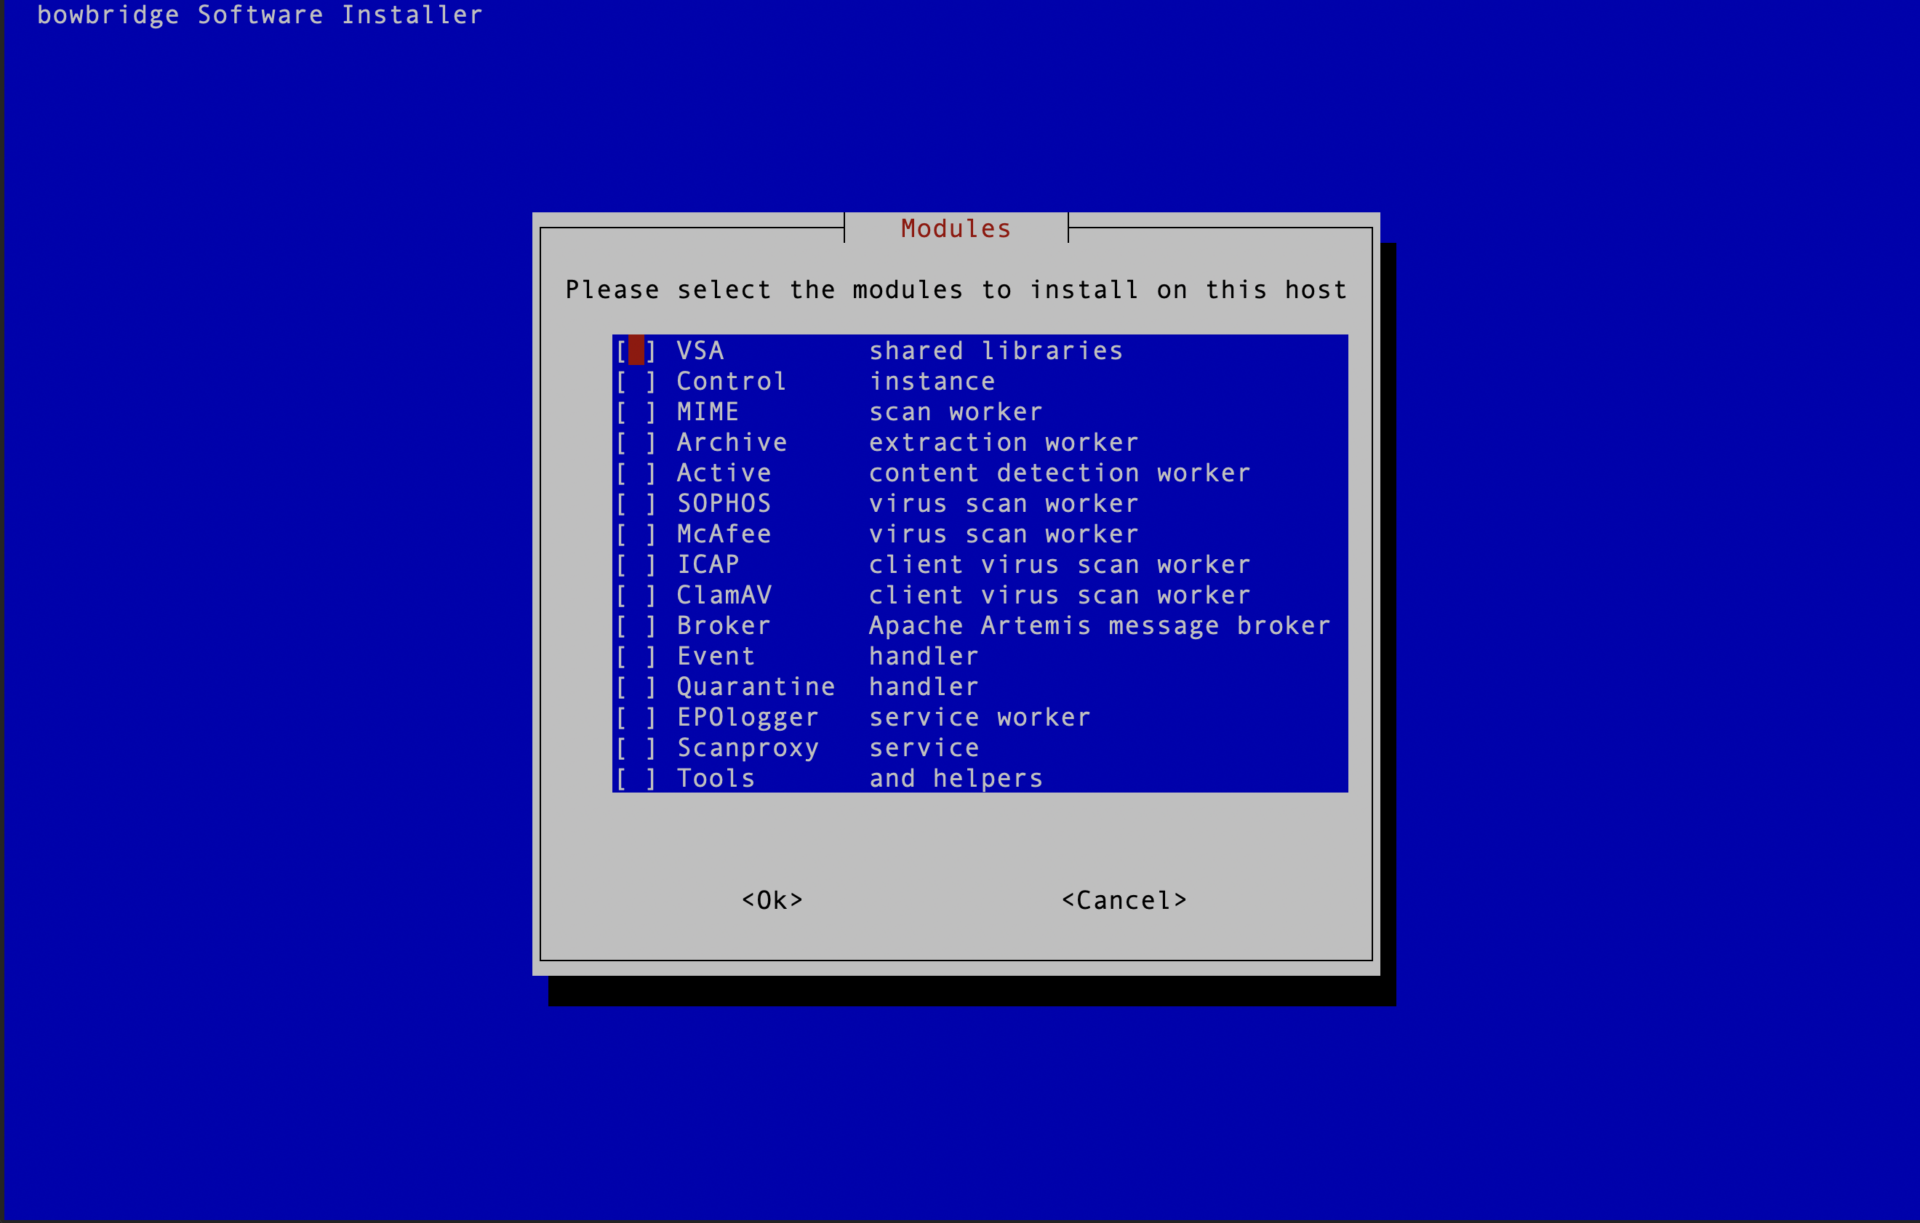
Select whether you would like to deploy all available modules or only a selection of them.
For an evaluation installation, we recommend installing all modules so administrators have the option to try the full functionality. For production deployments, choose “Selected” and only install the required modules.
Select the modules to install. (see “Identifying Required Modules”).
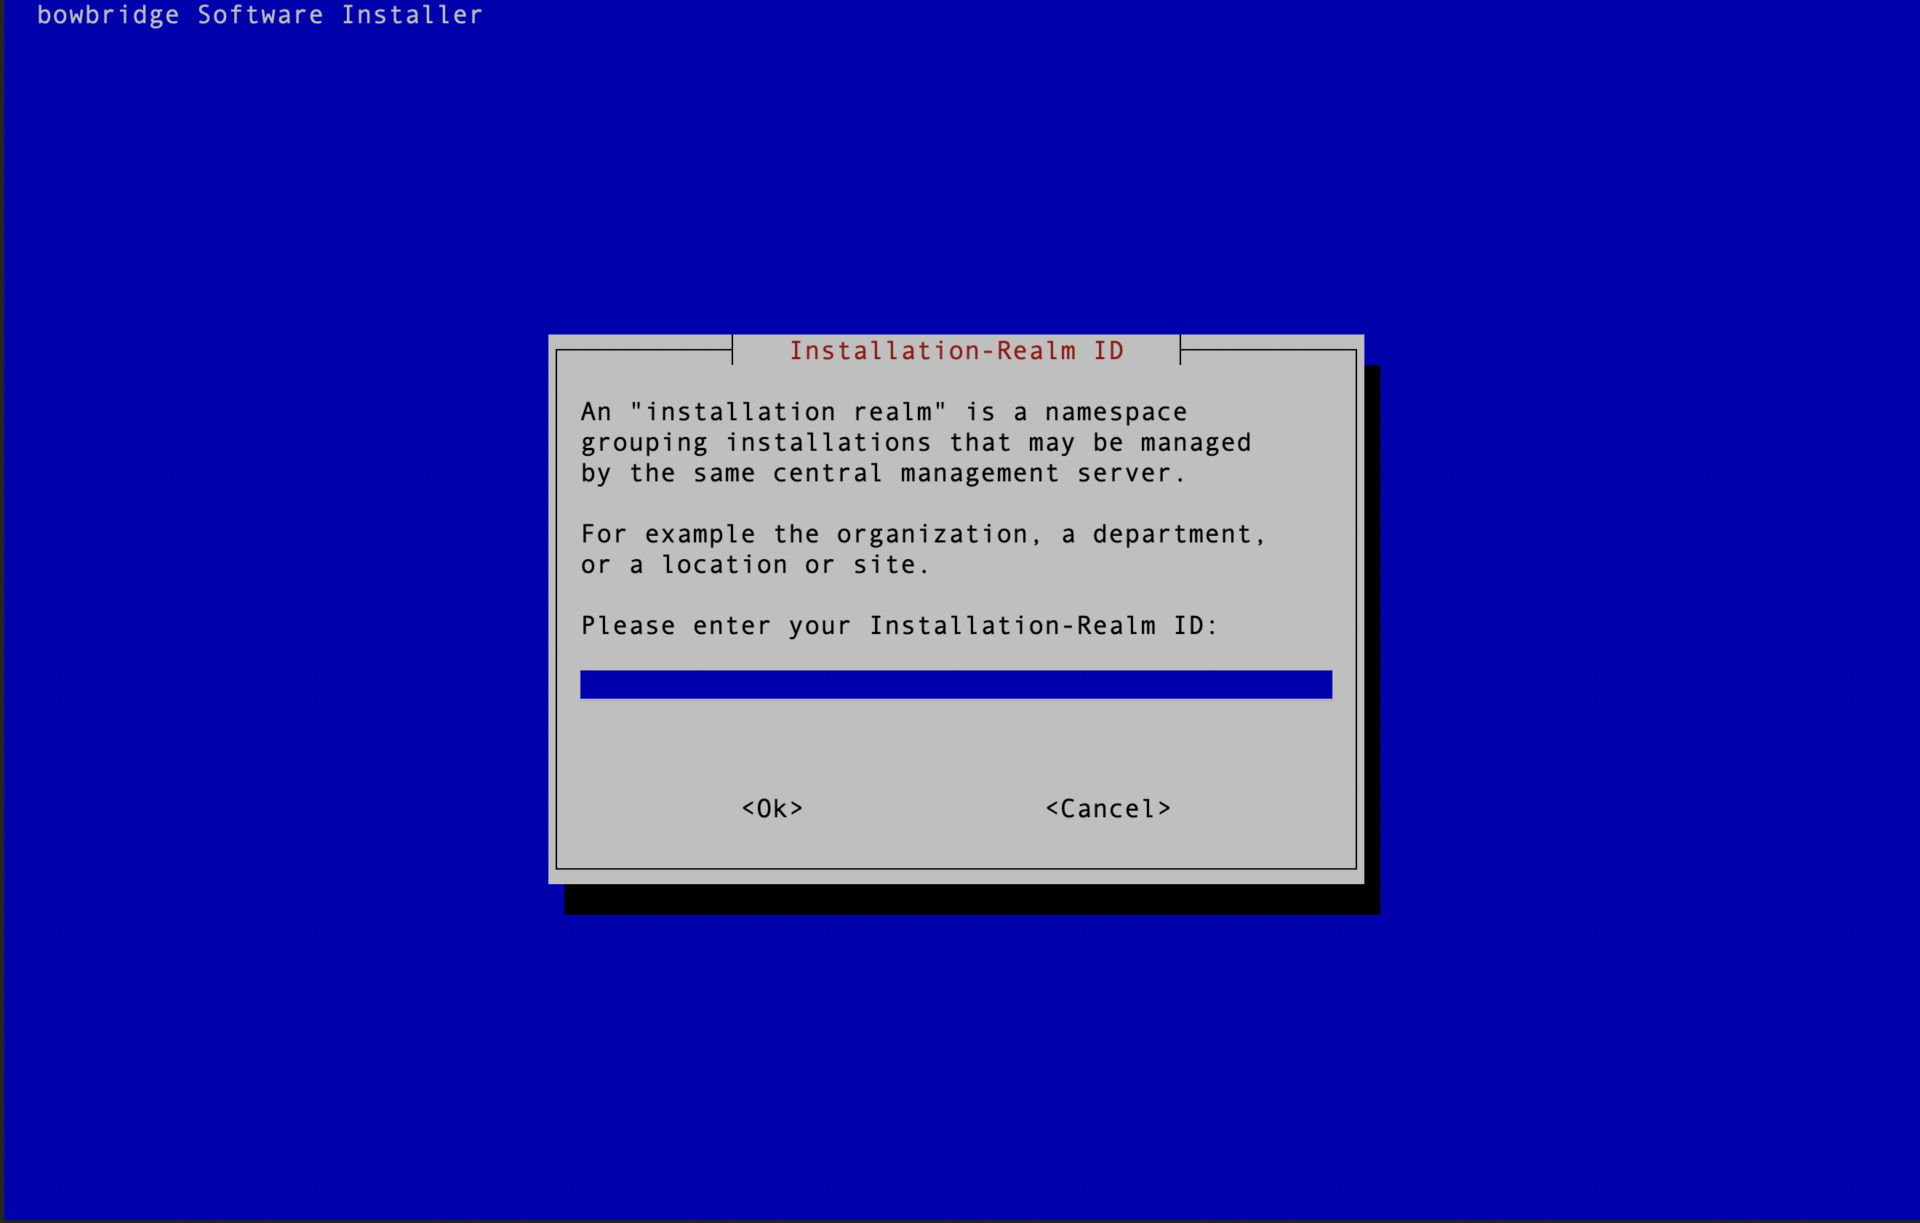
Enter the RealmID of the installation
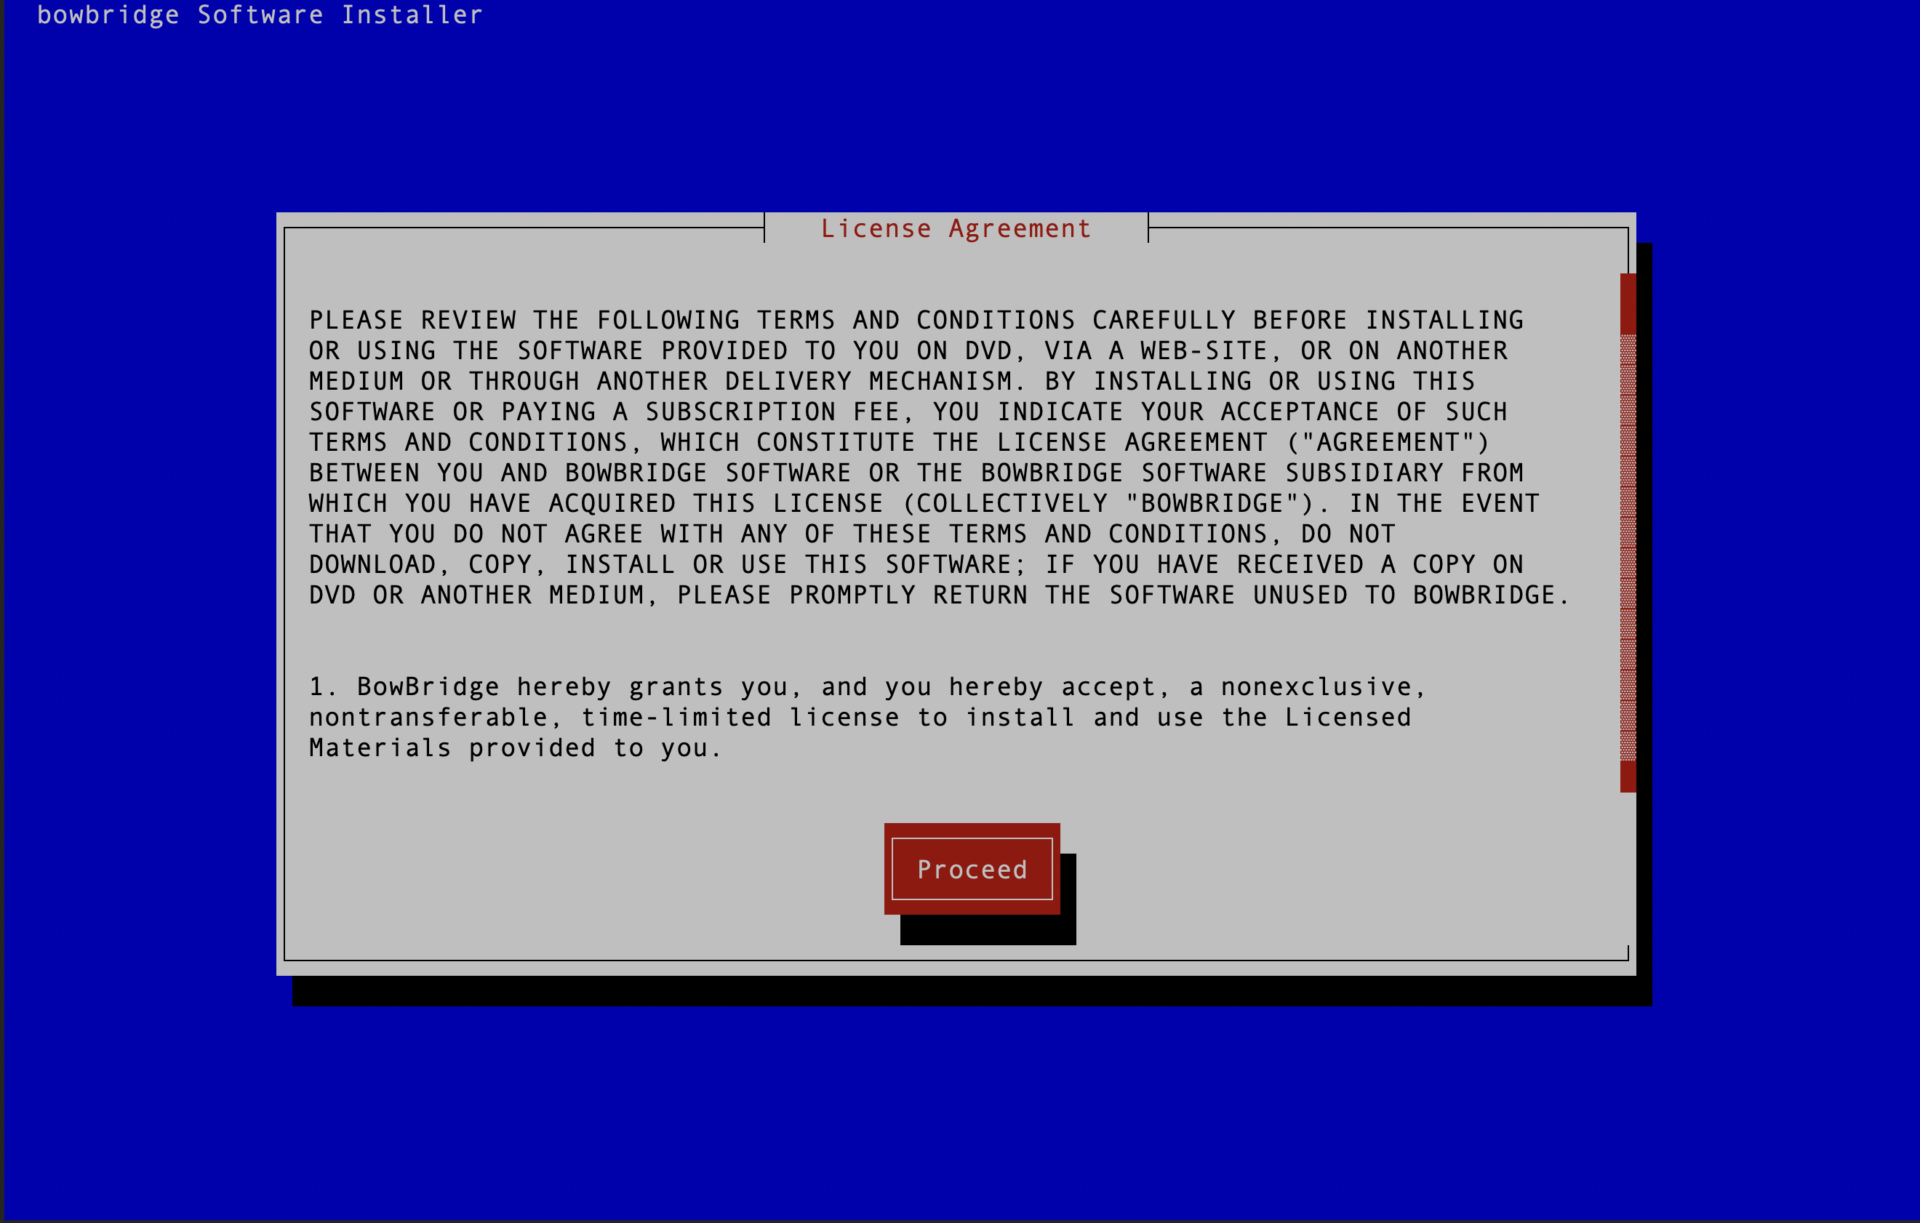
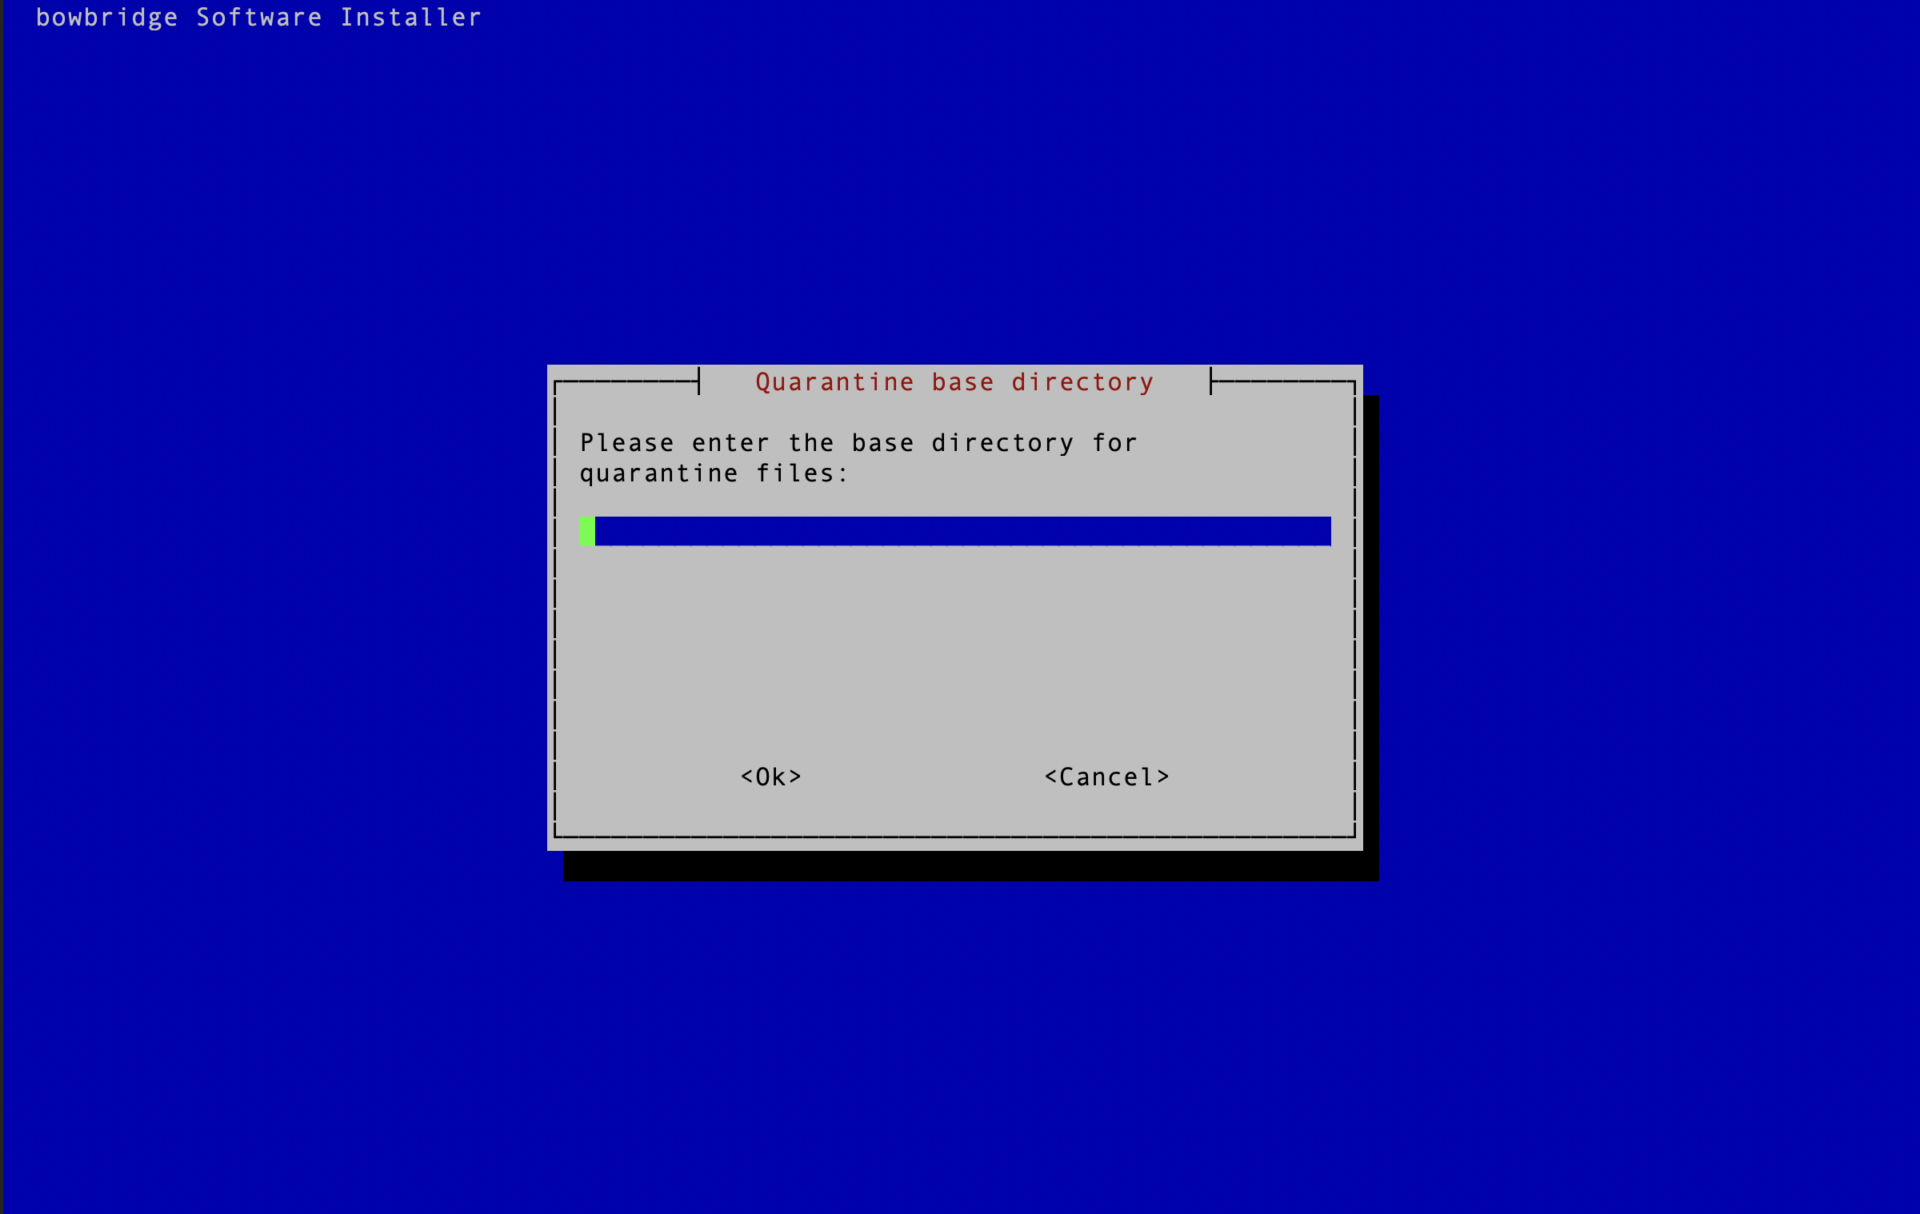
Administrators must accept the EULA before the installation starts. If you opted to install the quarantine handler, please enter the base-path for your quarantine. Inside that base-path folder, sub-folders for your Realm-ID and the SID(s) will be created when of the first quarantined file is stored.
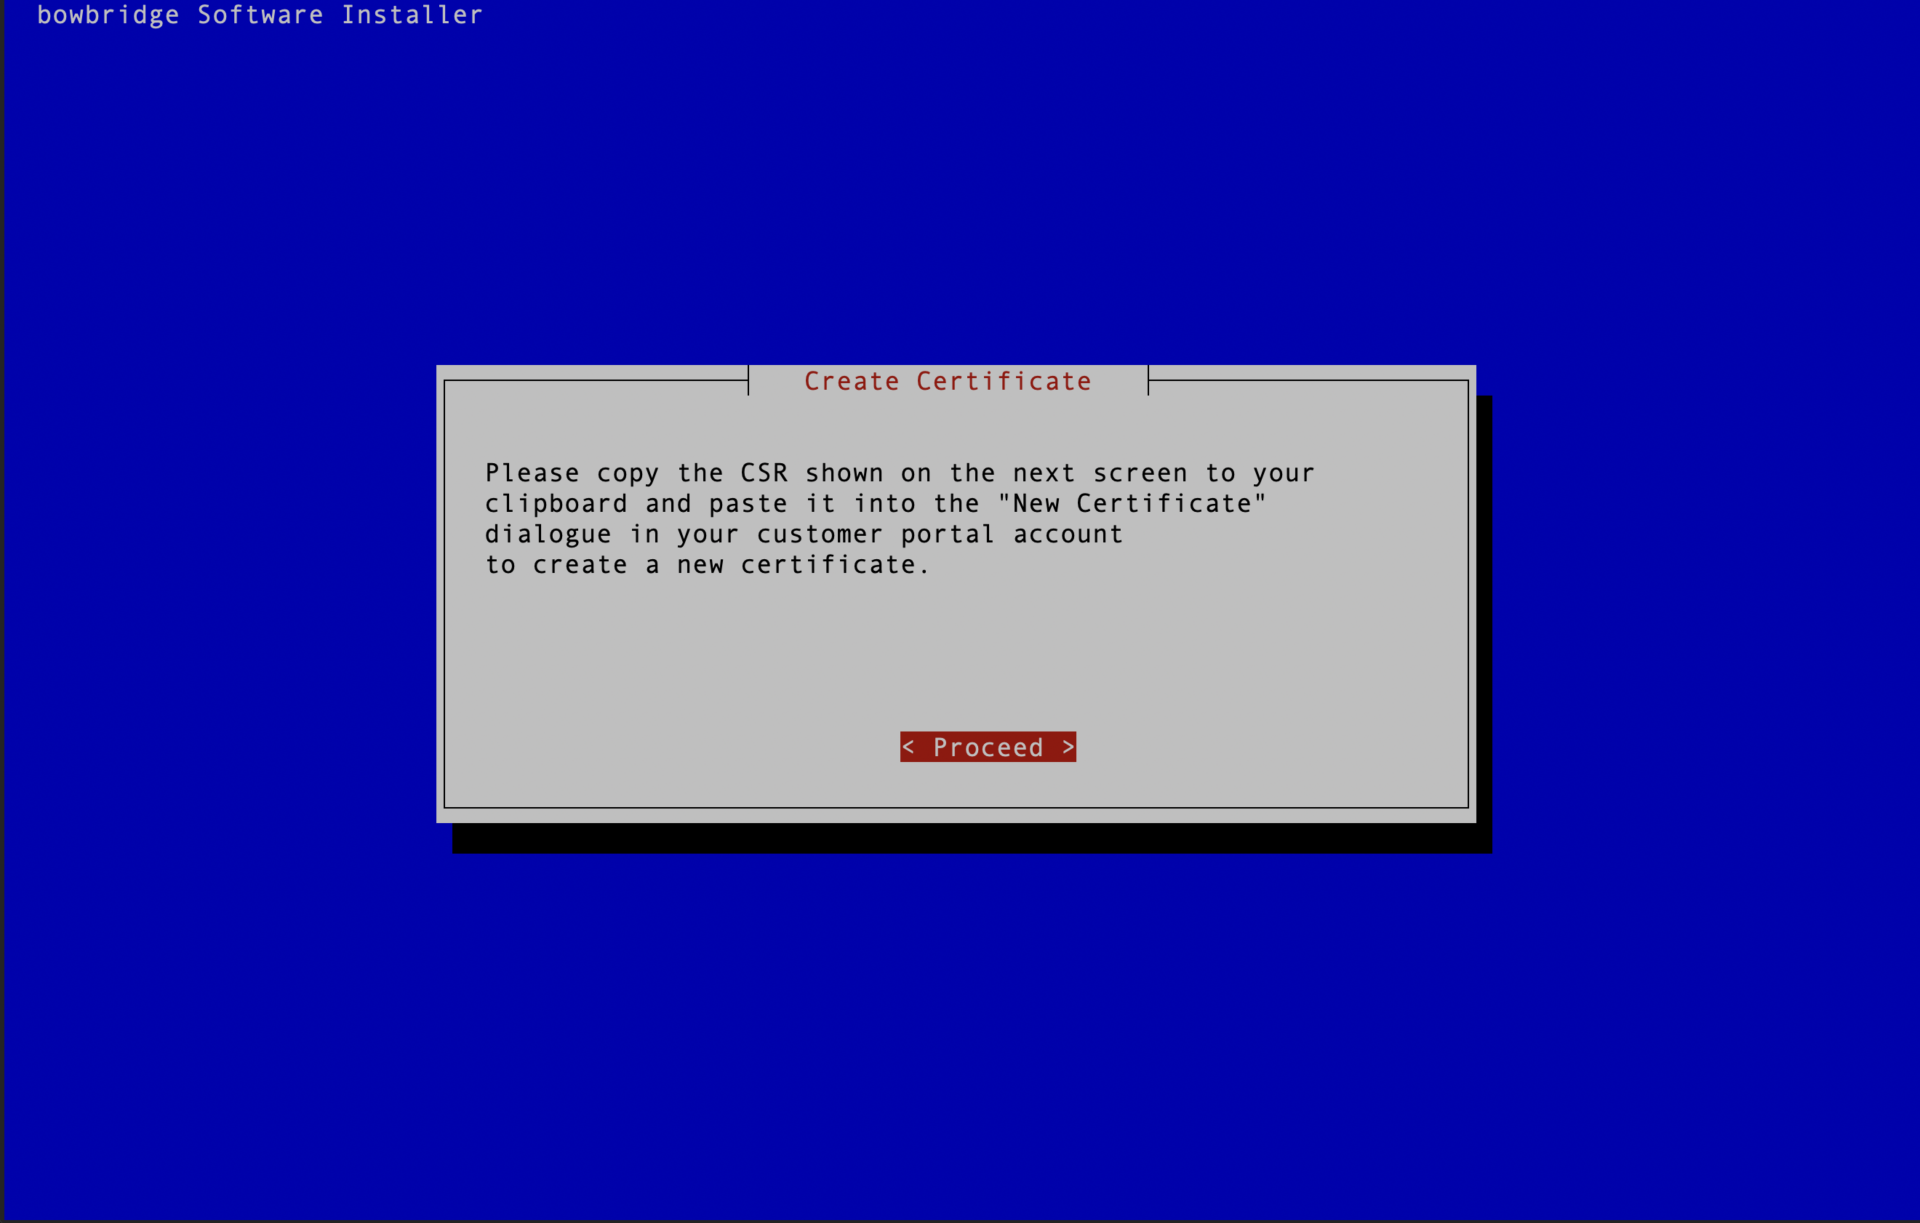
Generating the broker certificateIf the broker is among the modules to install, the interactive installer will guide you through the process of creating a certificate for the encryption and authentication of the broker.
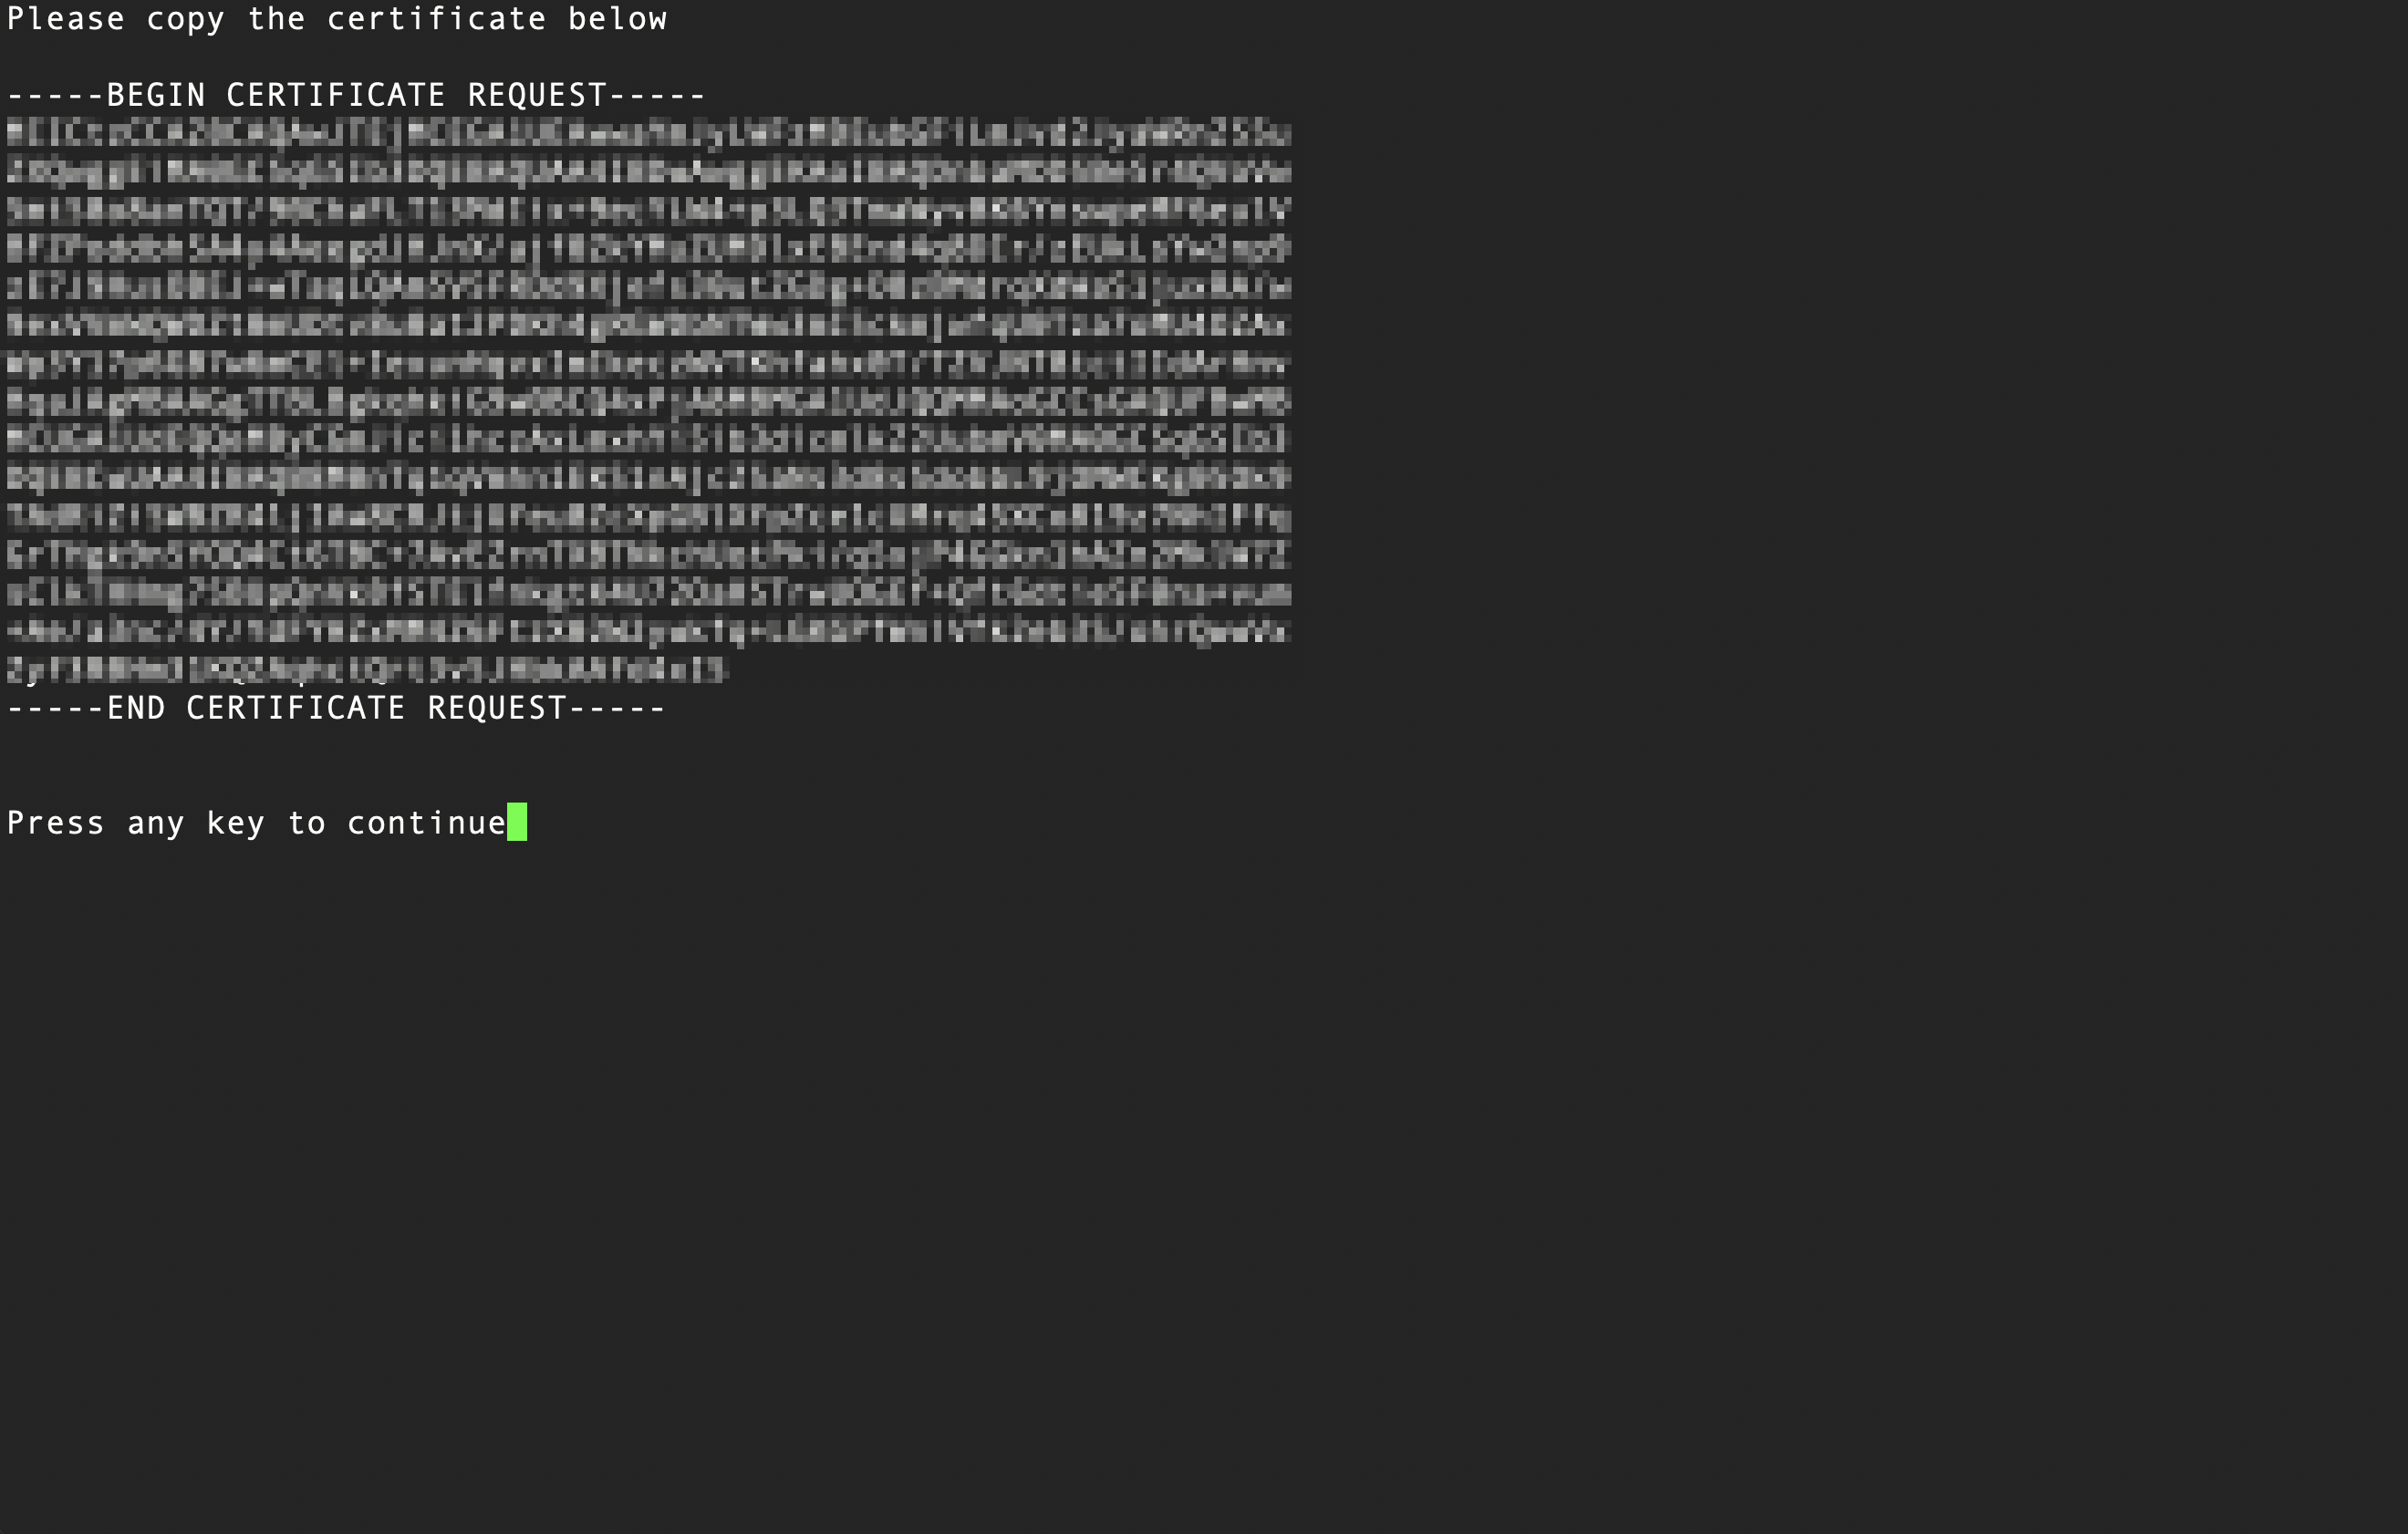
The installer generates an RSA keypair and will display a Certificate Signing Request (CSR) for the public key. This ensures the private key never leaves the server.
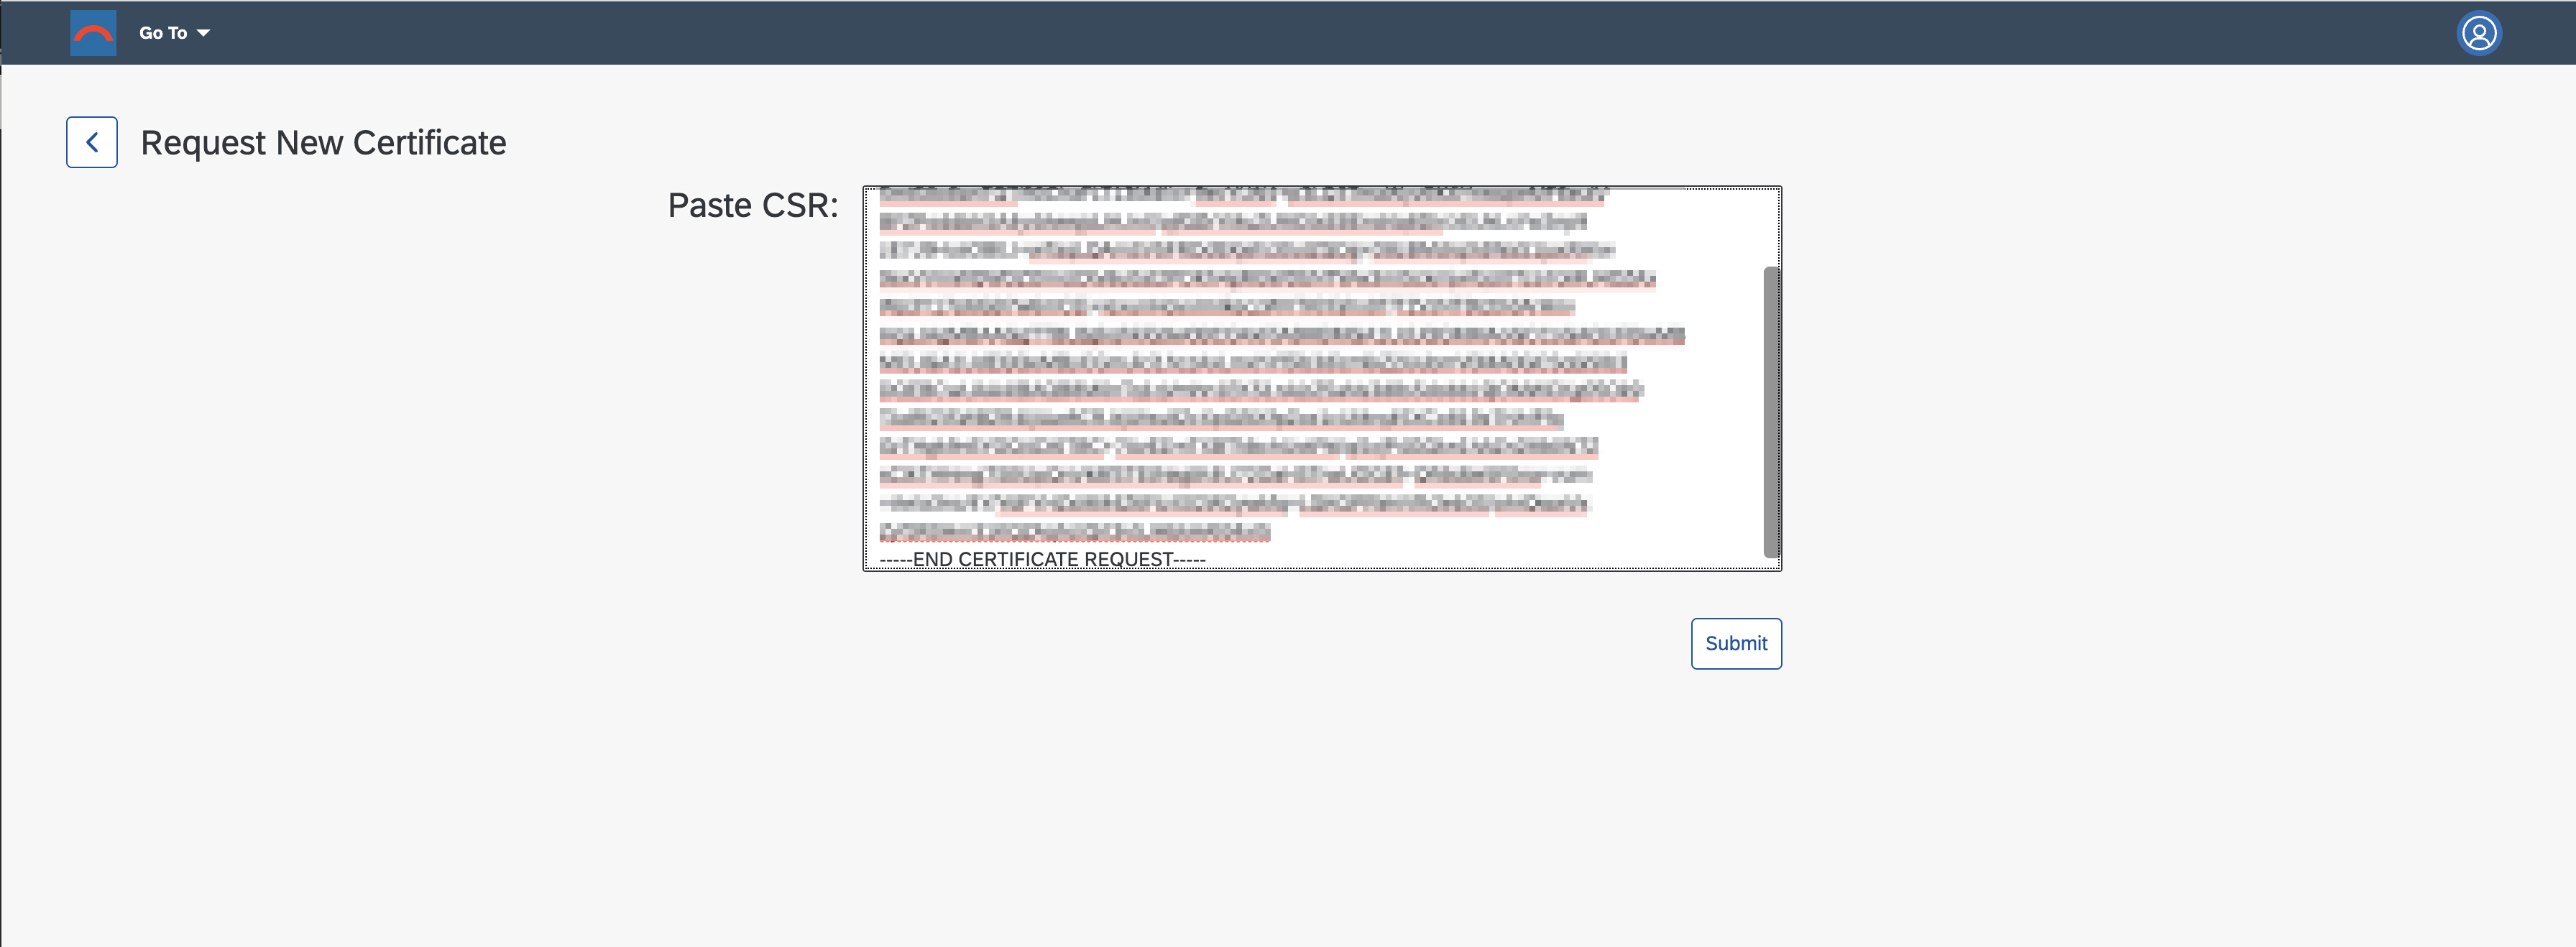
The CSR is displayed in a plain text terminal so it can be copied to the clipboard. Log-in to the bowbridge customer portal and open the “Certificates” tile. At the top of the table of existing certificates for the organization in question, clicking the “Create” button will open a dialogue box where the CSR can be inserted.
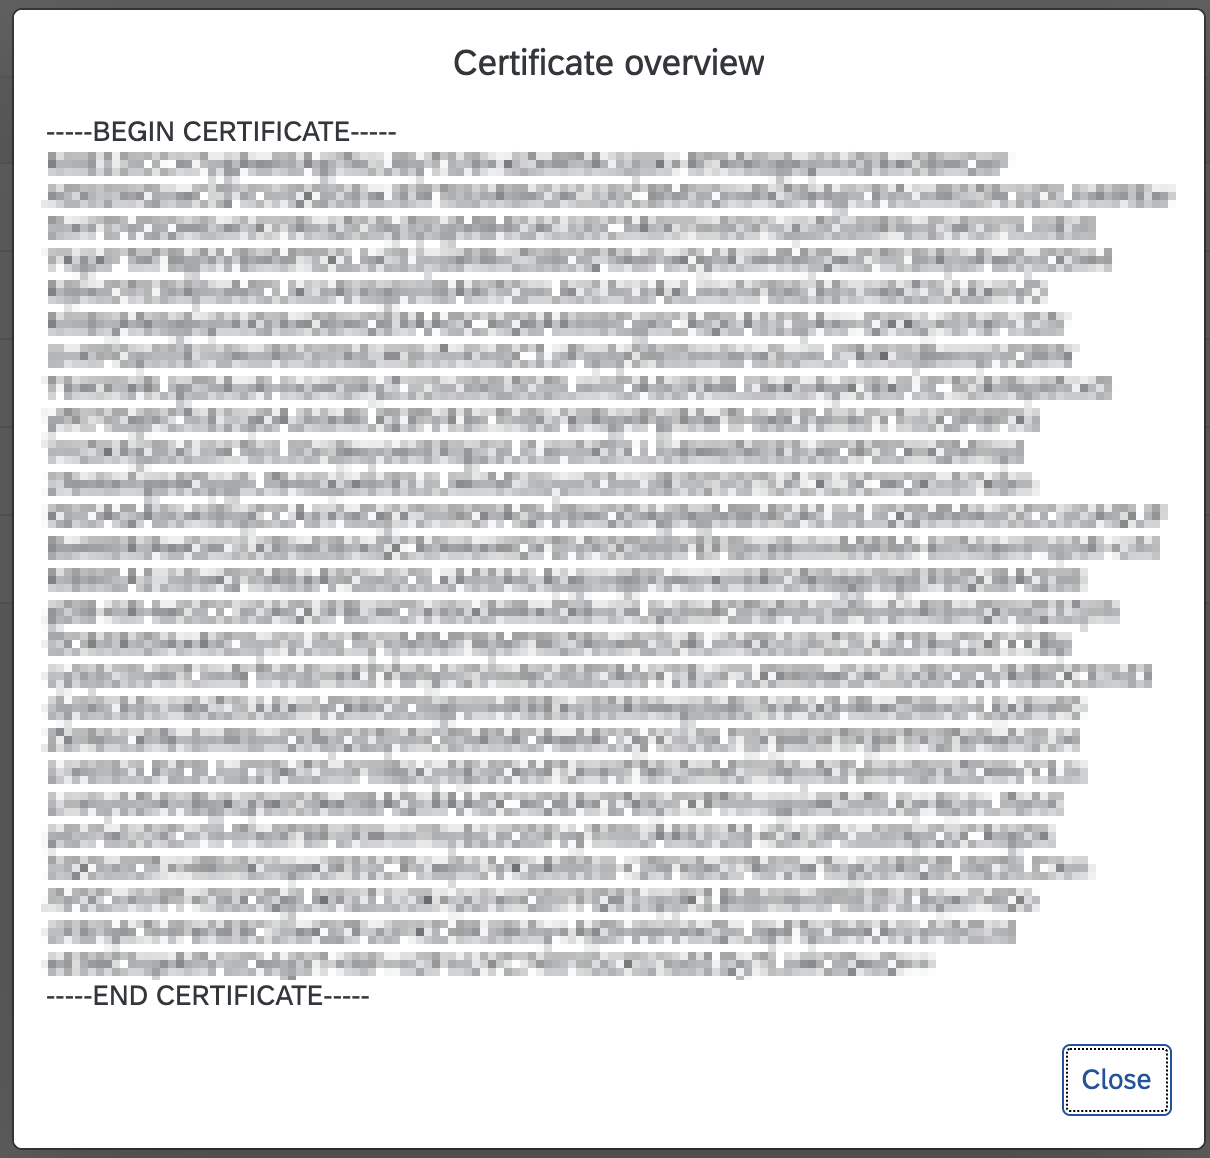
Upon submitting the CSR, an x.509 certificate for the server is created and signed by the bowbridge Certificate Authority and added to the list of certificates. Display the newly created certificate and copy it to the clipboard.
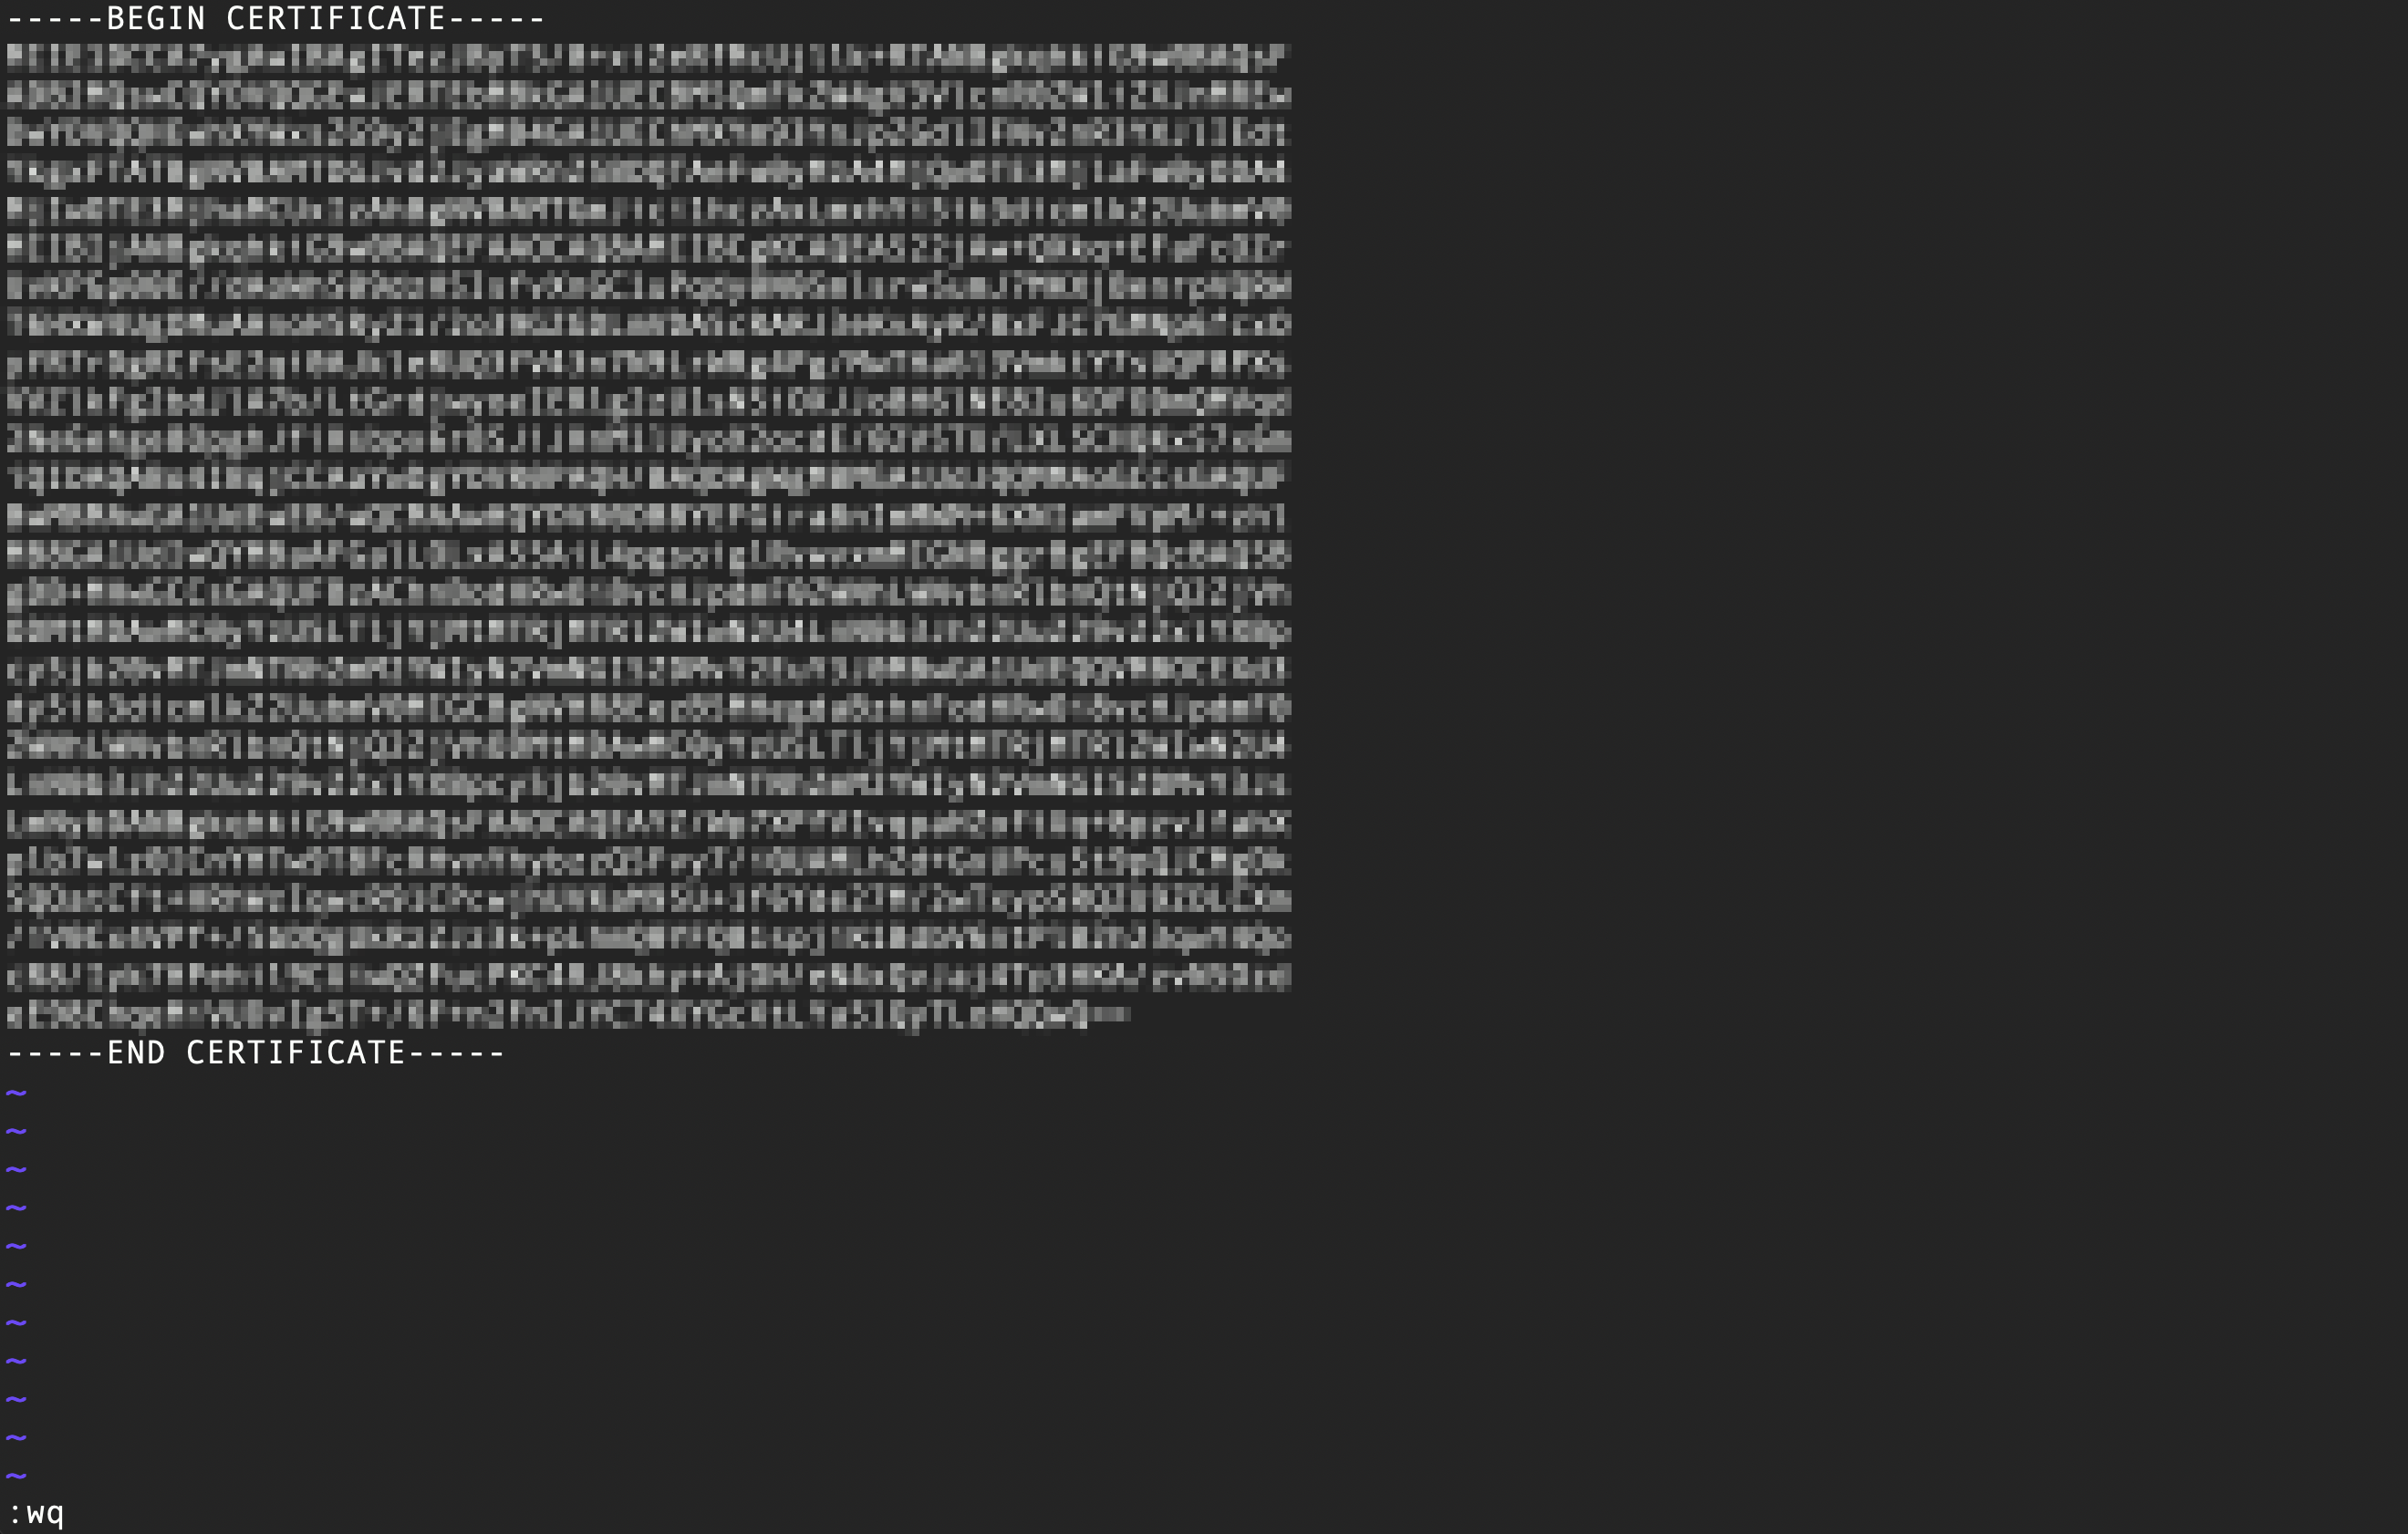
When asked to do so by the installer, paste the certificate into the open editor and close the editor (vi) by pressing the ESC-key and entering :wq and then pressing ENTER.
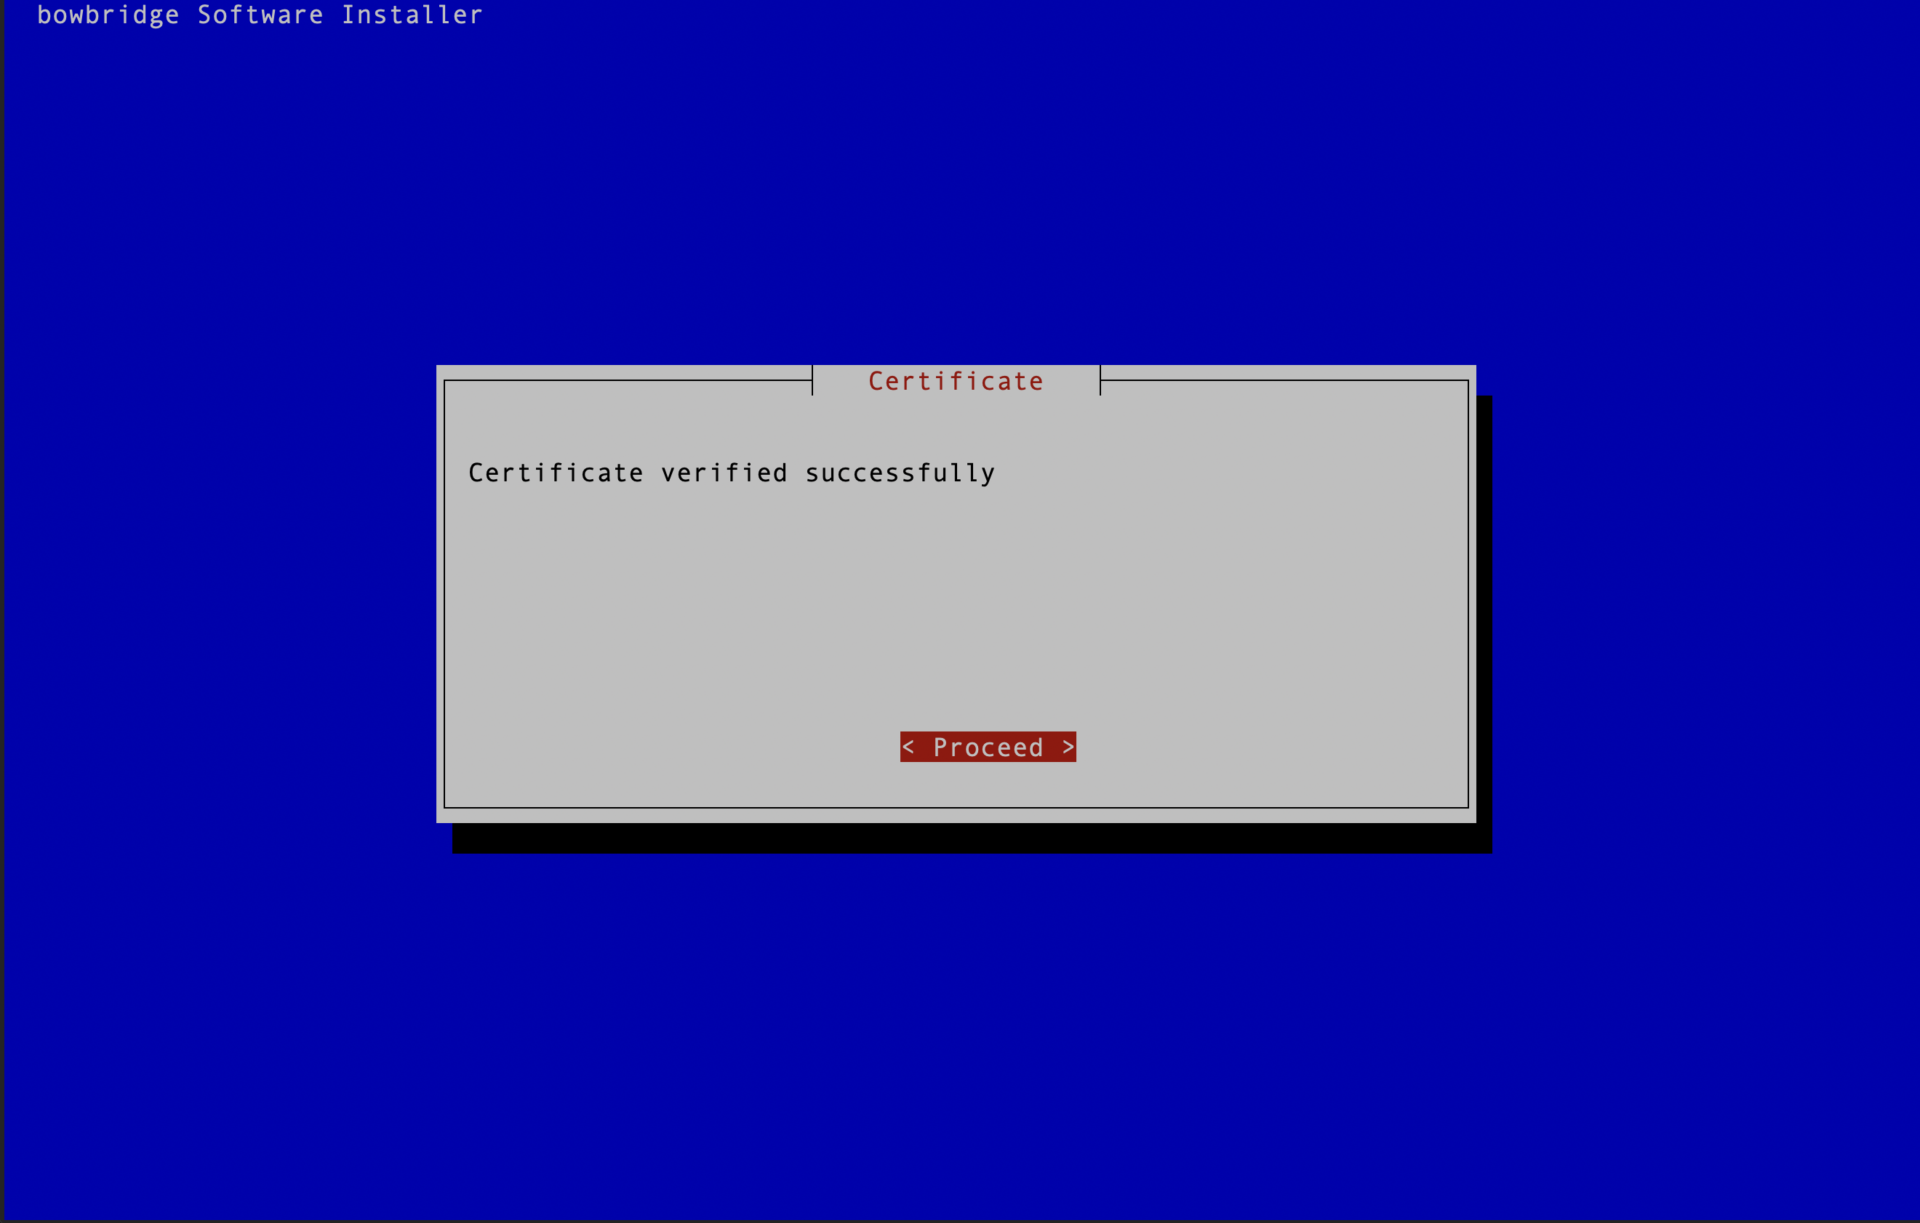
As the last step in creating the certificate, the installer checks the certificate is valid.
Proceed to the section Services Configuration.
3.4.Distributed Deployment
When deploying a distributed installation, the message broker must be deployed first. It may be deployed alongside other components but must be deployed before deploying other modules. The broker setup will generate credentials that will be needed to deploy other modules.
Installing the Message Broker (and co-located workers)
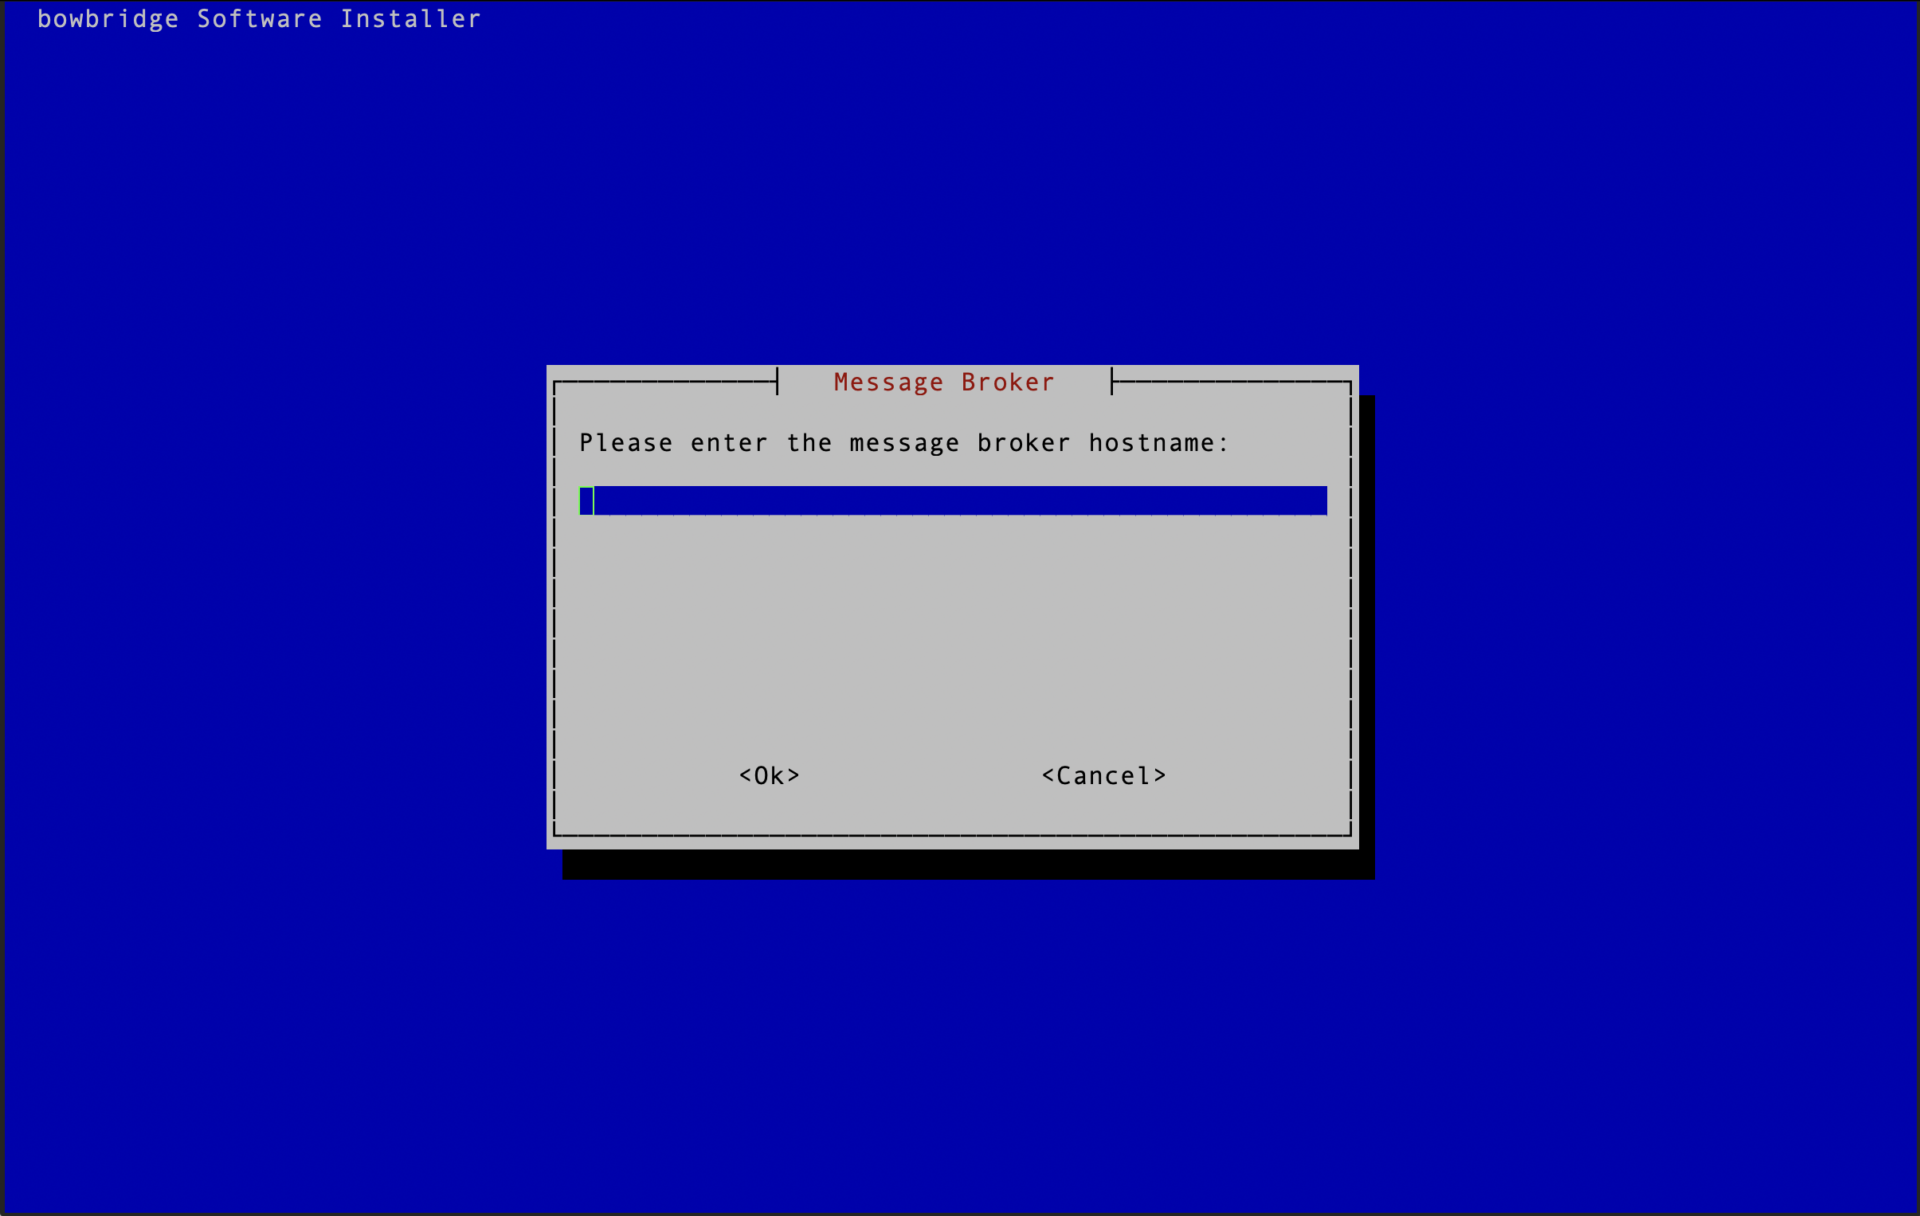
If the broker is to be deployed, please provide a name for the broker instance. The name must not contain spaces or special characters.
Generating the broker certificateIf the broker is among the modules to install, the interactive installer will guide you through the process of creating a certificate for the encryption and authentication of the broker.
The installer generates an RSA keypair and will display a Certificate Signing Request (CSR) for the public key. This ensures the private key never leaves the server.
The CSR is displayed in a plain text terminal to be copied to the clipboard. Log-in to the bowbridge customer portal and open the “Certificates” tile. At the top the table of existing certificates for your organization, clicking the “Create” button will open a dialogue where the CSR can be inserted.
Upon submitting the CSR, an x.509 certificate for the server is created and signed by the bowbridge Certificate Authority and added to the list of certificates. Display the newly created certificate and copy it to the clipboard.
When asked to do so by the installer, paste the certificate into the open editor and close the editor (vi) by pressing the ESC-key and entering :wq and then pressing ENTER.
As the last step in creating the certificate, the installer checks the certificate is valid.
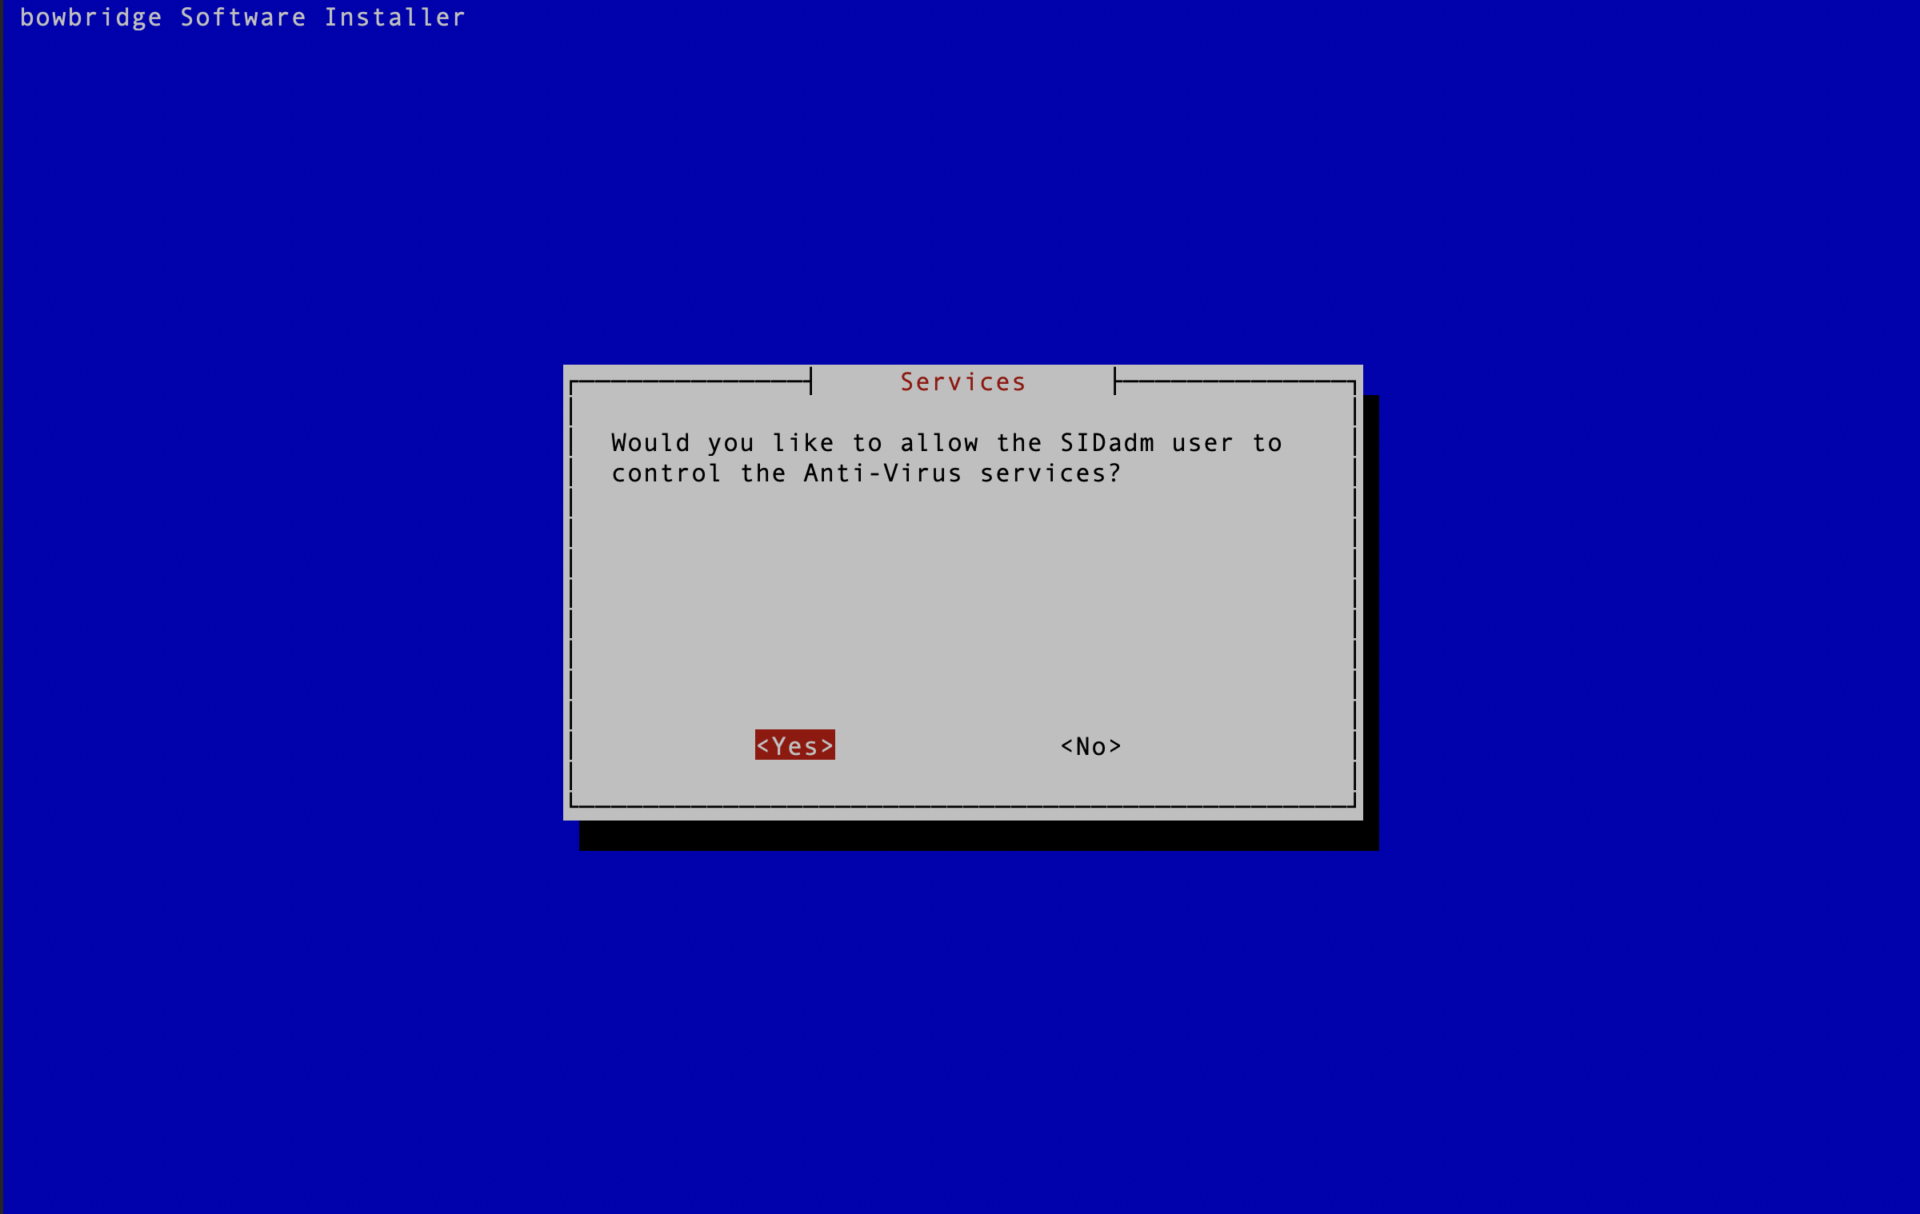
If the option is chosen to install the quarantine handler, please enter the base-path for the quarantine. Inside that base-path folder, sub-folders for the Realm-ID and the SID(s) will be created when the first quarantined file is stored. Creating the services configurationUnless explicitly chosen otherwise, bowbridge Anti-Virus 4.x will run the scan workers as services controlled by the Operating System. On Linux, they are implemented as systemd-services, and on AIX as subsystems.
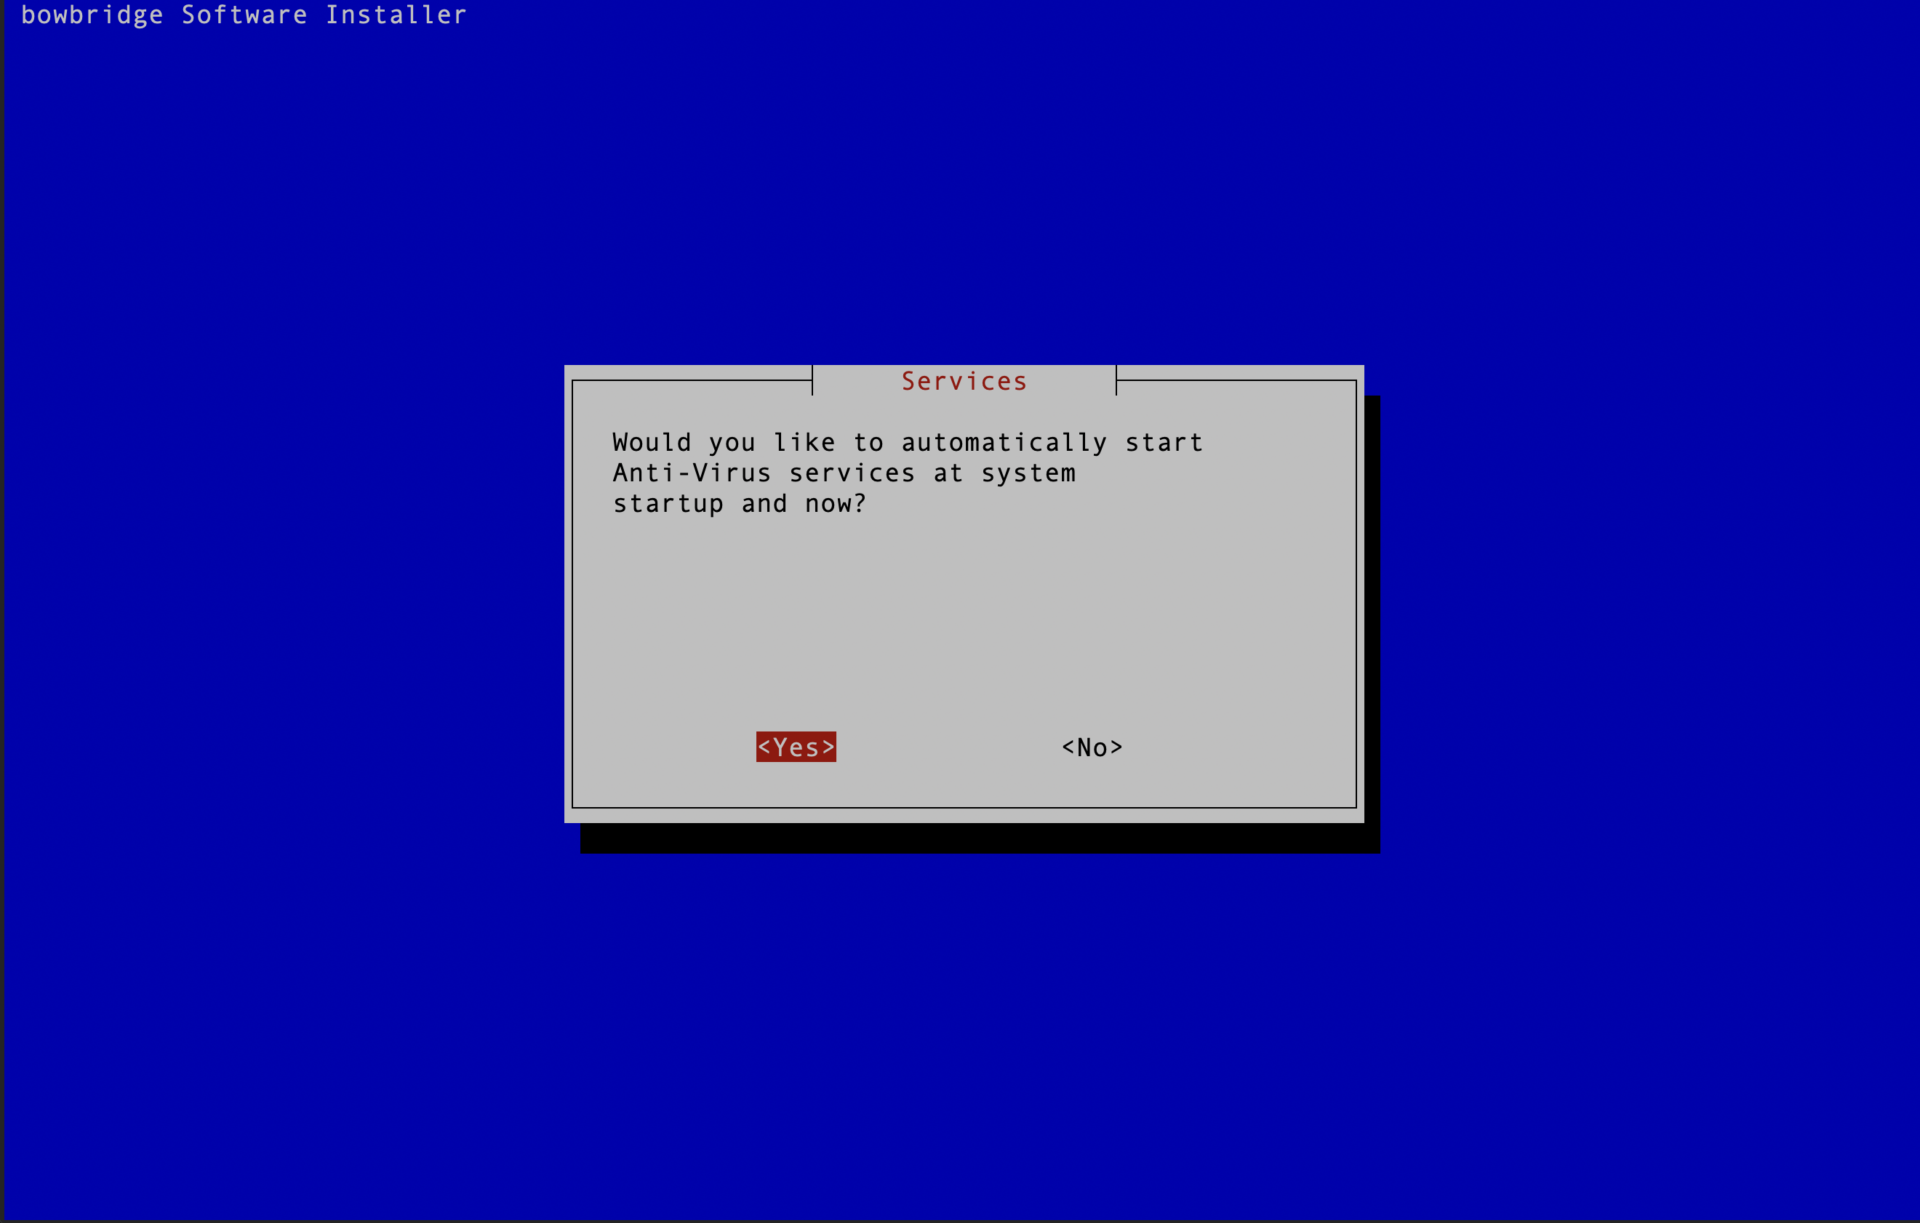
bowbridge recommends automatically starting the services when the OS boots. This ensures they are already running with the SAP instance starts, resulting in a faster start of the SAP instance further reduces the overall management and monitoring overhead.
By default, controlling OS-controlled services/subsystems requires root privileges, which SIDadm may not have access to.
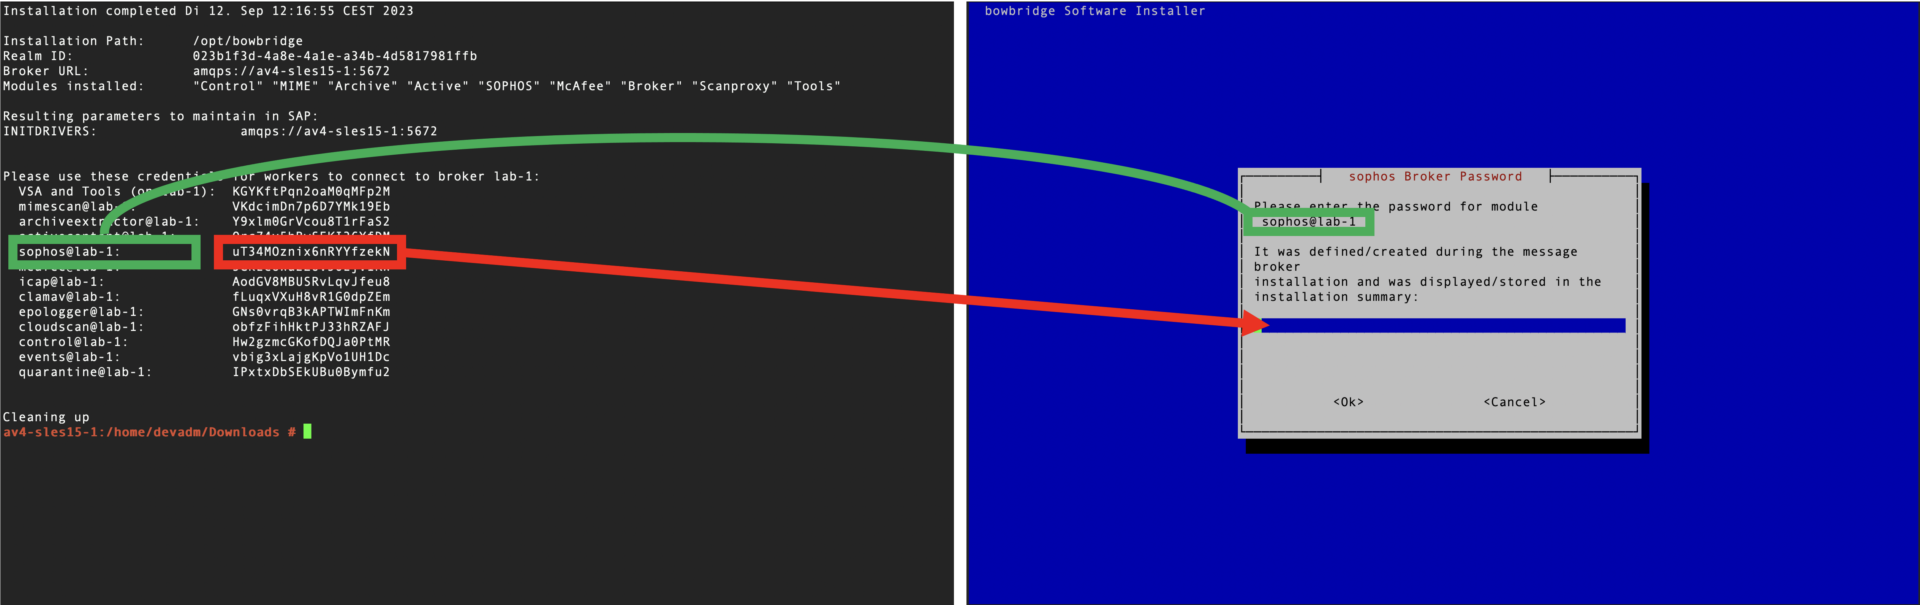
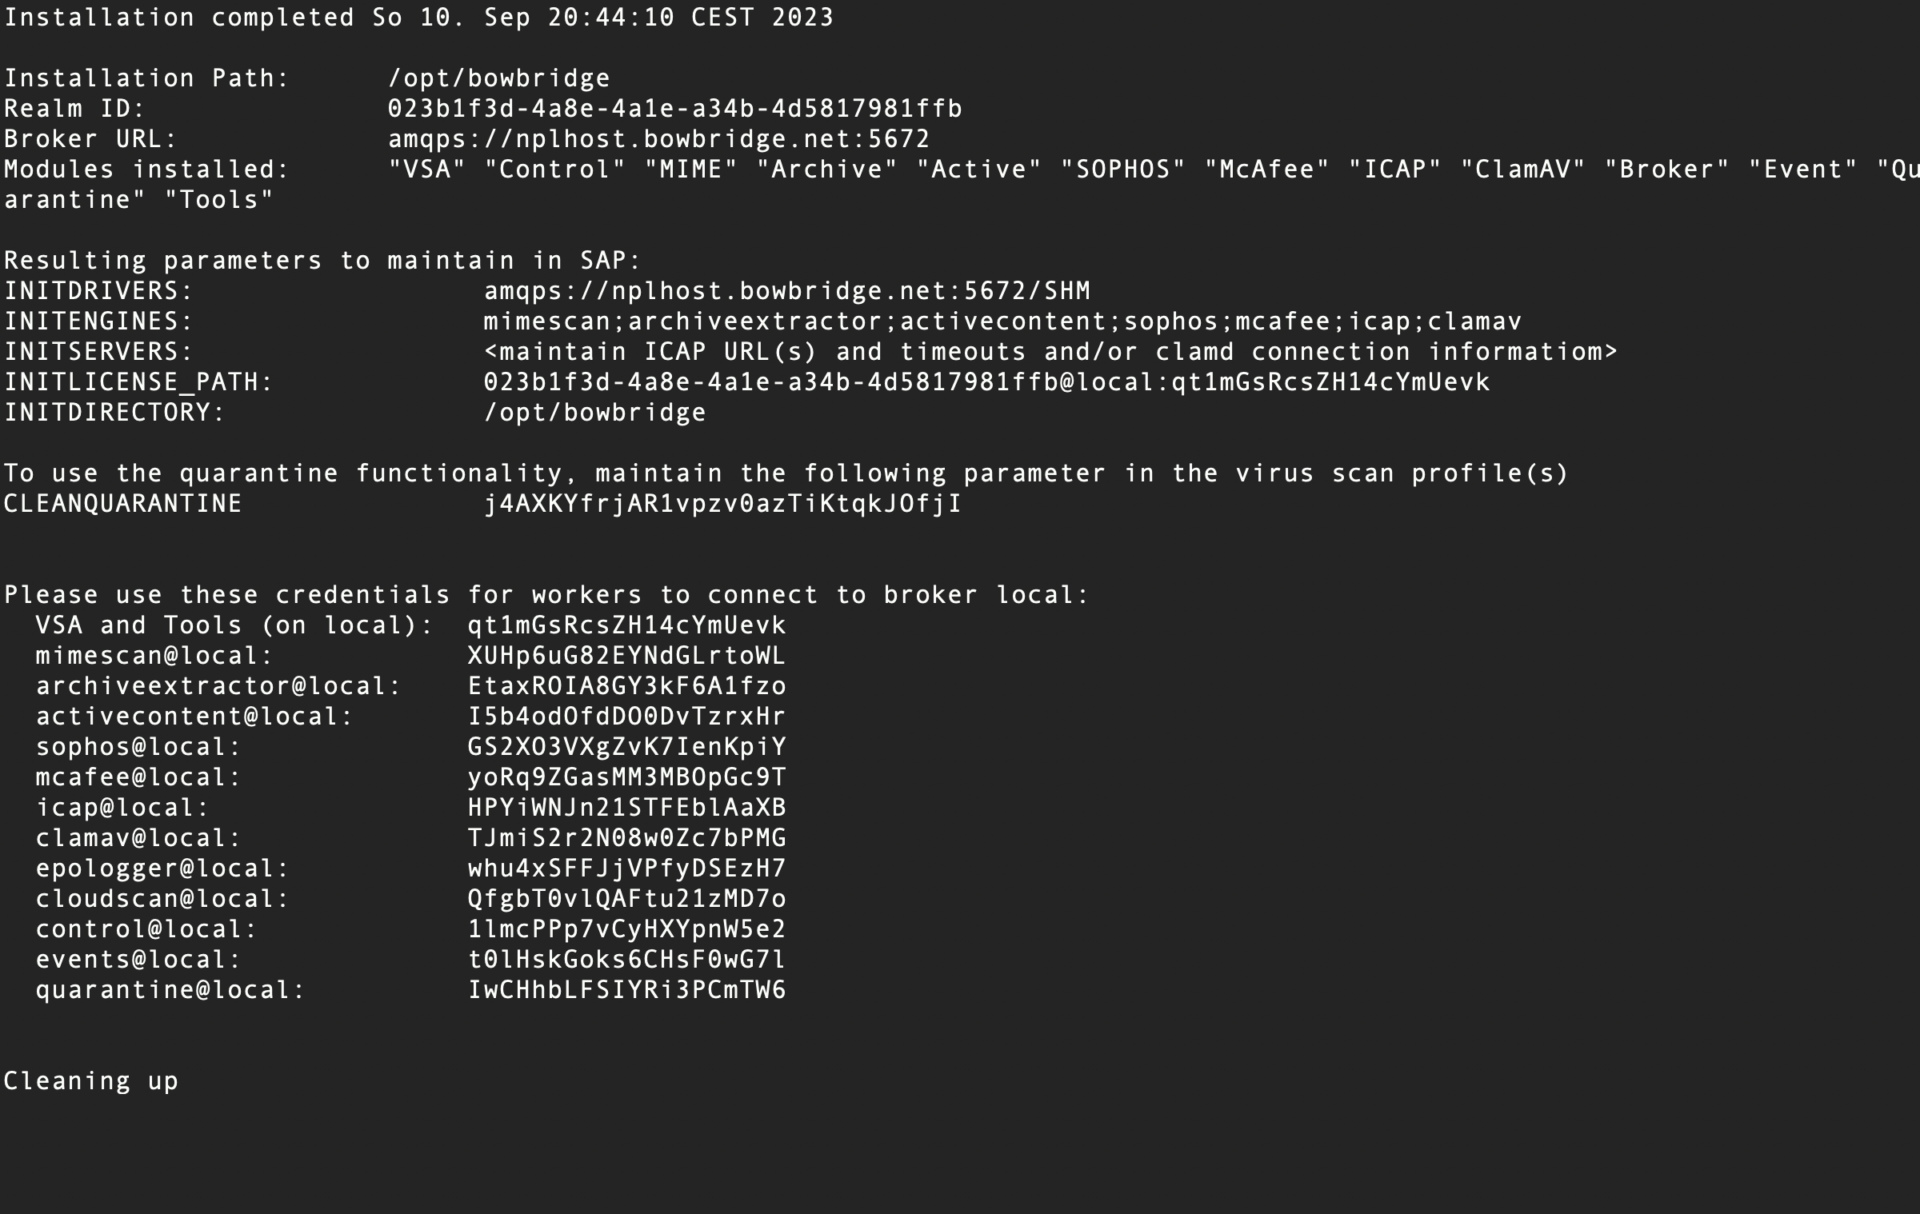
Upon completion of the installation, a summary is displayed. It contains the INIT parameters as they should be set in the SAP-level configuration.
This summary is stored in the bowbridge_installation_summary.txt file in the current directory. The installation log is stored in /tmp/bowbridge_installation.log
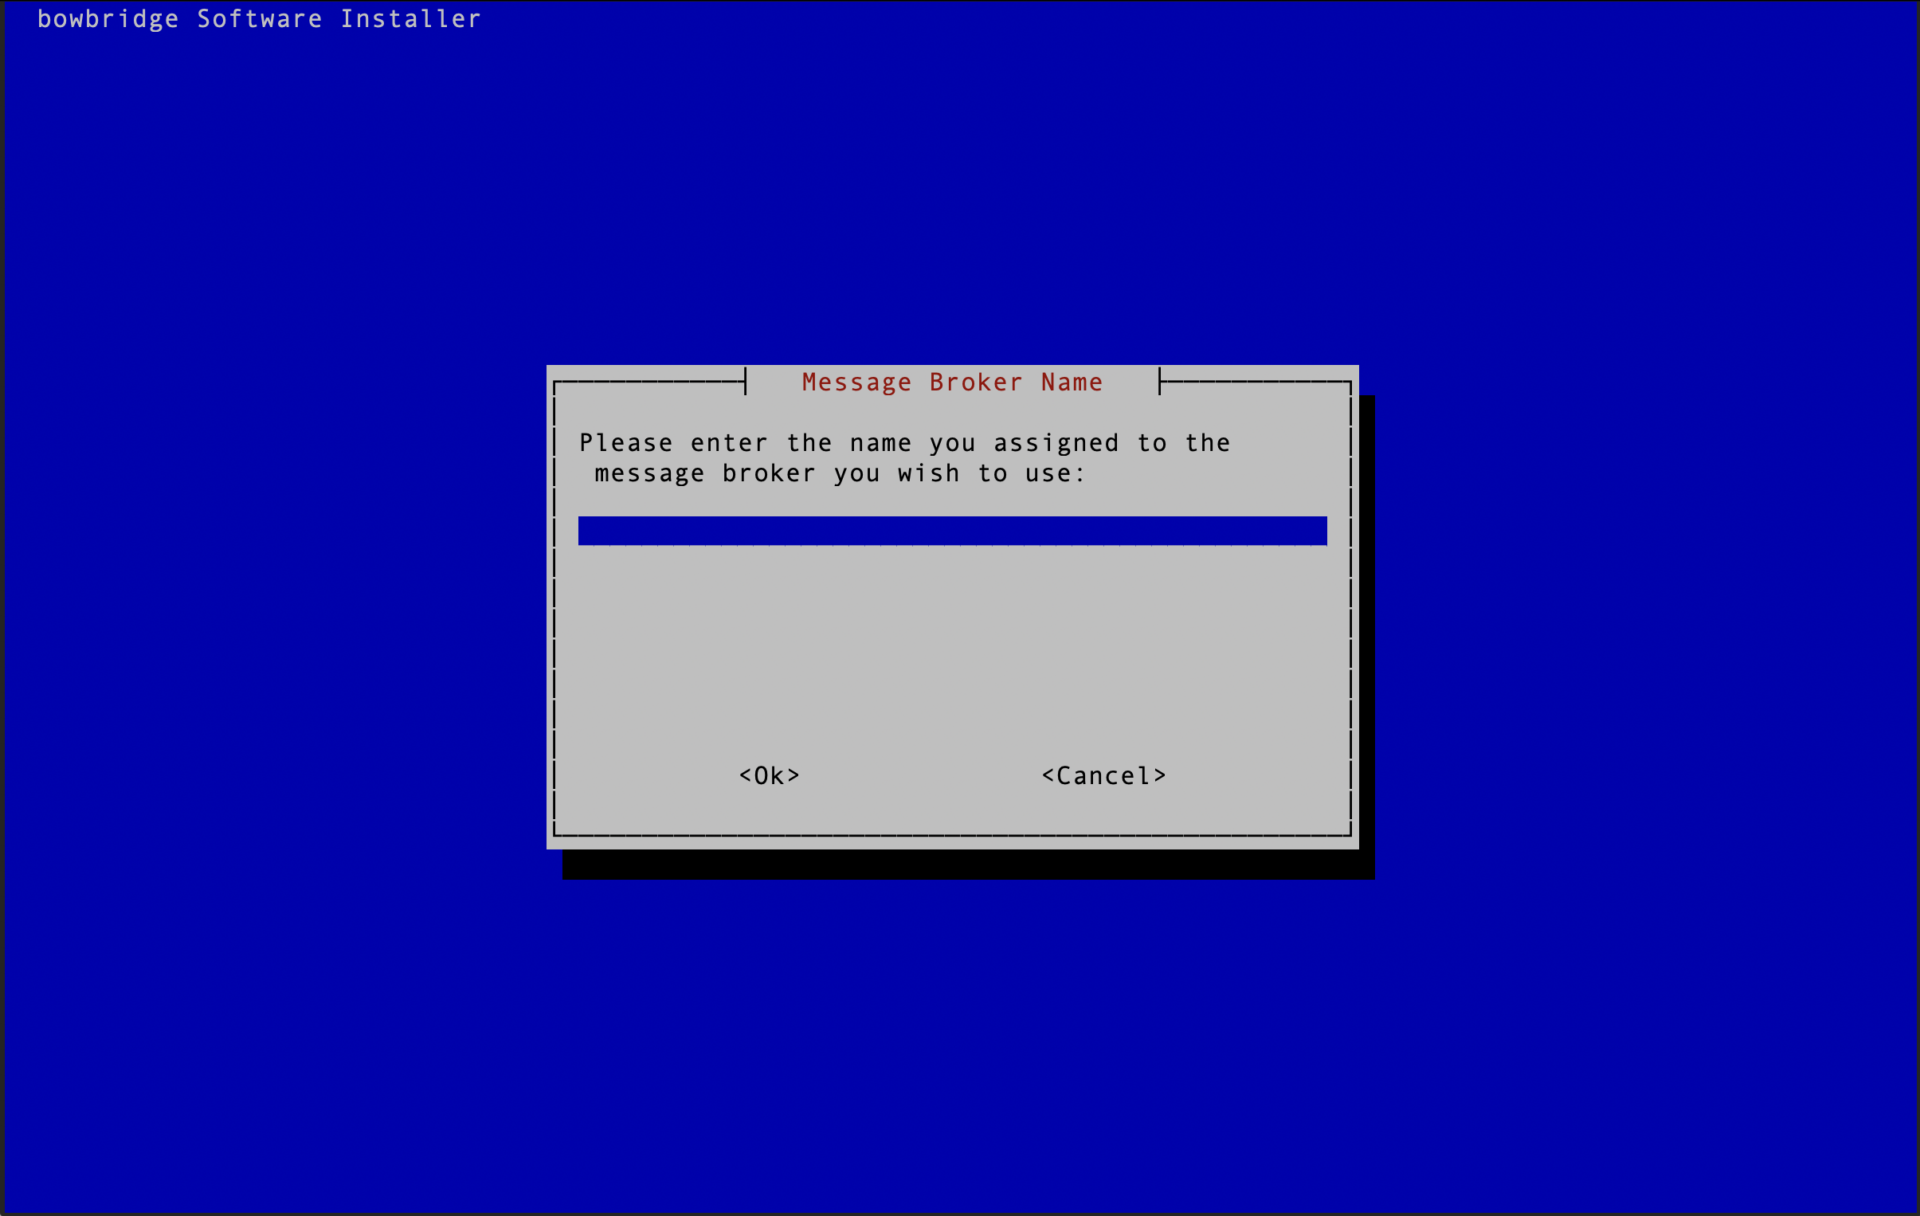
Installing workers not co-located with the message brokerOnce a message broker is installed, it is possible to add worker modules to the installation using the authentication credentials created by the broker at install-time. The installer can be run along the same lines of other deployment scenarios; then the module/s to install on this host can be selected. During the installation the DNS-resolvable hostname of the broker and the name of the broker instance must be provided.
Enter the RealmID of the installation
Administrators must accept the EULA before the installation starts.
Provide the broker-password for the respective component. It, too, is stored in the bowbridge-installation-summary.txt file on the broker host.
If the quarantine handler is bing installed, please enter the base-path for the quarantine. Inside that base-path folder, sub-folders for the Realm-ID and the SID(s) will be created when the first quarantined file is stored.
Installing the Virus Scan Adapter (VSA) shared libraries on the SAP application server hostAfter a message broker and the desired scan workers are deployed, the VSA shared libraries must be installed on every application server in order for them to connect to the scanning server(s). Run the installer script and choose “Installation” and “Distributed”
Select only the “VSA shared libraries” option and proceed with OK.
Specify the target directory for the shared libraries. bowbridge recommends installing them to /opt/bowbridge or /usr/sap/bowbridge. However, installation into any directory is possible, as long as the target directory is consistent across all instances of the SAP system.
Accept the EULA The installation then completes within a few seconds.
Proceed to the section Services Configuration. 3.5.Cloud Scan DeploymentOnly the VSA Client needs to be installed for a Cloud Scan deployment. No configuration files, license files, or local processes will be deployed to the application servers, and no further installation steps are required.
Due to its much smaller size, using the client-only installer package makes sense when deploying the VSA client to multiple application servers.
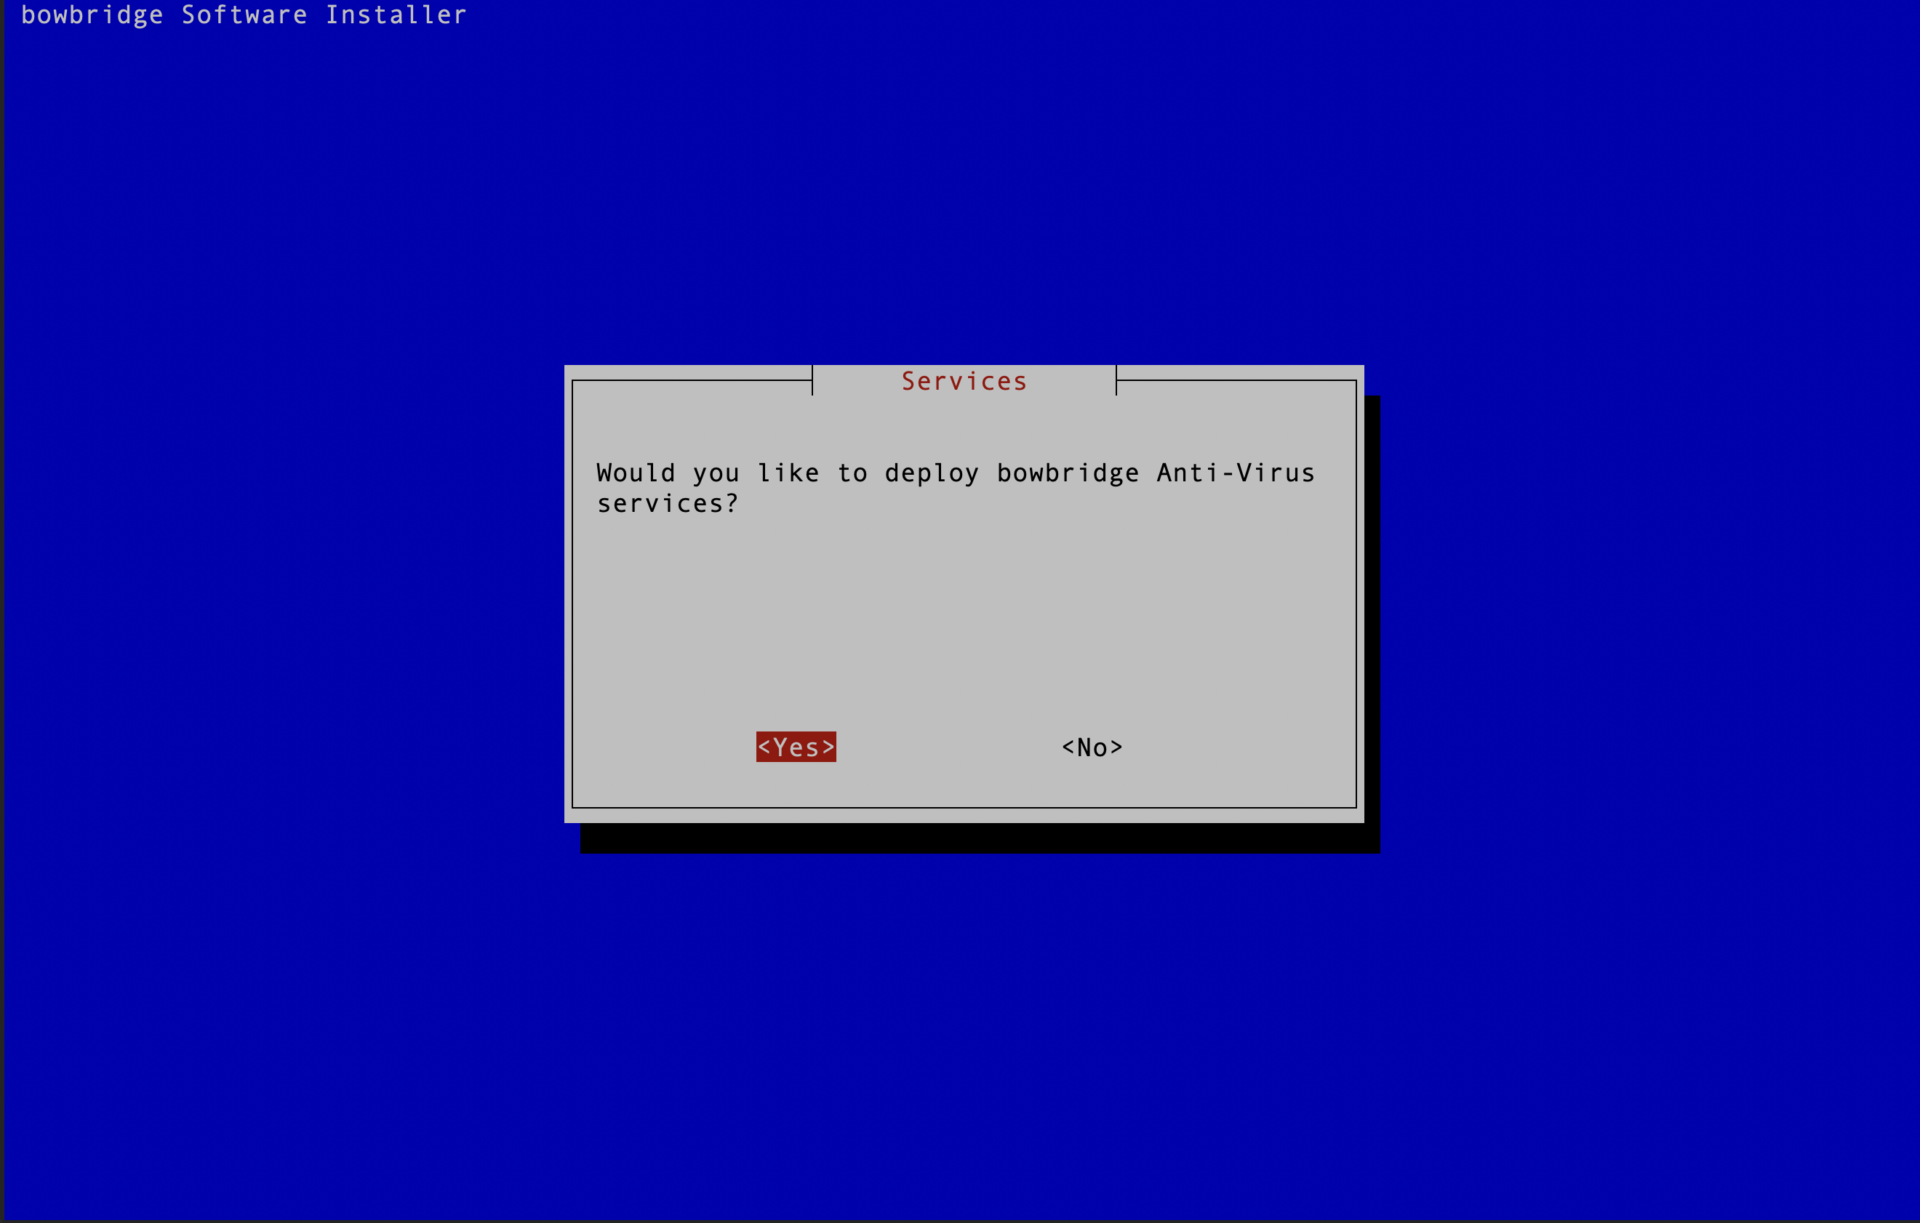
3.6.Services ConfigurationUnless explicitly chosen otherwise, bowbridge Anti-Virus 4.x will run the scan workers as services controlled by the Operating System. On Linux, they are implemented as systemd-services, and on AIX as subsystems.
bowbridge recommends automatically starting the services when the OS boots. This ensures they are already running with the SAP instance starts, resulting in a faster start of the SAP instance further reduces the overall management and monitoring overhead..
By default, controlling OS-controlled services/subsystems requires root privileges, which SIDadm may not have access to.
Upon completion of the installation, a summary is displayed. It contains the INIT parameters as they should be set in the SAP-level configuration.
This summary is stored in the bowbridge_installation_summary.txt file in the current directory. The installation log is stored in /tmp/bowbridge_installation.log 3.7.Post-installation TasksTypically, after the installation, administrators must perform several post-installation tasks to activate and customize the raw installation.
In on-premises installations, these must be performed on the host running bowbridge control. For Cloud Scan or hybrid installations with cloud-based management, perform these tasks in the bowbridge customer portal.
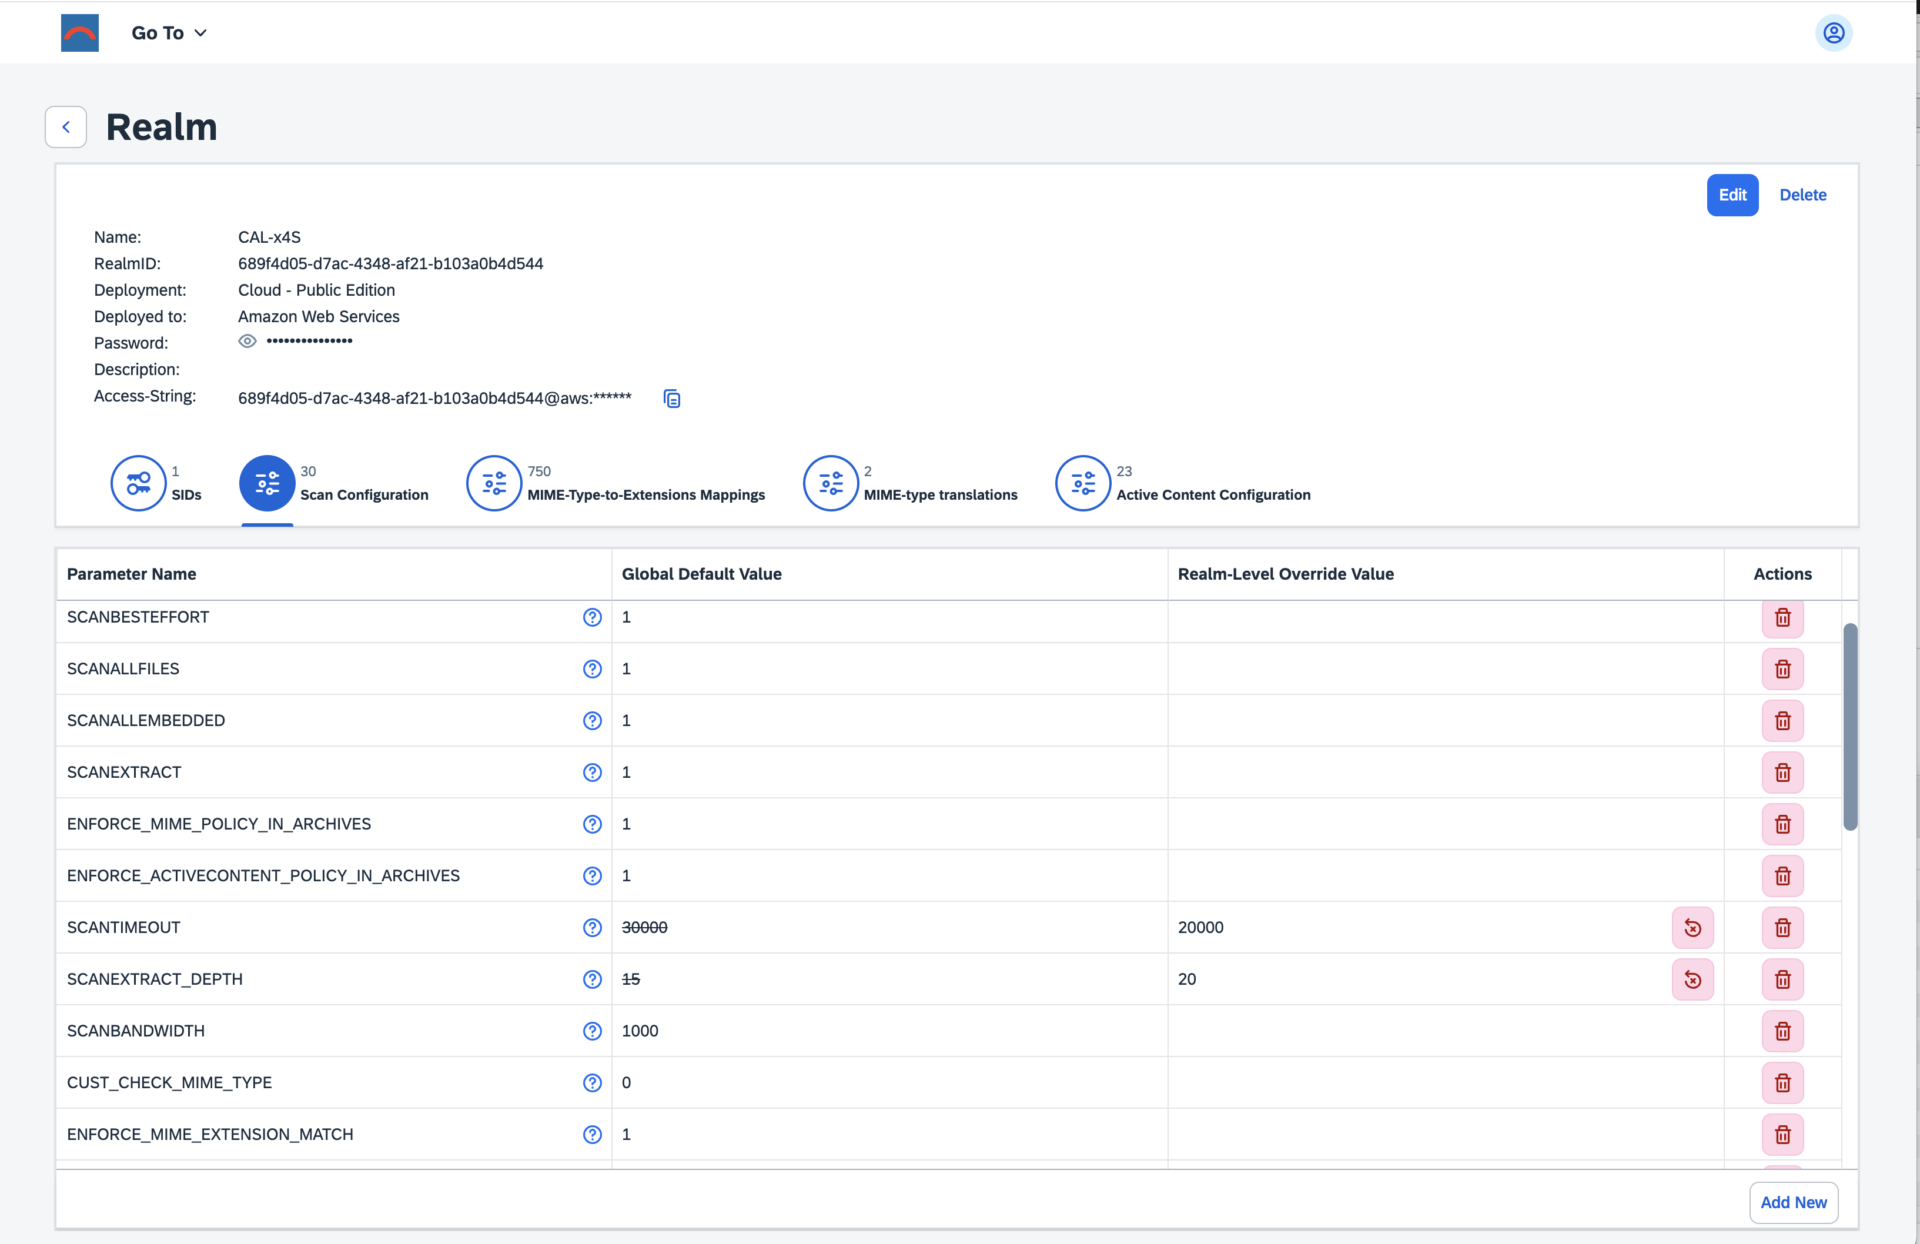
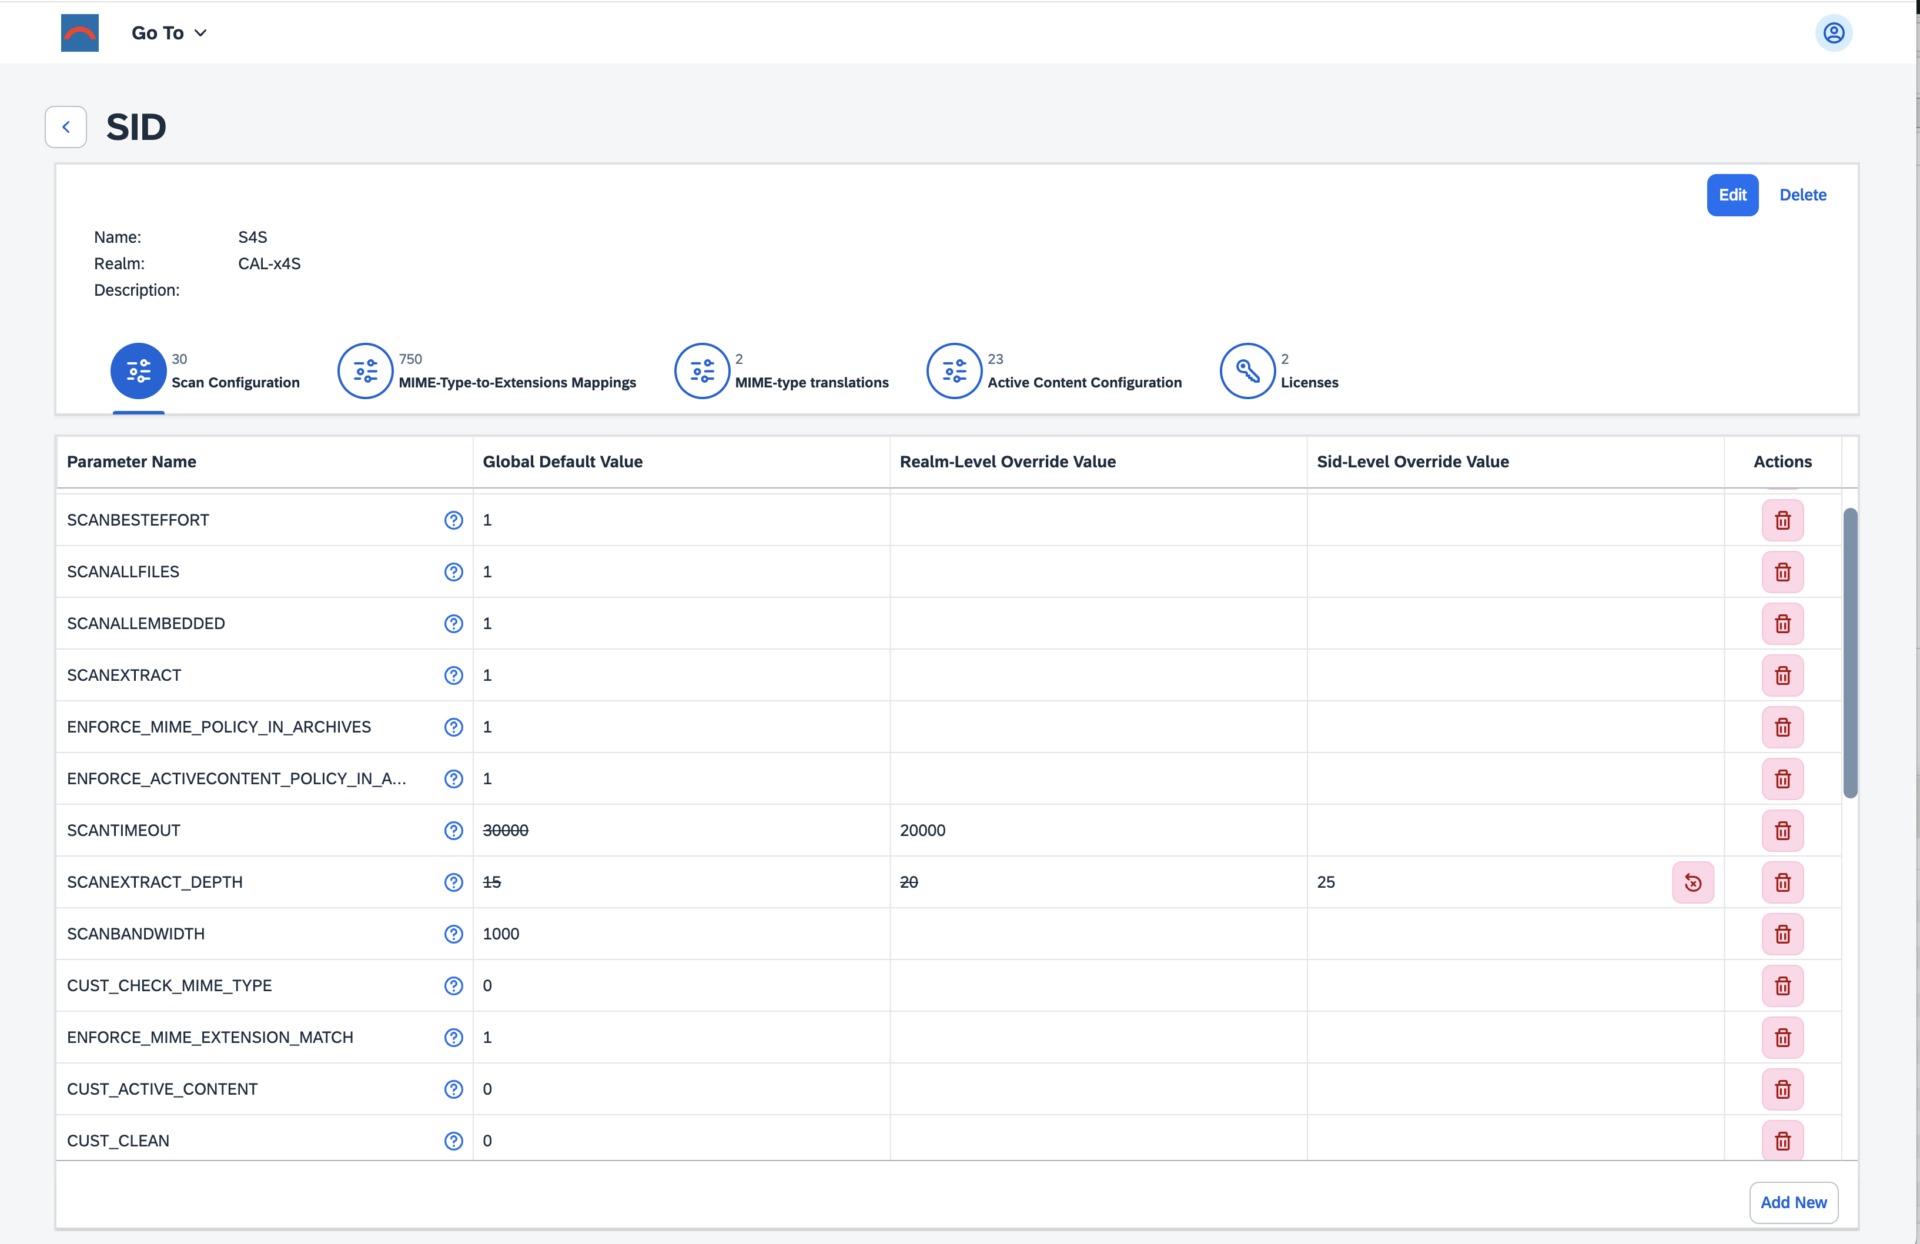
3.7.1.Configuration ManagementRealmsRealms are a new concept in bowbridge Anti-Virus 4.x. They allow for the grouping of multiple installations and assigning configuration parameters to all installations that are part of the group. These include scan parameters, MIME type-to-extension mappings, MIME type translations, and active-content settings. These settings are stored and maintained at the level of the bowbridge Control module. VSA clients retrieve the configurations at startup, so storing, maintaining, and updating the settings on individual application servers is no longer required. Typically, all application servers of one Organizational Unit, one Department, or one system line (DEV, QA, PROD, SBX, etc.) would share a Realm (identified by a globally unique RealmID), so parameters set at the Realm level would apply to all systems in that realm. For more granularity, administrators can add another layer of settings specific to an SID within the context of a Realm. For example, administrators could set up a realm for their SAP CRM system, specifying settings applicable to the entire system line. However, they may want a slightly different set of settings for the Production SID, so they could create a configuration that applies only to the Production SID or the CRM system. Hierarchical configurationsbowbridge Anti-Virus 4.x supports hierarchical configurations, specifically scan parameters, MIME type-to-extension mappings, MIME-type translations, and active-content settings. Administrators may assign parameters to apply to all installations, to only installations of a certain realm (i.e., system line), or even to only a specific SID within a realm. In detail, the layers are:
On-Premises:After installing the product, only the default.default versions of the configuration files exist in the config subdirectory on the host running the bowbridge Control module:
These configuration files are plain-text, human-readable, and extensively commented files. To add a configuration for a realm or a realm+SID combination, duplicate the default.default configuration and modify it as necessary. The Control Module monitors and detects changes to the configuration files and notifies workers of relevant changes, triggering a re-loading of the configuration. Only the VSA needs to be re-initialized, in order to reload the configurations. This is best achieved by clicking the “Load” button in transaction VSCAN, or periodically by setting an automatic re-init interval in transaction VSCAN or the Virus Scan Provider configuration in NetWeaver Administrator.
Cloud:In installations leveraging the bowbridge cloud-based management, Realms and SIDs are maintained in the bowbridge customer portal. Administrators may maintain configurations for the Realm-layer and the Realm+SID-layer in the respective tab Realm and SID objects.
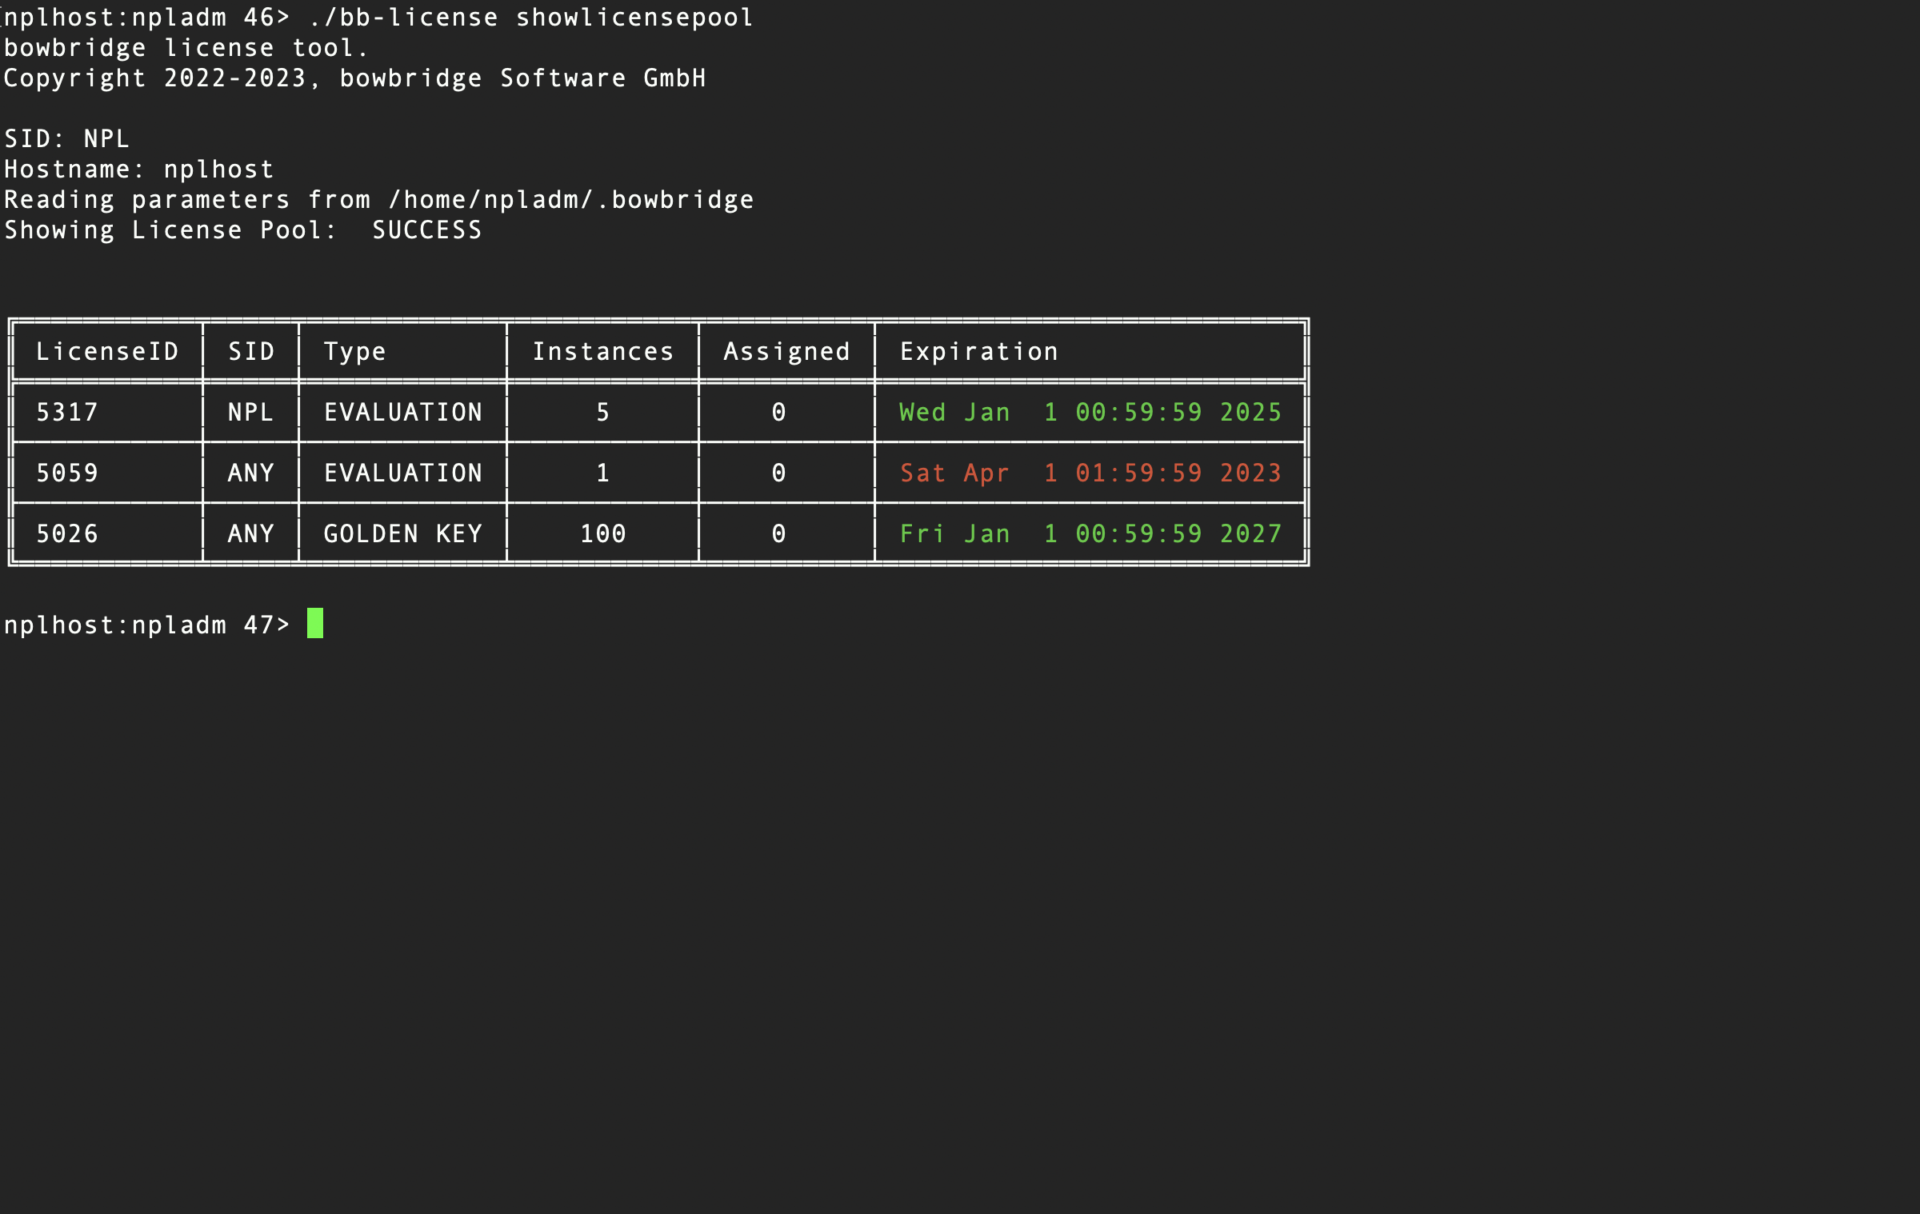
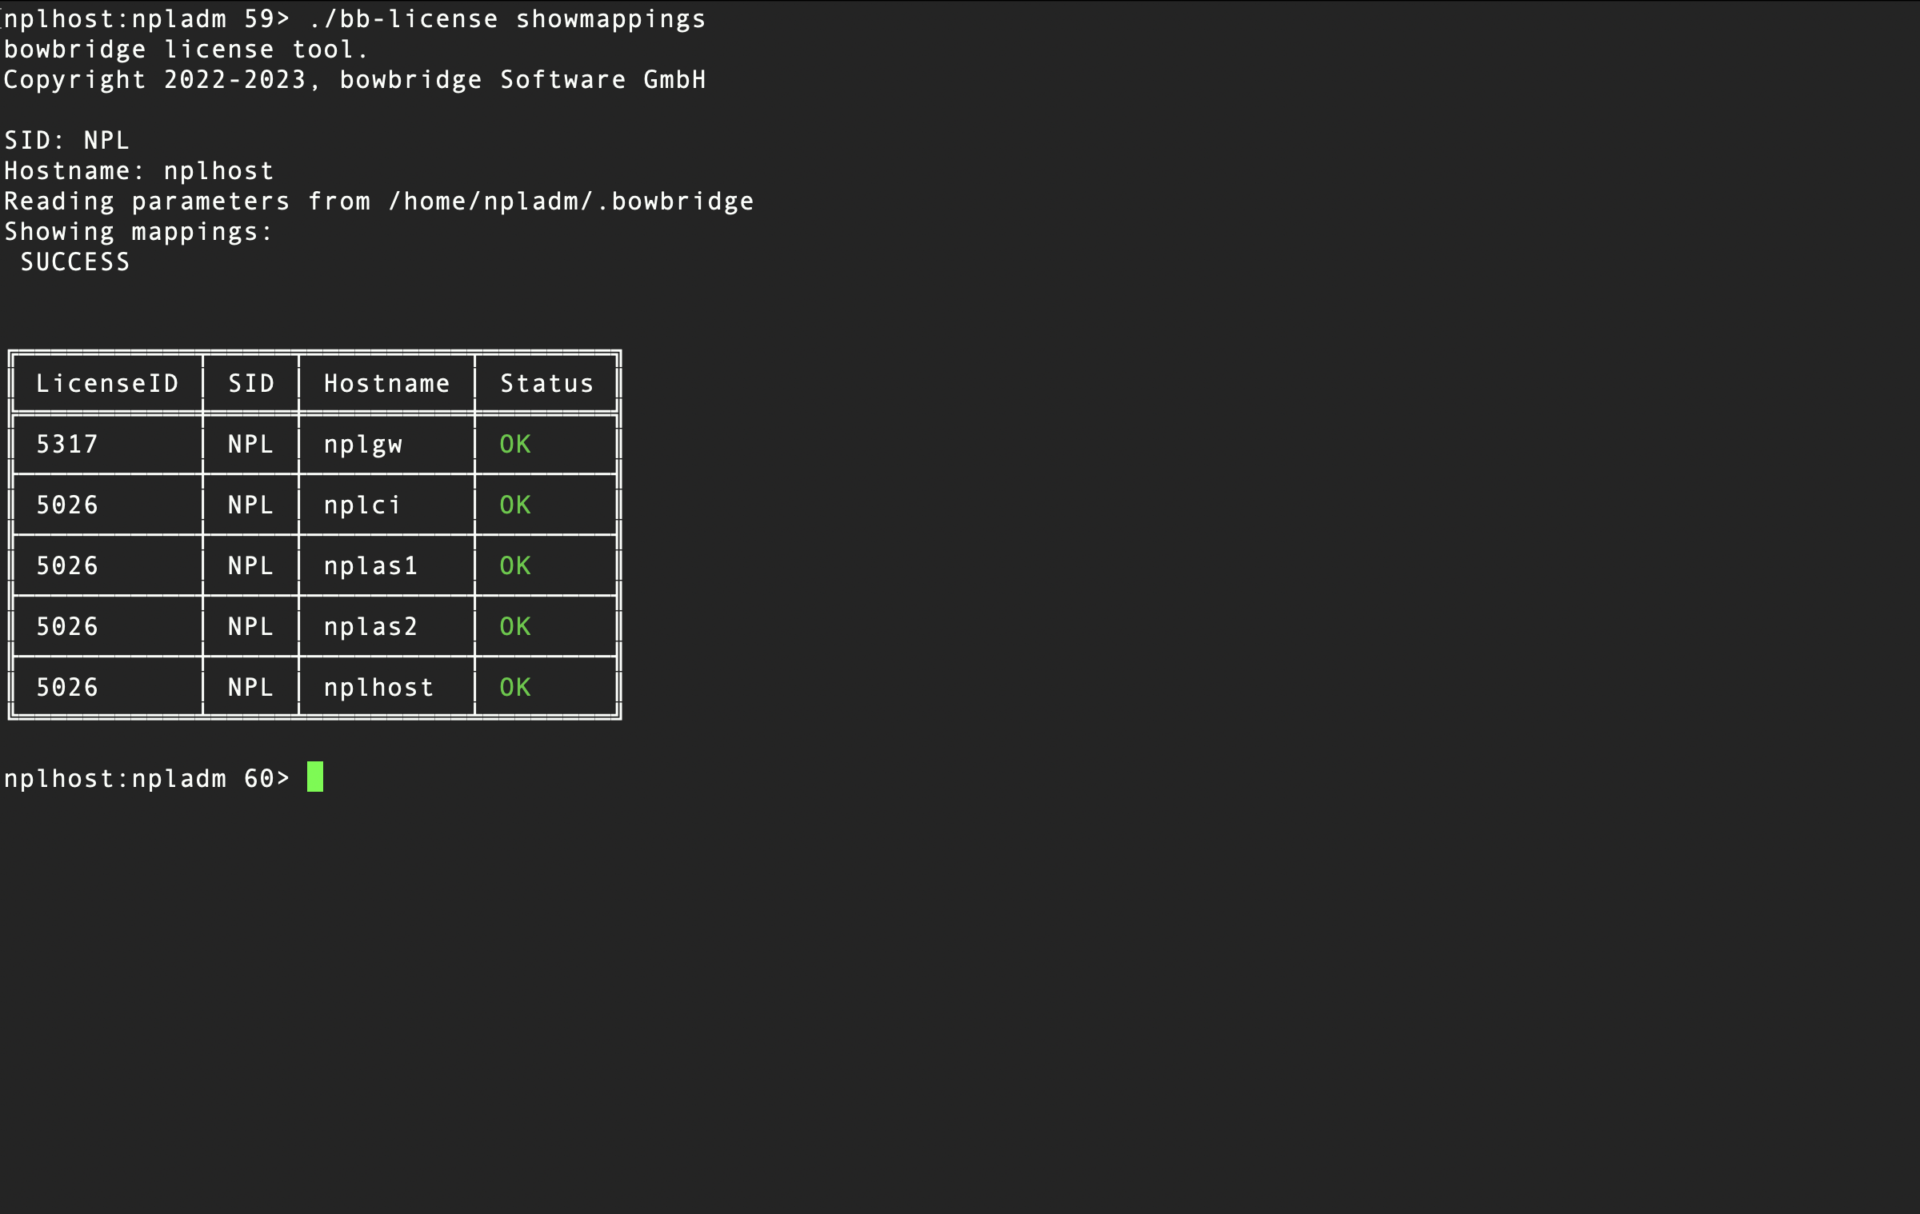
3.7.2.LicensesA bowbridge Anti-Virus license controls what services and features can be used by a VSA client. Each license is valid for a defined number of application servers. In on-premises installations, the administrator adds licenses to a “pool” of licenses for a given RealmID and maps license instances to individual hostname-and-SID combinations.
License management – On-PremisesIn Anti-Virus 4.x – On-Premises, licenses are managed centrally by the bowbridge Control module. It stores all licenses in the license pool related to the RealmID and manages the mapping of available licenses to VSA client instances of a specific Installation ID. License operations are performed with the bb-license command-line tool, which is part of the Tools package.
When performing license operations as SIDadm, the connection settings to the broker are taken from the .bowbridge file created by the installer in SIDadm’s home directory. –realm-id <Realm-ID (=INITLICENSE_PATH)> For the sake of conciseness, these parameters are omitted in the examples below, and it is assumed the configuration from the .bowbridge-file is used.
Showing all licenses managed by your control instance./bb-license showlicensepool returns a list of all licenses currently added to the license pool-
Adding a license to control’s license poolbb-license addlicense <license-file name> adds a license to the license-pool of the current realm.
Deleting a license from the license poolbb-license deletelicense <LicenseID> will, after requesting a confirmation, permanently remove a license and all related mappings from the license pool
Displaying the details of a specific licensebb-license showlicensedetails <LicenseID> will display the license details, such as the features, the expiration date, and the list of hostnames it is currently mapped to.
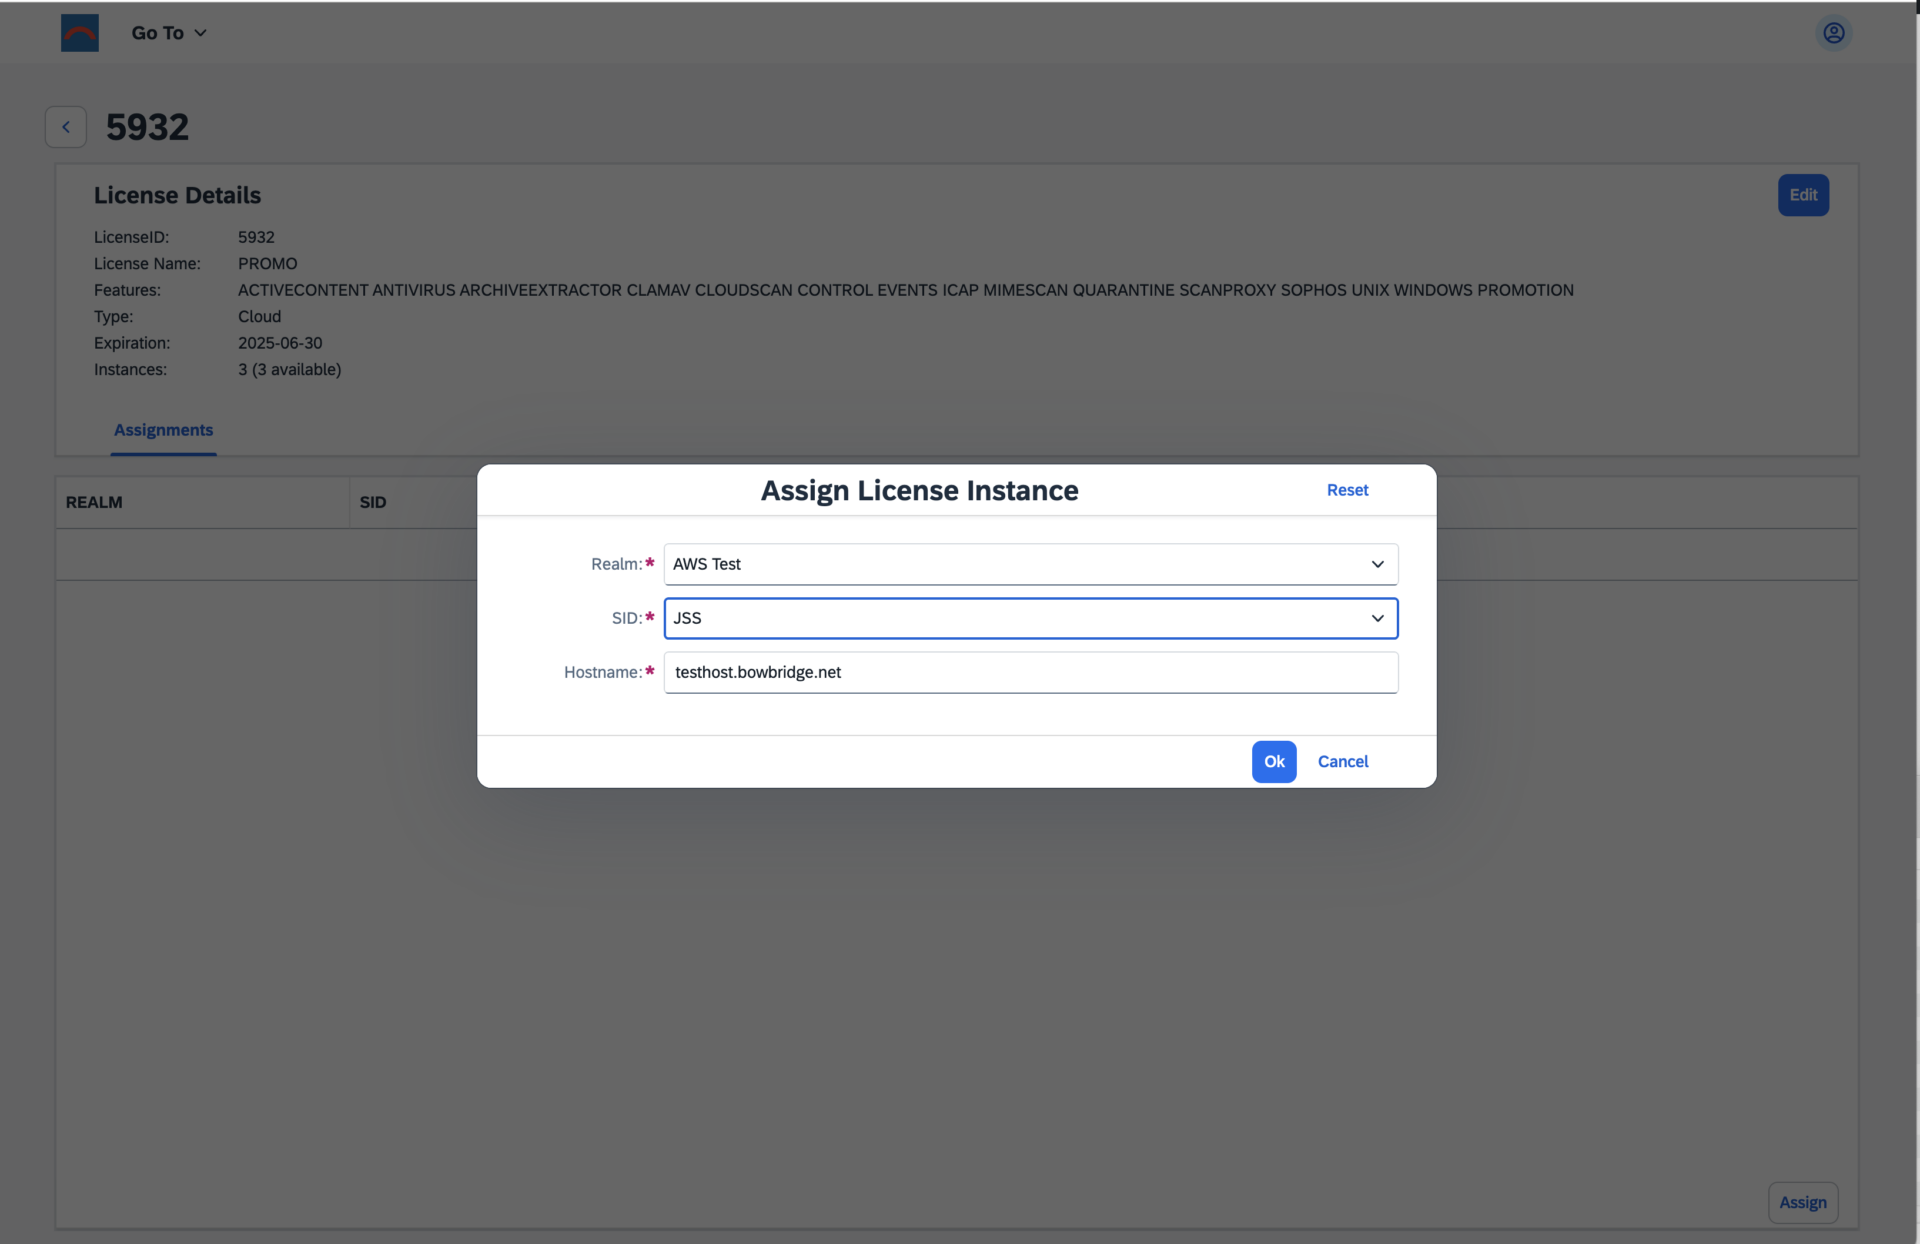
Mapping a license-instance to a hostnameTo activate an instance of a license for a specific VSA, mapping a license instance to the SID@hostname combination is required. bb-license addmapping <LicenseID>:<SID>@<hostname>
Showing all existing mappingsIn addition to viewing the hostnames a specific license is mapped to with bb-license showlicensedetails, it is also possible to view all mappings for the current realm with: bb-license showmappings
Deleting a license-to-host name mapping.If the host name of one of your SAP systems hosts changes, re-assigning a license may be necessary. bb-license deletemapping <LicenseID>:<SID>@<hostname>
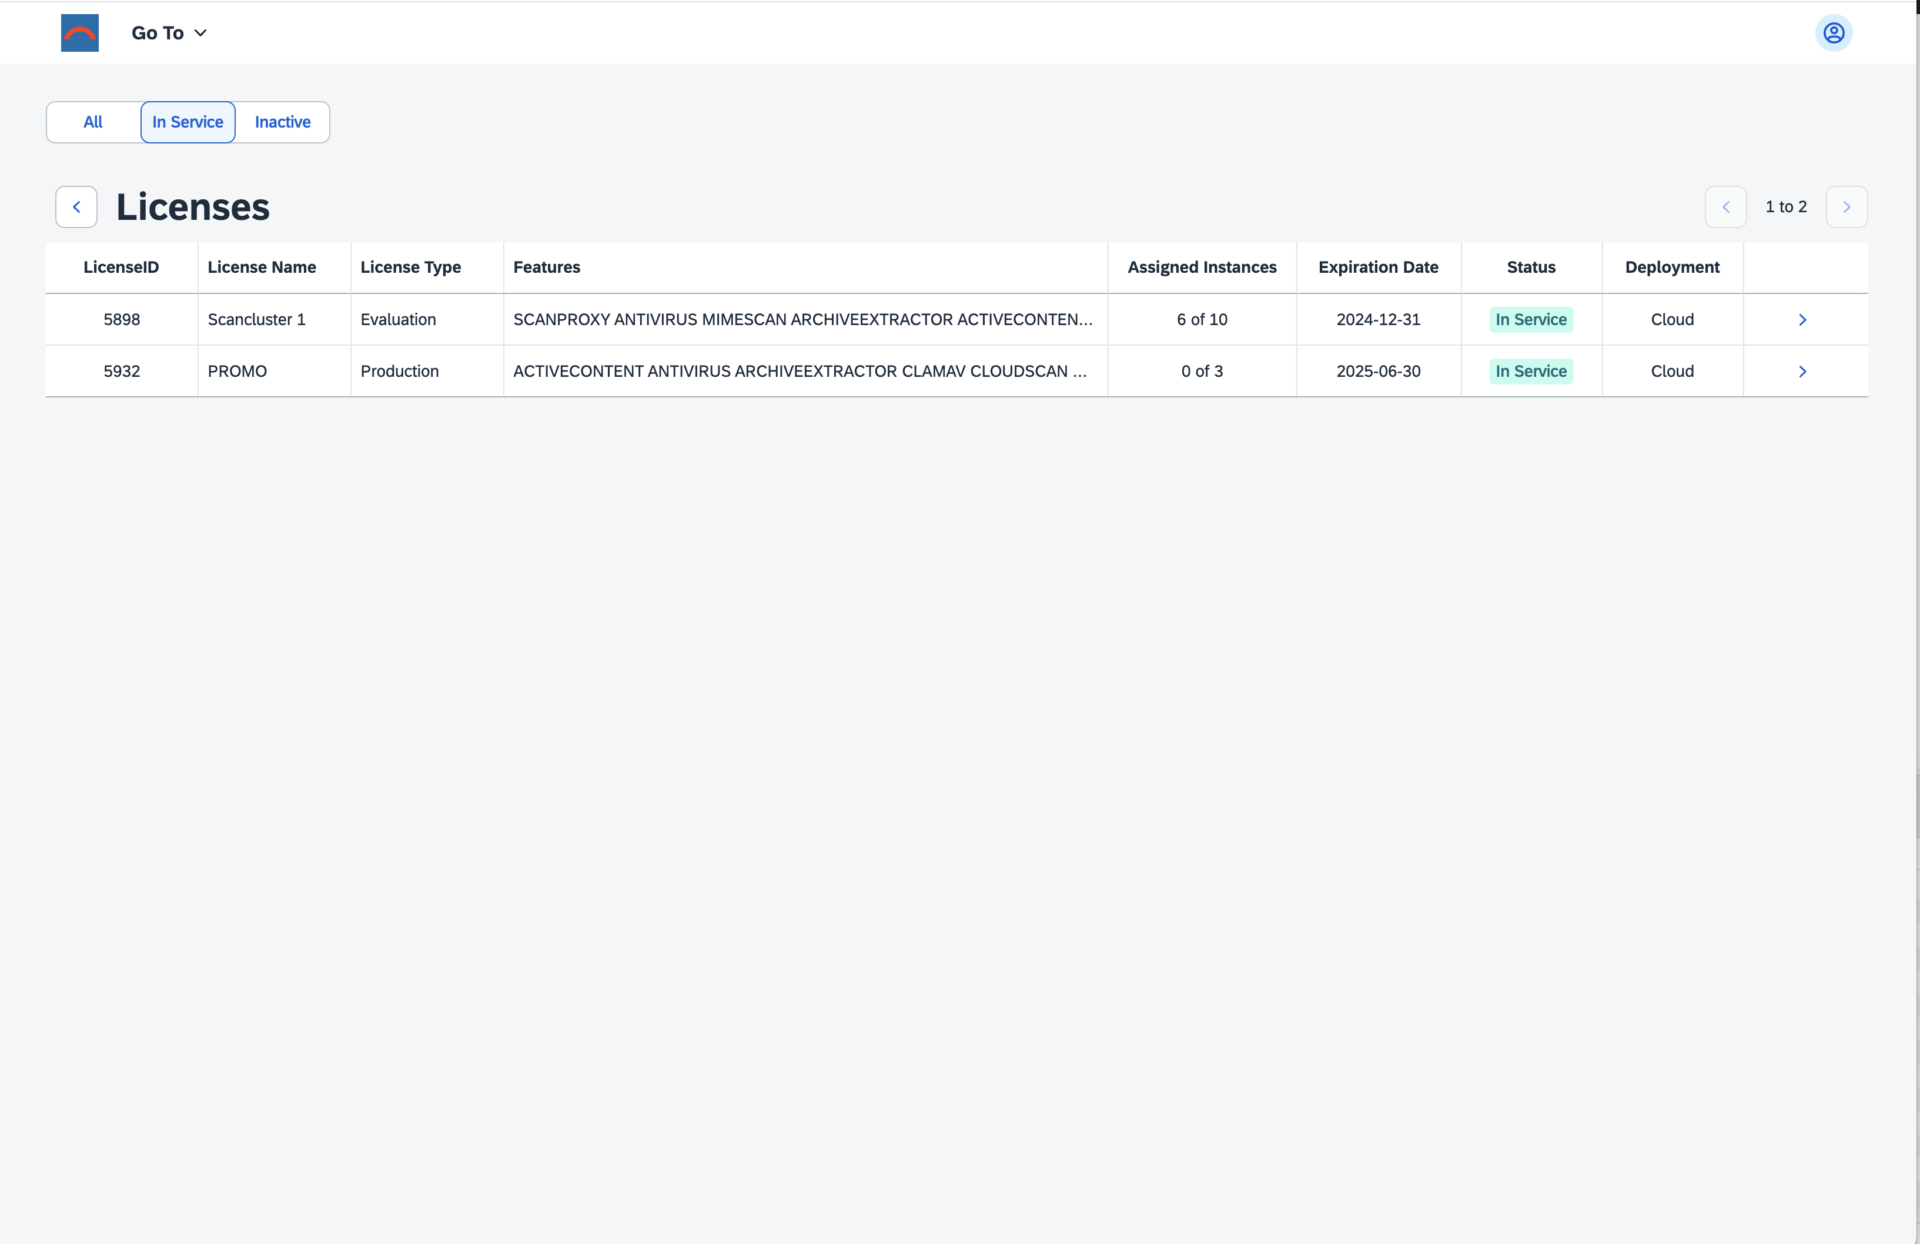
License Management – Cloud or hybrid installationsIn Anti-Virus 4.x – Cloud, licenses are managed in “Licenses”-tile the bowbridge customer portal. The Licenses overview page displays all licenses available in the account.
License instances may be assigned to or released from Realms, SIDs and hostnames in the License Details page of an individual license.
3.7.3.Logs and EventsAll bowbridge modules generate several types of logs and events. Storing logsOn-PremisesIn on-premises installations, none of them are stored on disk or are acted upon by default. To store logs and act on events, further configurations are necessary. In on-premises installations, all logs are sent to the control module of the realm. A log basepath must be defined for the control module to store the logs in the server’s filesystem. Control will then store all worker-originated logs in the basepath. Log entries originating from the VSA clients are stored in subdirectories for the RealmID and the SID to allow attribution to the correct system. As there are several types of logs, separate base-directory paths must be specified in the [bb-av-control] section of the <bowbridge program directory>/config/bb-av-control.cfg file. To enable the respective log, please uncomment the line and specify an existing directory as the value to:
Please also note the MAX_LOG_SIZE_MB parameter. Once a log file exceeds the size (in MB) specified as the value, the log file will be compressed into a ZIP archive, and a new log file will be created. After saving your configuration, the control module must be restarted for the changes to go into effect. To restart the service, run sudo systemctl restart bb-av-control.service (on Linux)
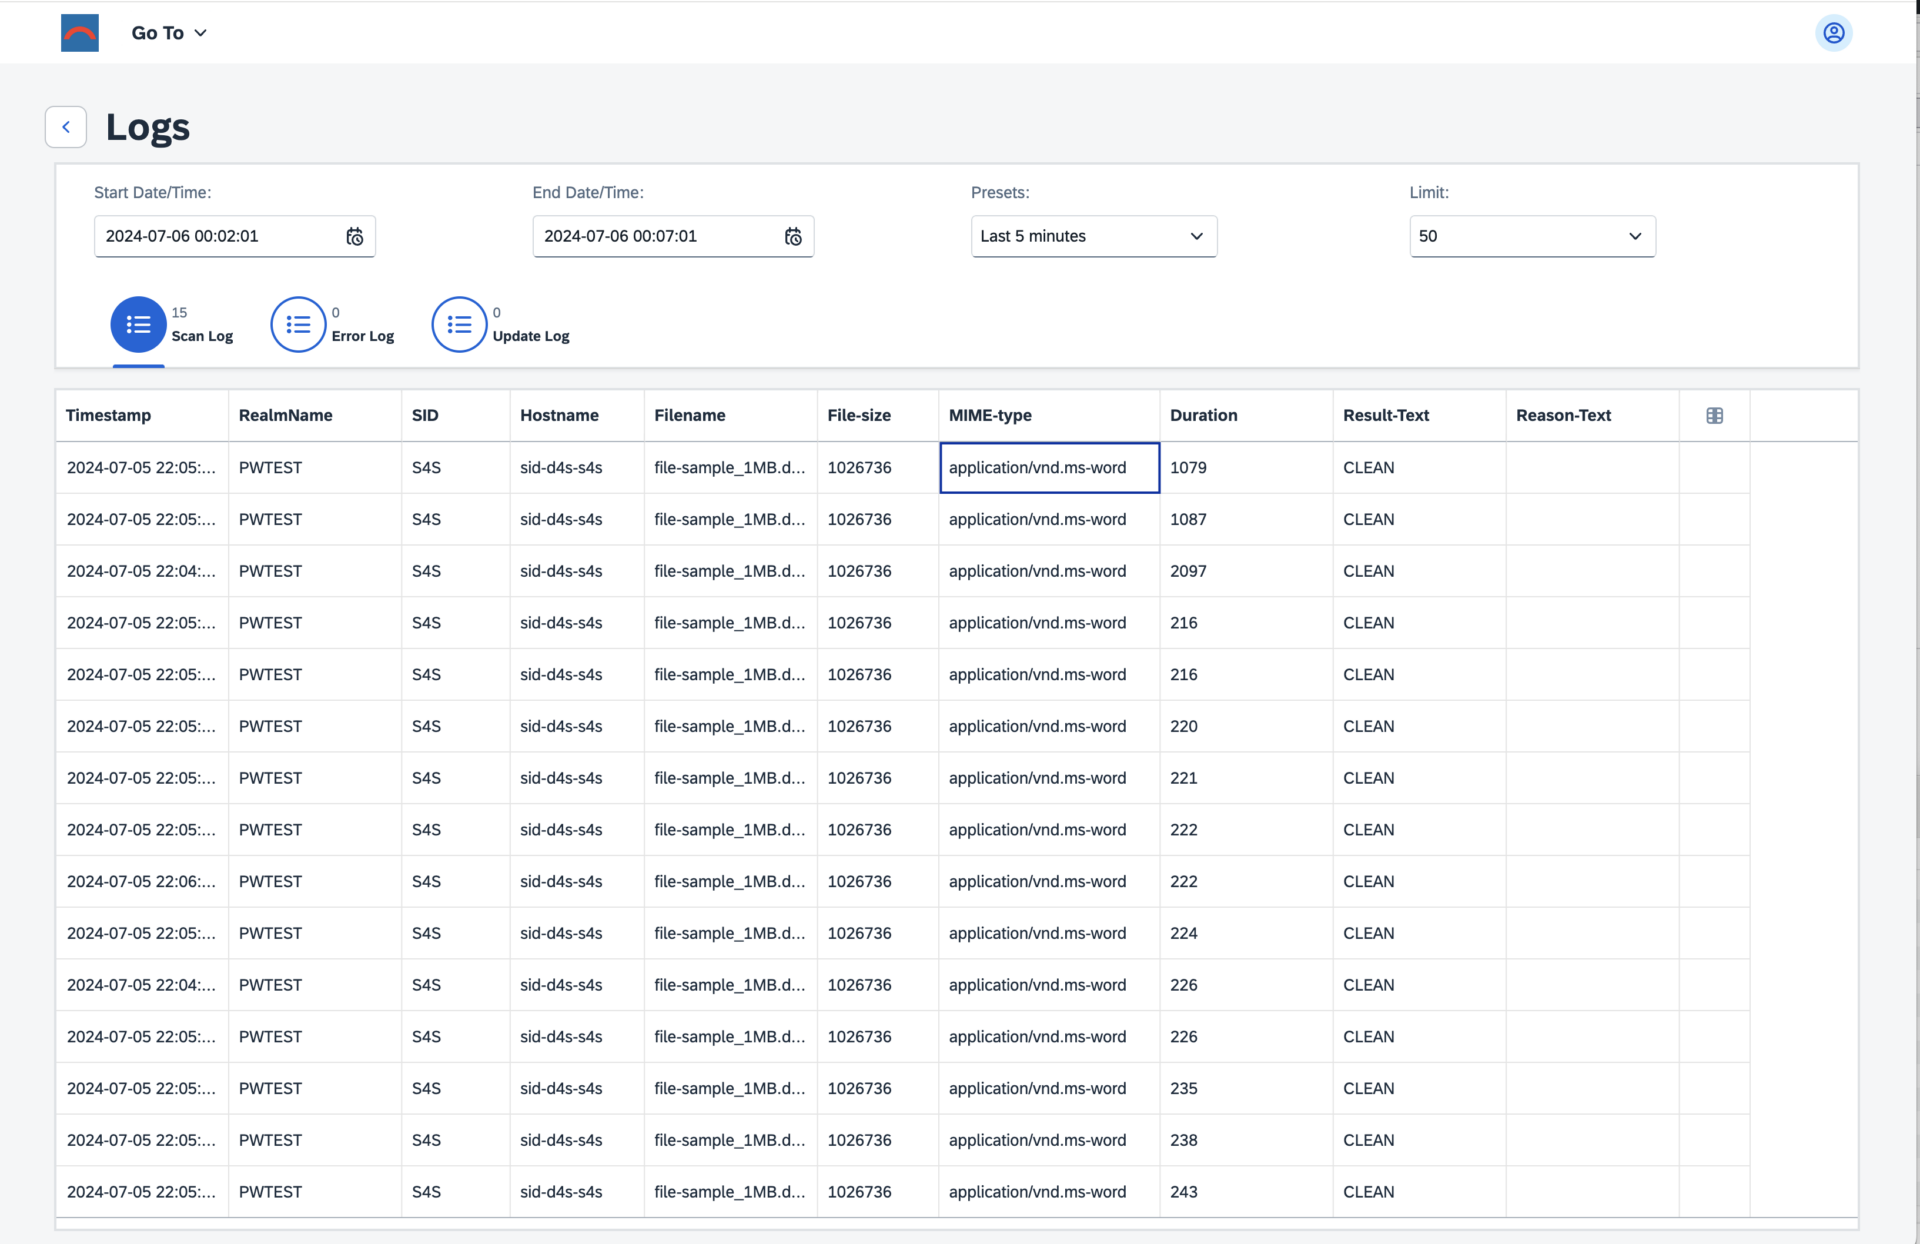
CloudIn cloud deployments, scan-logs and error logs are always stored by default. Update logs are only visible for “Private Edition” Scan Clusters. bowbridge stores log for the defined retention period and then deleted, unless customers export them or opt for a cold-storage option.
Processing eventsAll bowbridge Anti-Virus 4.x modules generate several types of events. To receive these events, an event-handler worker must be installed and configured to subscribe to certain events for a certain scope of sources. the file <bowbridge program directory>/config/bb-av-events.cfg contains the configuration for the bb-av-events service. The [SCOPE] section allows the administrator to specify what sources of events are relevant for this handler.
Administrators may choose to take a broad approach and receive all In addition to the scope, the event handler must subscribe to specific events of interest and map them to an OS-layer script that will be executed if the event occurs. Administrators may choose to take a broad approach and use a wildcard (“*”) for all scope definitions and uncomment all event-types. They may also choose to run multiple instances of event handler workers, for example, one for the NON-PROD instances and a separate one for the PROD instances of an SAP system. CloudIn order to subscribe to Events in a cloud-based installations, connect the bb-events service to the Dispatcher URL of the scan cluster.
For privacy, we recommend activating the event encryption features by setting the ENCRYPTION_KEY parameter in the COMMUNICATION section of the bb-av-events.cfg configuration file.
3.7.4.UpdatesAll modules except the VSA and the Broker can self-update. Administrators can choose which part of the module they want to update automatically:
bowbridge Anti-Virus 4.x downloads updates from the bowbridge update server over a secure, authenticated, and encrypted connection. The product verifies the download’s integrity and only activates it after it is confirmed to function. Deployment and activation of updates do not require administrator intervention and do not interrupt the service delivery. After the installation, automatic updating of Threat Data, Detection Engines, and Program Binaries become active. They are controlled by the UPDATE_DATA, UPDATE_ENGINE, and UPDATE_BINARY parameters configured in the start script of the respective worker. By default, bowbridge Anti-Virus 4.x will attempt to download the required updates via a direct internet connection. By setting the UPDATE_PROXY (and optionally the UPDATE_PROXYPASS) or UPDATE_SERVER parameters, administrators can configure the updates to be downloaded via a web proxy or from an alternative update source, such as the bowbridge Local Update Server (LUS). |
|||||||||||||||||||||||||||||||||||||||||||||||||||||||||||||||||